
Luminar NEO presets are pre-made adjustment sets that transform your photos with one click. Here's what you need to know:
- 22 preset collections included
- Cover basic touch-ups to dramatic effects
- Work on both RAW and JPEG files
- AI suggests presets based on photo content
- Can be customized and combined
Key benefits:
- Save time on complex edits
- Keep photo sets consistent
- Learn adjustment techniques
- Streamline your workflow
How to use:
- Open image in Luminar NEO
- Click "Presets" tab
- Choose a preset
- Tweak settings if needed
Popular preset types:
- Portrait
- Landscape
- Black and White
- Cinematic
- Vintage
Create your own:
- Edit a photo
- Click "Actions" > "Save as Preset"
- Name and save
Luminar NEO vs competitors:
- More AI tools than Lightroom
- Simpler interface than Capture One
- Focuses on quick, impressive results
| Feature | Luminar NEO | Lightroom | Capture One |
|---|---|---|---|
| AI tools | Extensive | Limited | Limited |
| Interface | Simple | Complex | Advanced |
| Focus | Quick edits | Detailed edits | Pro workflow |
| Pricing | $99/year | $9.99/month | $24/month |
Bottom line: Luminar NEO presets offer a fast track to pro-level edits, ideal for those who want quality results without a steep learning curve.
Related video from YouTube
Basics of Luminar NEO
What is Luminar NEO
Luminar NEO is photo editing software that uses AI to make complex edits simple. It's for photographers of all levels who want quick, quality results.
Here's what you get:
- Edit without changing your original image
- Work with RAW and JPEG files
- Use AI tools for tasks like sky replacement
- Apply one-click presets
Main tools and functions
Luminar NEO has tools to make your photos pop:
| Tool Category | What it does |
|---|---|
| Essentials | Fixes exposure, highlights, shadows |
| Creative | Enhances skies, adds atmosphere |
| Portrait | Improves faces, skin, body |
| Professional | Masks, layers, smart cropping |
AI editing:
NEO's AI tools speed things up:
- Accent AI adjusts multiple settings at once
- Structure AI adds detail without messing up skin
- Relight AI fixes lighting in specific areas
Masking and layers:
For more control, you can:
- Make complex selections with masks
- Use layers to stack adjustments and effects
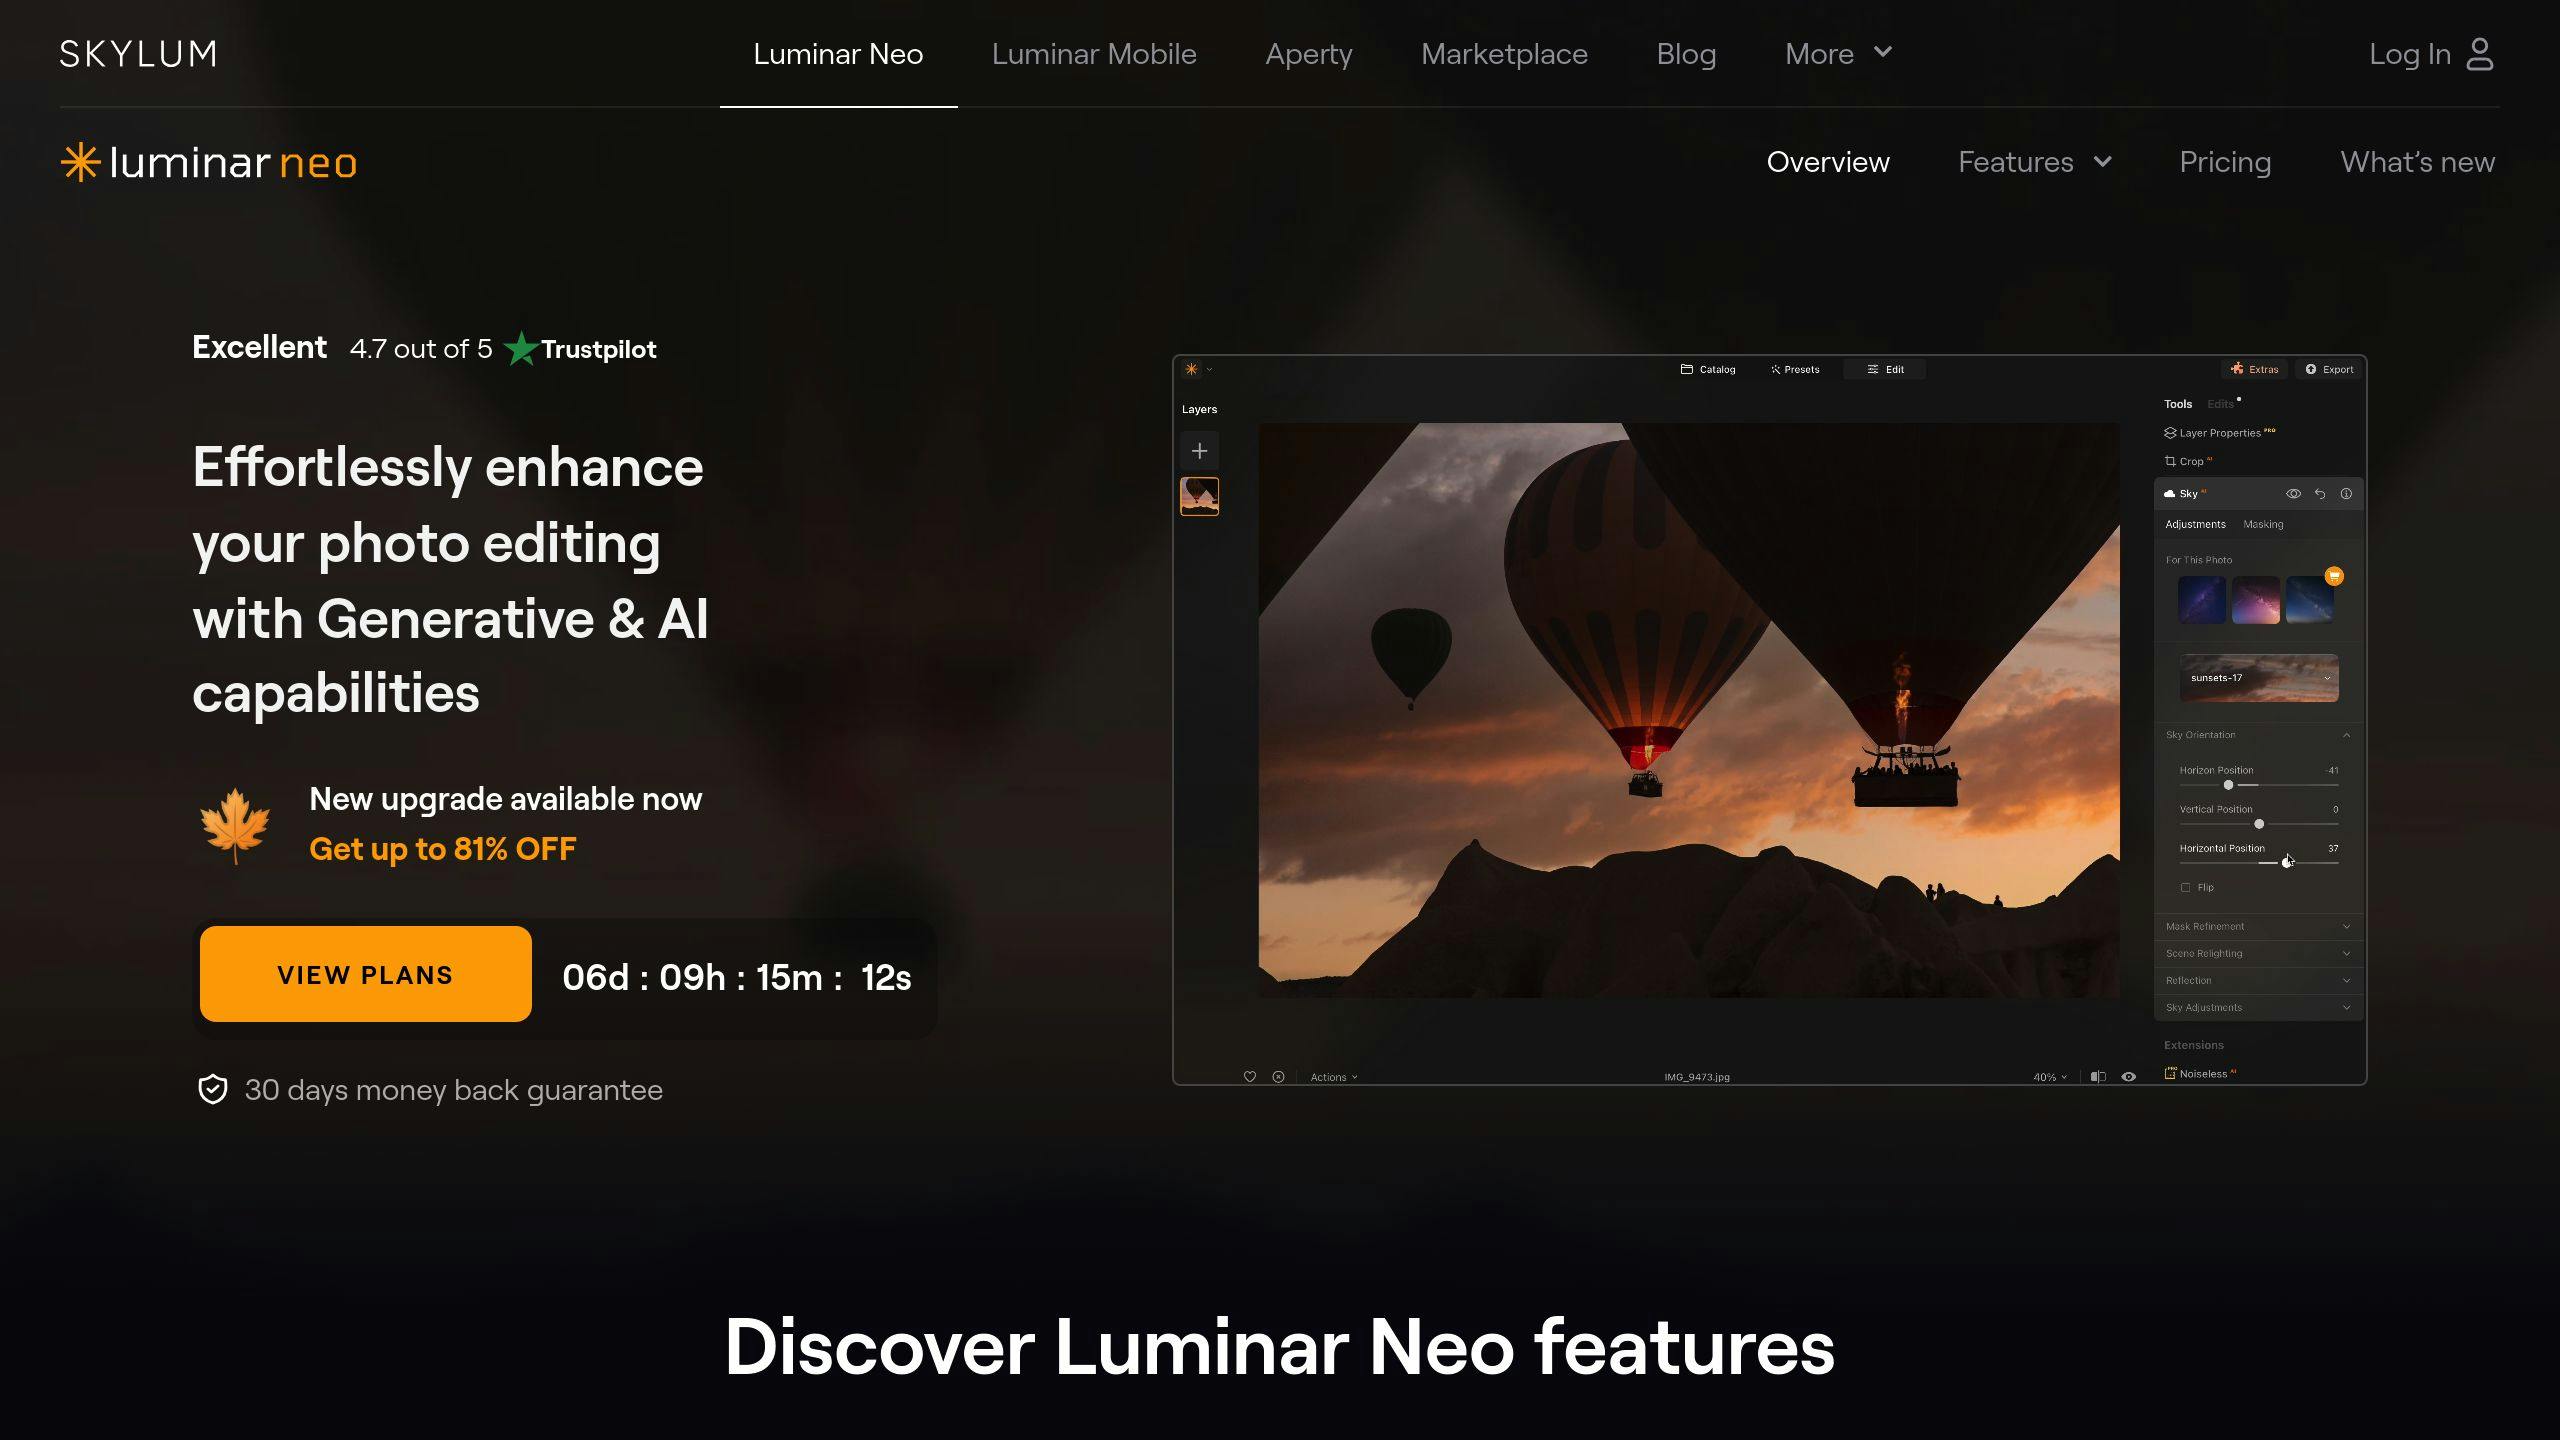
Presets (Looks):
NEO comes with 22 preset collections. Use them as-is or as a starting point for your edits.
"Luminar NEO's AI tech makes editing a breeze. You can enhance photos with just a few clicks." - Kieran, Photography Software Reviewer
Types of Luminar NEO Presets
Luminar NEO packs a punch with presets that'll make your photos pop. Let's dive into the different flavors:
Portrait Presets
Want to make faces look fantastic? Portrait presets have got you covered:
- "Ginger Rose" for that warm, rosy glow
- "Naturally Perfect" for a subtle touch-up
- "Korean Beauty" for that East Asian flair
Plus, you get tools to smooth skin, brighten eyes and teeth, and zap color casts.
Landscape Presets
Outdoor shots looking dull? The Essential Preset Bundle comes to the rescue:
- Essential Landscape Presets
- Emotional Scenery Presets
- Sunset & Sunrise Presets
- Blue Hour Presets
- Night Sky Presets
These bad boys will make your nature shots sing.
Black and White Presets
Going monochrome? Check out:
Play with tones and contrasts to your heart's content.
Cinematic Presets
Want that Hollywood look? Cinematic presets add some movie magic by tweaking:
- Color grading
- Contrast
- Mood
Vintage Presets
Feeling nostalgic? Vintage presets can:
- Sprinkle in some film grain
- Shift those color tones
- Create a blast-from-the-past vibe
Here's a quick rundown:
| Preset Type | What It Does | When to Use It |
|---|---|---|
| Portrait | Makes faces look fab | Headshots, family pics |
| Landscape | Pumps up nature's beauty | Travel shots, scenery |
| Black and White | Adds drama in monochrome | Artsy stuff, street scenes |
| Cinematic | Gives that movie feel | Storytelling, dramatic shots |
| Vintage | Takes you back in time | Retro vibes, creative projects |
For $49, you get a whopping 410 presets in 41 collections. They work on both RAW and JPEG files, so you can tweak to your heart's content without messing up your originals.
How to Install Luminar NEO Presets
Installing Luminar NEO presets is simple. Here's how to do it:
- Download your preset files (they end in .lnpc)
- Open Luminar NEO
- Click the "Presets" tab
- Hit "Add" near "Purchased" (or go to File > Add Luminar Neo Preset Collection)
- Find your .lnpc files and click "Open"
Your new presets will show up in the "Purchased" section. Easy, right?
Troubleshooting
Can't see your presets? Make sure you're looking in the "Purchased" section.
Presets not working? Double-check that you're using .lnpc files. Other types won't work with NEO.
If NEO keeps crashing, update to the latest version.
Moving presets from Luminar AI to NEO? Use the Migration tool:
- Get the tool from your Skylum account
- Install and open it
- Add your Luminar AI catalog (.luminarai file)
- Click "Migrate"
- Open NEO and find your presets in "Presets > My Presets"
Need more help? Check Skylum's support site or reach out to their team.
Using Luminar NEO Presets
Luminar NEO presets can transform your photos with a single click. Here's how to use them:
Applying presets
- Open your image in NEO
- Click Presets tab
- Browse categories (Essentials, Landscape, Portrait)
- Click a preset to apply
NEO suggests presets based on your photo. Editing a portrait? You'll see portrait presets first.
Tweaking presets
Presets are starting points. To fine-tune:
- Go to Edit tab after applying
- Use Edits panel to adjust preset tools
- Add new adjustments if needed
You can see which tools a preset used and tweak them individually.
Mixing presets
Want to blend effects? Here's how:
- Apply first preset
- Note adjustments in Edit tab
- Apply second preset
- In Edit, adjust tools from both presets
This lets you create unique looks by combining preset styles.
Pro tip: Like your combo? Save it as a new preset. Click Actions in Edit mode and pick "Save as Preset".
| Preset Workflow | Steps |
|---|---|
| Basic Application | 1. Open image 2. Click Presets tab 3. Choose preset |
| Custom Adjustments | 1. Apply preset 2. Switch to Edit tab 3. Modify tools |
| Preset Blending | 1. Apply first preset 2. Note adjustments 3. Apply second preset 4. Customize in Edit tab |
Making Your Own Luminar NEO Presets
Want to speed up your editing and create a unique style? Make your own Luminar NEO presets. Here's how:
- Open an image in Luminar NEO
- Edit it how you like
- Click Actions > Save as Preset
- Name it and hit Save
Your new preset will show up in My Presets. Easy, right?
Tips for Killer Presets
1. Have a goal
Know what look you're after before you start.
2. Use a test image
Pick a photo that's like the ones you'll use the preset on.
3. Keep it flexible
Don't go overboard with adjustments. Your preset should work on different images.
4. Name it smart
"Warm Sunset" or "Crisp B&W" tell you exactly what the preset does.
5. Group similar presets
Make collections for specific edit types (portraits, landscapes, etc.).
"I used the Dramatic Grungy preset as a starting point. Then I tweaked some filters and added a few more. After about 10 minutes of playing around, I had a brand new preset!" - Vanelli, Skylum's Education Director
Pro tip: Test your preset on various photos. Make sure it works well in different lighting and with different subjects.
| Step | What to Do |
|---|---|
| Edit | Adjust your photo how you want |
| Save | Use "Save as Preset" in the Actions menu |
| Organize | Put your new preset in the right category |
| Test & Tweak | Try it on different photos and fine-tune as needed |
Creating your own presets isn't just about saving time. It's about developing your unique style. So get creative and have fun with it!
sbb-itb-b27063b
Organizing Presets
Let's talk about keeping your Luminar NEO presets tidy and using them across devices.
Keeping presets organized
Luminar NEO gives you a few ways to keep your presets in check:
1. Preset Panel
This panel shows you different categories:
- Favorites
- My Presets
- Purchased
- For This Photo (AI suggestions)
2. Custom presets
Make your own by tweaking existing ones. Save them under "My Presets".
3. Favorites
Heart the presets you use a lot. They'll show up in your Favorites for quick access.
"When you apply a preset like 'Fast Fix,' it might bump up brightness and darken the sky. It all depends on what's baked into that preset", says a Luminar NEO pro.
Syncing presets across devices
Luminar NEO doesn't have a built-in sync feature. But you can still use your presets on different devices:
- Export your custom presets as files
- Move these files to your other devices
- Import the files into Luminar NEO on the new device
- Or, use cloud storage to access your presets anywhere
It's not automatic, but it gets the job done.
Advanced Preset Techniques
Luminar NEO's presets can supercharge your editing workflow when combined with AI tools and layers. Here's how to level up your editing game:
Presets + AI Tools
Luminar NEO's AI tools and presets are a match made in editing heaven:
1. Enhance AI
Apply a preset, then let Enhance AI fine-tune the exposure, contrast, and colors. It's a time-saver for batch editing.
2. Sky AI
Start with a landscape preset, then use Sky AI to swap out or boost the sky. Perfect for outdoor shots that need a sky upgrade.
3. Portrait AI
Slap on a portrait preset, then let Portrait AI work its magic on skin, eyes, and facial features.
4. Atmosphere AI
Pair a moody preset with Atmosphere AI to add fog, mist, or haze. Instant drama!
Presets + Layers
Layers in Luminar NEO give you next-level control. Here's how to mix them with presets:
1. Stack 'em up
Layer different presets to create unique effects:
- Layer 1: Color grading preset
- Layer 2: Texture preset (dial down the opacity)
2. Get selective
Use masks to apply presets to specific areas. Want a vibrant foreground but a muted background? No problem.
3. Fine-tune
Tweak the opacity of preset layers to dial the effect up or down.
4. Local touch-ups
After applying a preset, use the Clone tool on a separate layer for targeted retouching.
Luminar NEO Presets vs Other Software
Let's compare Luminar NEO presets with Adobe Lightroom and Capture One.
Luminar NEO vs Lightroom presets

| Feature | Luminar NEO | Adobe Lightroom |
|---|---|---|
| AI tools | Extensive (sky enhancement, facial retouching) | Limited |
| Presets | Wide range with AI recommendations | Extensive library |
| Interface | Simple, beginner-friendly | More complex |
| Workflow | Plugin for Photoshop and Lightroom | Standalone and mobile app |
| Pricing (2023) | $89/year (Explore) or $99/year (Pro) | $9.99/month (Photography Plan) |
Luminar NEO's AI presets can be a time-saver. Its Sky AI tool automatically enhances landscapes, while Lightroom needs manual tweaks for similar results.
Luminar NEO vs Capture One styles
| Feature | Luminar NEO | Capture One |
|---|---|---|
| Focus | AI-driven editing and presets | RAW processing and color grading |
| Preset system | AI-recommended presets | Styles for consistent looks |
| Tethered shooting | No | Advanced capabilities |
| Color editing | AI-enhanced | Precise tools |
| Pricing (2023) | $99/year (Pro) | $24/month or $299 one-time |
Capture One shines in pro workflows, especially for studio photographers. But Luminar NEO's AI tools can speed up editing for various styles.
"Luminar NEO bridges the gap between Lightroom and Capture One, offering raw editing capabilities and AI tools."
Luminar NEO stands out with its AI approach and user-friendly interface. It's great for quick, impressive results without a steep learning curve.
But it has some preset management issues. Users report limitations in controlling, exporting, and sharing presets compared to Lightroom and Capture One.
Choose based on your needs, budget, and tech comfort. Luminar NEO is ideal if you want AI-assisted editing and simplicity. Go for Lightroom or Capture One if you need advanced color control or tethering.
Popular Luminar NEO Preset Collections
Luminar NEO packs a punch with its preset collections. Let's dive into some top picks and how they can level up your photos.
Top preset packs
1. Essential Preset Bundle
This beast of a bundle gives you 410 presets across 41 collections for $49 (down from $450). It's got you covered for:
| Genre | Collections |
|---|---|
| Landscape | Essential Landscape, Night Sky |
| Portrait | Clean Portrait, Barbie Look |
| B&W | Matte Black, Monochrome Magic |
| Wedding | Retro Wedding, Professional Wedding |
Plus, it throws in presets for street, HDR, interiors, products, macro, and wildlife shots.
Photographer Jakub Bors cooked up 120 presets in 12 collections for $49 (was $165). Highlights:
- Sunset & Sunrise: 10 presets for warm vibes
- Golden Hour: 10 presets for that magic light
- Dramatic: 10 presets to make your shots pop
3. Luminar Neo Preset Mega Pack
Jim Nix's pack serves up 50 presets for landscapes, cityscapes, street scenes, portraits, and B&W shots.
Presets for different photo types
1. Landscape Photography
The "Landscape & Nature" collection's got 25 presets like "Hot Maldives" and "Yosemite." Works on RAW and JPEG.
2. Portrait Photography
"Essential Portrait Presets" pack includes:
- Clarity & Sharpness
- Full Skin Tones
- Skin Glow
- Warm Cinematic
3. Black and White Photography
"Experimental B&W" pack gives your B&W shots that timeless feel.
4. Seasonal Photography
"Fall Colors" pack pumps up those autumn reds, oranges, and yellows.
"The Cinematographer" pack adds depth for that movie-like vibe.
6. Social Media Content
"Influencer Vlog LUTs" pack is perfect for spicing up your social media visuals.
These presets are just a starting point. Tweak them to fit your style. For more options, hit up the Luminar Marketplace for both free and paid presets.
Using Presets in Your Workflow
Presets for batch editing
Want to save hours on large photo sets? Here's how to use presets for batch editing in Luminar NEO:
- Open batch process (File > Batch process or Cmd + B / Ctrl + B)
- Pick a preset (bundled, installed, or custom)
- Adjust strength with the Amount slider
- Set output options (format, naming, folder)
- Run and review
"I usually spend less than 5 minutes or so doing the editing in Luminar Neo. It will go even faster if you save a preset or two of some or all of the steps and apply that first." - Digital Photo Mentor
Presets in your editing process
Make your workflow smoother:
- Start with a preset as your base
- Tweak individual settings
- Save common edits as custom presets
- Layer presets for unique effects
| Preset Type | Best Use Case |
|---|---|
| Portrait | Wedding shoots |
| Landscape | Nature photography |
| B&W | Artistic shots |
| Cinematic | Dramatic scenes |
Don't forget: Check exposure, contrast, and saturation when using presets on multiple photos. Keep things consistent!
Common Problems and Questions
Preset Pitfalls
Luminar NEO users often run into these preset problems:
- Can't install presets
- Presets look different than expected
- Presets wipe out previous edits
- Too many presets slow things down
- Old presets don't work with new versions
Fixing Preset Headaches
Here's how to tackle these issues:
1. Installation Troubles
- Update Luminar NEO
- Check for .lnp file format
- Restart the software
2. Unexpected Results
- Try "For This Photo" AI suggestions
- Tweak the Amount slider
- Fine-tune settings after applying
3. Overwriting Edits
- Apply presets first, then make manual tweaks
- Save your work often
- Hang tight for the undo/redo update
"Applying a Preset discards previous edits. We know it's a pain." - Skylum Team
4. Slow Performance
- Organize presets into smaller groups
- Ditch unused presets
- Use an SSD for faster loading
5. Compatibility Issues
- Check for updated presets on Luminar Marketplace
- Ask preset creators about compatibility
- Recreate old favorites with new tools
Conclusion
Skylum's cooking up some cool AI tools for Luminar NEO. They're working on stuff like GenErase, SceneExpand, and Water Enhancer. These new features? They're all about making your photo editing faster and easier.
But let's talk about using presets RIGHT NOW:
- Kick things off with a preset
- Check out the AI's "For This Photo" suggestions
- Play with the Amount slider
- Make your own presets (trust me, future you will thank you)
"AI isn't here to steal your photography thunder. It's more like your sidekick. The magic? That's still all you - your ideas, your style, your experiences. AI just helps you bring that vision to life faster." - Ivan Kutanin, Skylum's CEO
Bottom line? Luminar NEO presets are your shortcut to awesome photos. Start with a preset, tweak it to your heart's content, and boom - you've got a stunner in no time flat.


