

Table of Contents
- 5 Cinematic Presets for Better Dynamic Range
- Quick Comparison
- What Makes a Preset Good for Dynamic Range
- 1. Wide Latitude Cine Base
- 2. Moody Teal and Orange Cine
- 3. Soft Filmic Highlight Roll Off
- 4. High Dynamic Range Urban Noir
- 5. Golden Hour Cine Drama
- Quick Comparison Table
- How to Get Better Results After Applying These Presets
- Conclusion
- FAQs
5 Cinematic Presets for Better Dynamic Range
If you want a more film-like, cinematic photo, start with one rule: keep highlight detail, keep shadow texture, and don’t let contrast get out of hand.
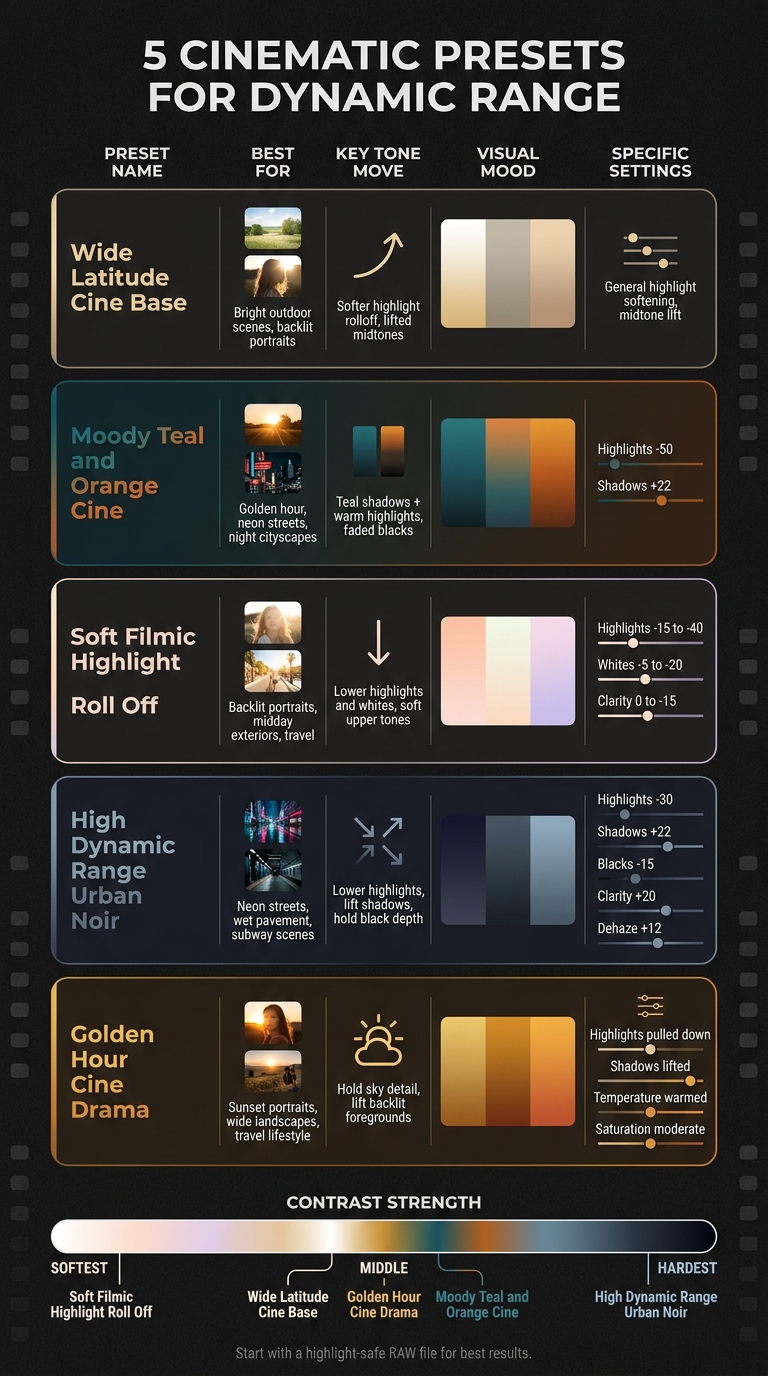
I’d sum this article up like this: the right preset depends on the light. For bright outdoor shots, I’d start with Wide Latitude Cine Base. For stylized color, I’d use Moody Teal and Orange Cine. For bright skin and sky control, Soft Filmic Highlight Roll Off makes more sense. For night streets, High Dynamic Range Urban Noir fits best. And for sunsets, Golden Hour Cine Drama helps keep both the sky and subject readable.
Here’s the main takeaway in plain English:
- Preset 1: softens bright areas and opens dark areas
- Preset 2: adds teal/orange color contrast without clipping highlights
- Preset 3: helps with bright skies, shiny surfaces, and backlit faces
- Preset 4: keeps noir-style contrast while pulling texture from dark streets
- Preset 5: holds sunset color while keeping people and foregrounds visible
A few numbers matter here too. The article points to settings like Highlights at -50, Shadows at +22, Clarity from -15 to +20, and Whites from -5 to -20. Those moves tell me the same thing: better dynamic range usually comes from pulling bright tones down, opening dark tones a bit, and letting the tone curve do most of the work.
5 Cinematic Presets for Dynamic Range: Quick Comparison Guide
Quick Comparison
| Preset | Best for | Main tone move | Look |
|---|---|---|---|
| Wide Latitude Cine Base | Bright outdoor scenes | Softer highlight rolloff, lifted midtones | Clean, balanced, film-like |
| Moody Teal and Orange Cine | Golden hour, neon, night scenes | Teal shadows, warm highlights, faded blacks | Dark, stylized, color-driven |
| Soft Filmic Highlight Roll Off | Backlit portraits, midday light | Lower highlights and whites, soft upper tones | Smooth, soft, low-stress contrast |
| High Dynamic Range Urban Noir | Neon streets, wet pavement, subway scenes | Lower highlights, lift shadows, hold black depth | Gritty, cool, punchy |
| Golden Hour Cine Drama | Sunset portraits and landscapes | Hold sky detail, lift backlit foregrounds | Warm, contrast-rich, sunset-focused |
What matters most is simple: a preset can reshape tones that exist, but it can’t fix clipped highlights. So if I’m working from a RAW file with safe exposure, these five looks give me five different ways to keep detail from shadows to highlights without making the image look overdone.
sbb-itb-b27063b
What Makes a Preset Good for Dynamic Range
A good cinematic dynamic-range preset spreads tones across the tonal range, lifts shadows, keeps enough contrast to hold depth, and protects color integrity so skin tones and skies stay believable. Those are the main things to look at when judging each preset below.
A preset can't bring back clipped highlights. But it can redistribute the tones that were captured by lifting midtones, softening highlights, and anchoring blacks. The strongest presets adjust tone, contrast, and color as a set so the final image feels balanced.
Controlled split-toning adds depth by separating warm highlights from cool shadows without throwing skin tones or skies off balance. That's where a lot of that cinematic depth comes from.
Use these criteria to compare the Cinematic Collection and the other presets below.
1. Wide Latitude Cine Base
Use this as your base preset. It smooths highlight rolloff, opens up shadows, and steadies midtones. If your file still has usable detail in the bright and dark areas but needs cleaner tonal shaping, this is the safest place to start for dynamic-range control in this list.
Its main strength is highlight rolloff. Bright parts of the frame fade off more gently instead of clipping hard, which helps the image feel more filmic. As Cinecolor describes it:
"Each LUT smooths out highlight rolloff, adjusts mid-tone levels, and slightly modifies color balance for a wide array of modern filmic looks."
It also gives midtones a slight lift, which helps keep depth in the image and skin tones on track. Contrast stays fairly restrained, so the frame keeps clean separation without looking harsh.
This preset works best with RAW files or LOG profiles like S-Log, F-Log, or D-Log. It's a solid pick for backlit portraits and bright outdoor scenes. That said, it can only work with what's there. If key detail was never captured, no preset can bring it back.
Apply it first to set your tonal baseline, then adjust Exposure to fit the scene.
If you want a softer, moodier tonal balance, the next preset goes in that direction.
2. Moody Teal and Orange Cine
If the wide-latitude base feels a little plain, this preset leans harder into color contrast without throwing away highlight detail. It pushes teal into the shadows and orange into the midtones and highlights, which gives you stronger subject separation and helps warm subjects pop from the background.
The look comes from a lifted black point and controlled highlights, so detail stays visible on both ends of the tonal range. Its tone curve uses a cinematic S-curve that turns deep shadows into rich dark tones instead of crushing them into pure black. On the other end, highlights are pulled down to help stop clipping.
"The secret cinematic touch is fading the blacks and highlights... This prevents harsh, blown-out whites and gives the image a soft, vintage film roll-off." - Skinner, Founder, Cinemora Presets
In practice, set highlights around -50 to hold detail in bright areas, and push shadows to around +22 or more so dark zones stay readable. Keep Orange and Yellow HSL moves restrained so skin tones still look natural under the teal grade.
This preset fits:
- Golden hour portraits
- Neon street scenes
- Night cityscapes
It tends to fall flat in overcast light because there isn't much warmth in the scene to balance the teal. And if the teal starts to take over the frame, use Balance to push the grade toward the highlights instead of rebuilding the whole look from scratch.
3. Soft Filmic Highlight Roll Off
This preset, part of The Master Preset Bundle, is made for bright scenes. It helps skies, skin, and shiny surfaces keep their detail instead of blowing out to white. After a color-led teal-and-orange look, the focus here shifts to tone recovery. A bright sky can still show cloud detail, and faces stay readable even in backlight.
A gentle curve lifts the upper midtones, softens the highlight point, and nudges the black point up a bit for a softer base. The black point remains slightly lifted, so shadows stay soft without turning muddy or flat.
Set Highlights to -15 to -40, Whites to -5 to -20, and keep Clarity near 0. For portraits, pull Clarity down to -5 to -15.
It works especially well for backlit portraits, harsh midday exteriors, and travel photography, where highlight detail matters most. The frame looks softer, but the brightest areas still hold onto detail.
Next, the urban noir preset uses the same highlight control in a darker, high-contrast setting.

The Ultimate Presets.IO Bundle

$89.00
$1,662.00
The Ultimate Presets.io Bundle combines The Master Preset Bundle Volume I and The Master Preset Bundle Volume II into one complete collection, giving you every editing style you need in a single download. Save $37 vs. Volume I and II… continue reading
4. High Dynamic Range Urban Noir
This preset holds detail in bright areas and dark areas at the same time, while still keeping that cinematic noir feel. It works best when your scene already has bold practical lights and deep ambient shadow. Think neon signs, wet pavement, and corners of the frame that almost fall into black.
To protect bright signage, set Highlights to -30 and bring Whites down. Then lift Shadows to +22 to pull texture back into dark areas, and keep Blacks at -15 so the image still has punch.
Clarity and Dehaze help bring out gritty street texture, especially in reflective city scenes. A cooler white balance also helps warm lights pop a bit more.
Here are the main settings at a glance.
| Setting | Value |
|---|---|
| Highlights | -30 |
| Shadows | +22 |
| Blacks | -15 |
| Clarity | +20 |
| Dehaze | +12 |
This preset does best in low-light urban scenes with clear light sources, like neon signboards, subway stations, and rain-slicked streets. If your shadows already look too crushed, nudge Blacks up a little. And if you're working with high ISO files, add Noise Reduction in the Detail panel to clean up grain in the recovered shadow areas.
The final preset shifts from city night scenes to warm, contrast-rich daylight.
5. Golden Hour Cine Drama
After the cooler urban noir look, this preset takes that same dynamic-range control and moves it into warm sunset light. It’s built for golden hour, where the big job is simple: hold the sky together while keeping the subject easy to see. That means backlit foregrounds stay readable, and sunset skies keep their color and texture instead of turning into a blown-out mess. It helps preserve sky detail, facial detail, and foreground texture so the frame keeps its shape and depth.
The tone curve adds contrast, but it doesn’t push highlights over the edge. Oranges and yellows stay rich, while skin avoids that overly orange look that can ruin a sunset portrait. Even with strong backlight, skin tones still look natural.
Use these settings as a starting point for sunset scenes:
| Setting | Purpose |
|---|---|
| Highlights | Pulled down to retain sky detail |
| Shadows | Lifted to recover backlit foreground |
| Exposure | Adjusted to balance the subject and sky |
| Temperature | Warmed to enhance golden tones |
| Saturation | Kept moderate to avoid oversaturated skin |
This preset tends to work best for outdoor portraits during golden hour, wide landscape shots with a strong horizon, and travel or lifestyle scenes where warm light does most of the heavy lifting. If skin starts to look a little too warm, pull Temperature slightly cooler or lower Saturation by a few points after you apply the preset.
Quick Comparison Table
Use this table to match each preset to the lighting and contrast problem in your shot.
| Preset Name | Best Use Case | Dynamic Range Focus | Tonal Outcome |
|---|---|---|---|
| Wide Latitude Cine Base | Bright outdoor scenes | Keeps highlight detail while lifting midtones | Opens shadows, softens highlight rolloff |
| Moody Teal and Orange Cine | Travel & cinematic storytelling | Strong contrast with protected highlights and shadows | Holds shadow detail, prevents highlight clipping |
| Soft Filmic Highlight Roll Off | Portraits & lifestyle | Soft highlight recovery and lifted shadows | Protects skin and sky detail, keeps blacks from crushing |
| High Dynamic Range Urban Noir | Street photography | Recovered shadow detail with preserved black depth | Pulls texture from dark zones, controls bright light sources |
| Golden Hour Cine Drama | Sunset & backlit scenes | Warm highlights with controlled sky detail | Lifts backlit foregrounds, retains sky color and texture |
The biggest split between these presets comes down to contrast strength. Soft Filmic Highlight Roll Off is the lowest-contrast option, so it keeps things gentler and more forgiving. High Dynamic Range Urban Noir is the hardest-edged look of the group. And if you want the boldest color separation, Moody Teal and Orange Cine is the one to pick.
How to Get Better Results After Applying These Presets
Once you apply one of the five presets above, make a few quick tweaks so it fits the shot in front of you.
Start with Exposure. Then dial in Highlights and Shadows based on the file. Pull down Highlights and Whites until detail comes back. Keep Shadows just a little below zero so the image still feels deep instead of washed out.
If the light is uneven, use masks to bring back detail in specific areas instead of flattening the entire frame. A sky mask or linear gradient works well for darkening the sky. Then use a second mask to brighten the foreground.
Keep Contrast close to 0 and let the Tone Curve do most of the shaping. If you stack contrast controls on top of each other, you start fighting the cinematic look these presets are meant to create. For portraits, lower Clarity by 5 to 15 points.
Conclusion
These presets all aim for the same thing: gentle highlight roll-off, controlled contrast, and shadows you can still read.
That changes how you should use them in practice. First, pick the preset that fits the scene. Then fine-tune exposure.
Keep the grade restrained. Let detail lead the image, not the effect.
Each preset has its lane: Wide Latitude Cine Base for flexible tonal shaping, Moody Teal and Orange Cine for stylized contrast with protected highlights, Soft Filmic Highlight Roll Off for bright scenes and skin detail, High Dynamic Range Urban Noir for city night work, and Golden Hour Cine Drama for warm sunset light.
The source file matters too. Start with a highlight-safe RAW file, then adjust Highlights and Shadows to hold detail.
When the preset, scene, RAW file, and exposure discipline line up, the image feels cinematic instead of over-processed.
FAQs
Which preset should I start with for most photos?
Start with the Golden Hour preset for most photos. It adds warm, nostalgic tones that work well for portraits and landscapes, which is why so many people use it for a cinematic look.
Can these presets recover blown highlights?
Yes, some presets can help recover blown highlights. They usually do this by pulling down brightness with the highlights slider and bringing back detail where data is still there.
This can be especially helpful in HDR editing. But there’s a catch: the result depends on how much highlight detail the file still has. If those bright areas are fully clipped, there may not be much to bring back.
Should I edit RAW files for the best dynamic range?
Yes. Shooting in RAW is the better pick if you want the best dynamic range, especially with cinematic presets.
RAW files keep more detail and tonal data. That gives you more room to edit without the image falling apart.