
Table of Contents
5 Color Pop Presets for Street Photography
Street photography thrives on vibrant visuals, and Lightroom presets can save you hours of editing while delivering polished results. This article explores five presets from Presets.io that enhance urban scenes with bold colors and dynamic contrasts. Whether you're shooting in daylight or under neon lights, these presets are tailored to highlight the energy and texture of city life.
Key Presets:
- Vibrant Urban Pop: Perfect for sunny or overcast days, it boosts colors and contrast for lively cityscapes.
- Neon Contrast Burst: Ideal for nighttime shots, it amplifies neon hues and deepens shadows for a cinematic look.
- HDR Street Glow: Balances light and shadow for dramatic depth, especially during blue hour or rainy evenings.
- Pop Art Cityscape: Adds a playful, artistic flair to urban scenes with bold colors and sharp contrasts.
- Cinematic Color Surge: Creates a movie-like atmosphere with selective color adjustments and rich tones.
These presets simplify editing while maintaining a consistent style. If you're on the go, learn how to import presets to Lightroom on Android to start editing immediately. Below, we dive into their features, best use cases, and tips for achieving stunning street photography. You can also follow our guide to import presets to Lightroom on iPhone for mobile workflows.
Vibrant Color Street Photography- My Editing Workflow
sbb-itb-b27063b
1. Vibrant Urban Pop
The Vibrant Urban Pop preset takes ordinary street shots and turns them into bold, eye-catching images by enhancing color depth and sharpening tones. Drawing inspiration from presets like "Muyvibrante" and "Brilliante", it amplifies specific hues to create a rich, energetic feel while keeping the look polished and natural. This makes it a great match for street photography, where vivid colors can help main subjects stand out amid the bustling chaos of urban settings.
Vibrance/Saturation Boost
This preset brightens colors and brings out subtle tones without overdoing it, especially on skin tones. When using it, pay close attention to skin tones to avoid an overly orange cast, which can happen during golden hour edits with high vibrance settings.
Contrast Adjustment
The preset enhances contrast and lifts shadows, revealing hidden details in darker areas like pavement, buildings, and clothing. After applying it, you might want to fine-tune shadow recovery to ensure everything stays balanced and natural.
Best Lighting Condition
Vibrant Urban Pop works best under crisp, sunny conditions and is exceptional for adding a golden hour glow to photos that could use extra warmth. It also performs well on overcast days, breathing life into otherwise flat lighting. Additionally, it excels in dramatic lighting situations, where deep shadows and vivid highlights create striking contrasts.
Ideal Street Scenario
This preset is ideal for vibrant cityscapes - think crowded markets, busy intersections, or street performances - where bright colors help subjects pop against the background. It captures the movement and energy of urban life while highlighting architectural details, like the natural hues of stone, brick, or cobblestone streets, which can often look dull in raw images. Use it as a starting point, and adjust exposure and white balance to match the mood of your specific scene.
Next, we’ll dive into another preset designed to bring out the drama of neon-lit urban nights.
2. Neon Contrast Burst
The Neon Contrast Burst preset takes nighttime street photography to another level by layering deep neon hues like electric blue, vivid pink, and bright purple into urban scenes. It’s designed to emphasize the glow of the city, transforming everyday shots into cinematic visuals that bring to mind the futuristic vibes of Blade Runner or The Matrix. By deepening blacks and enhancing tonal depth, it ensures neon details shine through with clarity.
Vibrance and Saturation Boost
This preset zeroes in on neon tones, creating rich, saturated colors that pop against dark cityscapes. It amplifies artificial light sources without overpowering the image.
The effect is especially striking on glowing storefronts, neon signs, and street lamps, making these elements stand out dramatically in shadowy surroundings.
Contrast Adjustment
To create a sharp contrast between bright lights and dark backgrounds, this preset deepens blacks while slightly lowering highlights. This approach keeps neon signs from looking overexposed while maintaining surface textures on materials like concrete, stone, or fabric. If details in shadows - like those in jackets or hair - are lost, you can slightly lift the shadows. This tweak ensures urban textures are accentuated without compromising the overall mood.
Best Lighting Conditions
Neon Contrast Burst works best in low-light settings, particularly during blue hour or nighttime when artificial lights dominate. It thrives in environments where neon signs, street lamps, or illuminated storefronts provide the primary light sources. Rather than fabricating contrast, this preset enhances the existing interplay between light and shadow.
Ideal Street Scenarios
Perfect for capturing bustling intersections, narrow urban alleys with vibrant signage, or cyberpunk-inspired cityscapes, this preset delivers a polished, cinematic feel. It’s an excellent way to highlight the energy and atmosphere of nighttime urban life. For an even more dynamic approach, check out HDR Street Glow to amplify your visuals further.
3. HDR Street Glow
The HDR Street Glow preset brings a bold, cinematic vibe to urban photography by blending vibrant highlights with rich shadows. This creates a high-dynamic-range effect that captures the energy and texture of city life - whether it’s weathered brick walls or rain-slicked streets. It enhances contrast and depth while keeping the raw, gritty feel of urban environments intact.
Vibrance and Saturation Boost
Muted colors come alive with this preset, but it never sacrifices the moody feel that defines street photography. Advanced color grading techniques ensure that even flat scenes are revitalized[7,8]. Think of the warm glow of streetlights against a cool evening sky - this preset amplifies those contrasts without tipping into oversaturation. Photographer Tim Martin praises it, saying:
I absolutely love the colour and grit of this Lightroom collection, it's perfect for today's digital photographer that wants a beautiful film look.
Contrast Adjustment
Street photography often involves challenging lighting, and HDR Street Glow excels at balancing these extremes. It manages the interplay of light and shadow beautifully, giving your photos dramatic depth. If your image feels too dark, tweak the exposure or lift the shadows slightly to maintain detail in grittier scenes. This preset provides a solid base, but you’ll want to fine-tune it for specific lighting conditions since streetlights and ambient light can vary widely.
Best Lighting Conditions
HDR Street Glow shines brightest during evening and blue hour, when artificial lighting transforms the urban landscape. The glow of streetlights, neon signs, and shop windows creates the perfect highlights against darkened cityscapes. To get the best results, consider using a tripod and settings like a 1/4-second shutter speed, f/5.6 aperture, and ISO 800. This combination helps capture intricate details while keeping noise under control.
Ideal Street Scenarios
This preset is a go-to for capturing the essence of urban life at night. It works beautifully for bustling streets, quiet alleyways, or solitary figures walking through dimly lit areas. Whether you’re photographing street performers, empty cafes, or dramatic city skylines, HDR Street Glow emphasizes texture and mood. It’s especially effective at highlighting the sharp lines of buildings and the intrigue of shadowy corners, evoking a film noir aesthetic.
Next, dive into how the Pop Art Cityscape preset can transform urban scenes with a more artistic flair.
4. Pop Art Cityscape
The Pop Art Cityscape preset transforms everyday urban scenes into eye-catching, playful visuals with a pop art twist inspired by anime. By leveraging AI tools, it infuses cityscapes with bold colors and striking lines, turning ordinary streets into imaginative works of art.
Vibrance and Saturation Boost
Muted tones? Not a problem. This preset works its magic by pushing vibrance up to around +80 and dialing up saturation for greens and yellows by +60. The result? Foliage and small accents leap off the screen, while dull cobblestone streets and concrete pavements come alive with rich, dynamic colors.
Contrast Adjustment
Contrast is key to making urban scenes pop. This preset sharpens the difference between highlights and shadows, creating bold, defined lines that add depth to flat cityscapes.
Best Lighting Condition
Overcast or evenly lit conditions are ideal for this preset. A neutral lighting base avoids the harshness of direct sunlight, preventing overexposure and preserving details. Soft shade enhances the vibrant color pops without sacrificing highlight clarity. Even in midday sun, the preset can tone down strong highlights, though you might need to tweak settings slightly for a more natural finish.
Ideal Street Scenarios
This preset shines brightest in lively urban settings. Think busy markets, street performers, or quaint cafes. Bold architectural features like skyscrapers or striking lines also amplify its whimsical charm. Add in some street life, and you’ve got vibrant compositions that tell a story.
Ready for another take on urban photography? Check out our new Lightroom presets like the Cinematic Color Surge next for a fresh perspective on city colors.
5. Cinematic Color Surge
The Cinematic Color Surge preset brings a dramatic, movie-like quality to your street photography, enhancing tones and adding depth. As AAA Presets describes it:
"Cinematic street photography goes beyond simply capturing a scene; it's about crafting a visual narrative that draws viewers in and evokes an emotional response."
Vibrance and Saturation Boost
This preset, included in The Master Preset Bundle, focuses on selective HSL adjustments to amplify reds, oranges, and yellows while keeping skin tones and neutrals looking natural. Shadows are cooled down to create a clear separation between subjects and backgrounds, making primary colors pop. Lauren Wessel from Archipelago sums it up perfectly:
"The key when you edit... is to enhance the vibrancy without oversaturating, while still keeping that cozy, timeless atmosphere."
Contrast Adjustment
To achieve its cinematic depth, the preset deepens blacks, reduces highlights, and utilizes the Dehaze tool. This combination enhances contrast, giving images a rich, saturated look without directly increasing saturation. The Dehaze tool is particularly effective for backlit or foggy scenes, adding layers of dimension and mood. These contrast adjustments work best when paired with thoughtful lighting.
Best Lighting Condition
Golden hour and twilight are ideal for this preset, as the warm light and dynamic shadows naturally enhance its cinematic qualities. Rainy days and shadowy corners also work well, adding an atmospheric touch to your urban shots.
Ideal Street Scenarios
This preset shines in busy city streets, night markets, and urban environments lit by dramatic artificial light. It’s equally striking in foggy settings or areas with vibrant street art and unique architecture, providing a perfect backdrop for its rich, cinematic color grading.
The Master Preset Bundle: Volume II

$69.00
$990.00
The Master Preset Bundle Volume II New Looks. More Styles. Even More Creative Control. Get 66 brand-new Presets.io collections in one powerful Volume 2 bundle — crafted to expand your editing range, refresh your workflow, and deliver polished, professional results in… continue reading
Preset Comparison Table
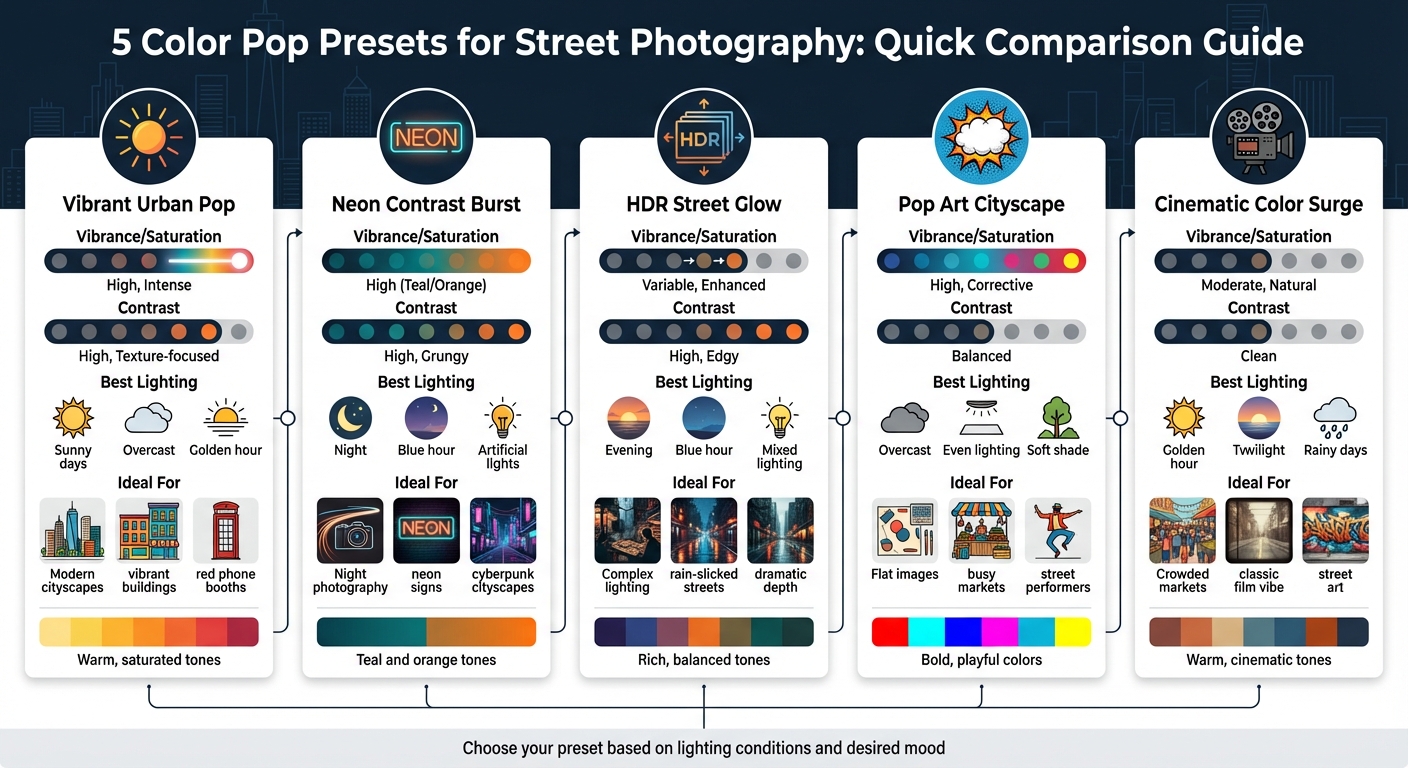
5 Color Pop Lightroom Presets for Street Photography Comparison Guide
Here’s a quick overview of the presets, highlighting their editing strengths and ideal use cases. This guide can help you pick the perfect preset to match the lighting and mood of your street photography.
For instance, Cinematic Color Surge delivers a balanced, natural look with moderate saturation and clean contrast, while Neon Contrast Burst leans into bold teal and orange tones, making it perfect for nighttime cityscapes with artificial lighting.
| Preset Name | Vibrance/Saturation Level | Contrast Setting | Recommended Use Case |
|---|---|---|---|
| Vibrant Urban Pop | High, Intense | High, Texture-focused | Modern cityscapes, red phone booths, vibrant buildings |
| Neon Contrast Burst | High (Teal/Orange) | High, Grungy | Night photography with artificial lights and deep shadows |
| HDR Street Glow | Variable, Enhanced | High, Edgy | Complex lighting that needs texture recovery |
| Pop Art Cityscape | High, Corrective | Balanced | Flat images needing vivid colors and extra energy |
| Cinematic Color Surge | Moderate, Natural | Clean | Crowded markets or scenes with a classic film vibe |
If your photos feel dull, Pop Art Cityscape or HDR Street Glow can bring them to life. For neon-lit environments, stick with Neon Contrast Burst. And if you’re after a timeless, cinematic feel, Cinematic Color Surge is the way to go. Match your preset choice to your vision, and watch your urban photography come alive.
Conclusion
Street photography thrives on capturing the raw energy and character of urban life, and color pop presets bring that vibrancy to the forefront. These tools can turn flat, everyday scenes into striking visual narratives, highlighting textures, details, and moods that might otherwise get lost in the chaos of city streets. From neon-lit alleyways to sun-soaked markets, these presets not only cut down on editing time but also help maintain a cohesive style.
The five presets discussed - ranging from the bold Neon Contrast Burst to the versatile Cinematic Color Surge - offer distinct ways to make your images stand out. With modern AI-driven adjustments that fine-tune lighting, contrast, and composition, you can spend less time on post-processing and more time capturing those fleeting, decisive moments. Each preset brings its unique flair to different urban settings, making it easier to enhance the mood and depth of your photos.
Dive into these presets to discover what resonates with your creative vision. Use Vibrant Urban Pop to amplify colorful cityscapes or HDR Street Glow for scenes with intricate lighting. Tweak exposure and white balance as needed to fine-tune your results.
Looking to expand your editing arsenal? Check out Presets.io for a wide variety of Lightroom presets, including collections that cater to cinematic, vintage, and film-inspired styles. With weekly updates and step-by-step installation guides, you’ll have everything you need to refine your street photography, simplify your workflow, and develop a signature aesthetic.
FAQs
Which preset should I use for my lighting?
For eye-catching results in different lighting scenarios, explore presets that amplify color and mood. High Contrast Color Pop presets deliver bold, striking visuals, perfect for dramatic effects. On the other hand, Natural Color Pop presets provide softer adjustments, maintaining realistic skin tones. Pick the style that matches your vision - vivid and bold or soft and natural.
How do I keep skin tones from looking orange?
When editing street photography in Lightroom, achieving natural-looking skin tones is key. To steer clear of overly orange hues, focus on fine-tuning colors in the B&W Mix panel. Adjust the individual color channels carefully to balance tones.
Another essential step is refining the white balance. While making basic adjustments, be cautious with the temperature and tint sliders - overdoing the warm tones can lead to unnatural results. Instead, aim for subtle tweaks that keep skin tones looking natural and realistic in your photos. Small adjustments can make a big difference.
What settings should I tweak after applying a preset?
After applying a preset, you can fine-tune the image by adjusting settings like exposure, contrast, shadows, and vibrance. Start by balancing brightness and depth with exposure and contrast. Then, tweak shadows and highlights to bring out more detail in the image. If you're aiming for a bold, colorful look, play with vibrance and saturation to achieve the perfect color intensity. For black-and-white photos, focus on settings like grain, vignette, and clarity to create mood and texture.