
Table of Contents
How Side Lighting Enhances Macro Textures
Side lighting is a simple yet powerful technique in macro photography that highlights textures by creating contrast between light and shadow. Unlike front or backlighting, cross lighting adds depth and dimension to your subject, making details like flower petal veins, tree bark, or butterfly wings stand out.
Here’s why side lighting works so well:
- Texture Visibility: Shadows emphasize ridges, grooves, and dips, bringing out fine details.
- Depth and Dimension: The interplay of light and shadow creates a three-dimensional effect.
- Versatility: Works with natural light (like golden hour) or artificial light sources (LED panels, flash).
Quick tips for using side lighting:
- Position your light source at a 45° to 90° angle to your subject.
- Use diffusers to soften harsh shadows.
- Experiment with light angles and intensity to find the best results for different textures.
Whether you're using natural sunlight or artificial lights, cross lighting can transform flat, lifeless images into dynamic, textured photos. Pair it with Lightroom editing tools like the Texture and Clarity sliders to refine your results further.
Improve Your Macro Photography with 3 Simple Lighting Techniques!
sbb-itb-b27063b
What Is Side Lighting?
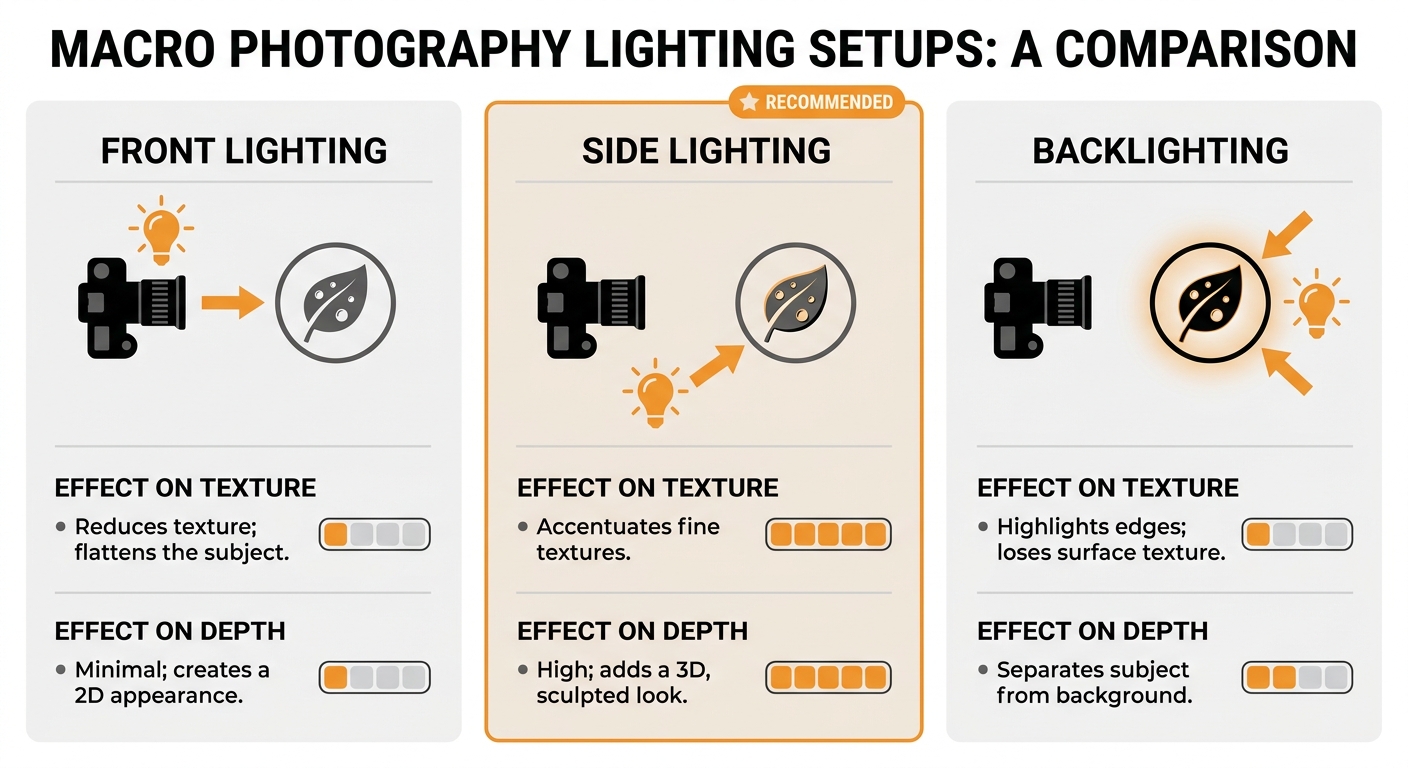
Comparison of Front, Side, and Backlighting Effects on Macro Photography Texture and Depth
The Basics of Side Lighting
Side lighting involves positioning the light source at about a 90° angle to your subject. Instead of illuminating the subject from the front or back, the light comes from the side, creating a striking division between light and shadow. This contrast is what makes textures pop.
Photographer Chris Sale puts it perfectly:
"The trick for bringing out texture is finding lighting that can bring the depth of elements into relief, which is done by having light on one side and dark on the other, which is exactly why side-lighting is so useful."
The angle doesn’t have to be locked at 90°. You can tweak it based on what you’re photographing. For intricate details, positioning the light nearly parallel to the surface works well. For subjects with rougher textures - like tree bark or metal - a broader angle between 45° and 90° helps avoid shadows that are too harsh.
Now, let’s see how cross lighting stacks up against other lighting techniques.
Side Lighting vs. Other Lighting Setups
To fully appreciate cross lighting, it helps to compare it with other common setups and their effects on texture and depth.
Side lighting creates shadows that emphasize the subject’s texture. In contrast, front lighting - where the light source is near the camera - tends to fill in shadows, flattening the visual depth. Photographer Rajib Mukherjee explains:
"The closer your light is to the camera view, the less dimension and texture you are going to have."
Backlighting, meanwhile, is great for highlighting edges and adding a glow to translucent areas or fine details, like hair. However, it often leaves the front of the subject in darkness, making surface textures harder to see unless the subject itself is semi-transparent.
Here’s a quick breakdown of how these setups compare:
| Lighting Setup | Effect on Texture | Effect on Depth |
|---|---|---|
| Front Lighting | Reduces texture; flattens the subject | Minimal; creates a 2D appearance |
| Side Lighting | Accentuates fine textures | High; adds a 3D, sculpted look |
| Backlighting | Highlights edges; loses surface texture | Separates subject from background |
Cross lighting shines because it reveals the physical relief of a subject. Raised areas catch the light, while recessed parts stay in shadow, giving the image a three-dimensional quality that feels dynamic and full of life.
How Side Lighting Reveals Macro Textures
Using Shadows to Show Fine Details
Side lighting has a unique way of bringing out the smallest details in a subject. By placing the light at just the right angle, you can highlight raised areas while casting shadows in the grooves. This contrast is what makes textures stand out so vividly.
For delicate textures - think flower petal veins or the scales on a butterfly's wing - position the light almost parallel to the surface. This angle enhances even the tiniest ridges and grooves. On the other hand, for coarser textures like tree bark, coin engravings, or cantaloupe skin, a light angle of about 45° strikes a good balance. It keeps shadows from becoming too long, so the details remain clear and defined.
This careful use of shadows doesn’t just reveal the texture; it also provides a stunning level of detail that makes the subject pop.
Adding Depth and Dimension
Cross lighting does more than just highlight details - it creates a sense of depth and dimension by balancing light and shadow. This contrast can make viewers feel as though they could reach out and touch the surface.
Photographer Ivo Guimaraes explains it perfectly:
"Side lighting accentuates the texture of the subject as it casts side shadows creating the sense of dimension and volume."
This technique is especially effective for capturing textures like the iridescence of soap bubbles, the fine hairs on a geranium stem, or the intricate designs on an insect’s wings. Experimenting with both the angle and the height of the light source can reveal hidden textures that a standard setup might miss. The end result? A photo that feels dynamic and full of life, rather than flat or purely informational.
The Wedding Bundle

$44.00
$165.00
The Wedding Bundle is a thoughtfully curated collection of Lightroom presets crafted to elevate every moment of your wedding photography — from intimate preparations to the final celebration. Featuring presets from Love, Matte Film, Stylish, The Bouquet, Vintage Dress, Elegant… continue reading

Setting Up Side Lighting for Macro Shots
Working with Natural Side Light
Golden hour sunlight - right after sunrise or just before sunset - is ideal for creating soft shadows that highlight texture. Position your subject so the sunlight hits it at a 90° angle relative to your camera. To find the light's direction, check your shadow; standing 90° from it ensures true cross lighting. For capturing fine details, aim for an angle that’s nearly parallel to the surface of your subject. Since the sun doesn’t move to accommodate your needs, you’ll need to rotate your subject or adjust your position until the shadows enhance the texture perfectly.
If the sunlight feels too harsh, a diffuser can work wonders. Simple items like tracing paper, a white sheet, or even baking paper can soften the light. To balance the shadows, place a reflector - such as white cardboard or aluminum foil - on the opposite side to bounce light back. This technique helps bring out the intricate details in macro textures while keeping the lighting balanced and natural.
Using Artificial Light Sources
When natural light isn’t an option, artificial lighting offers flexibility and control. Off-camera flash or LED panels are excellent choices for macro photography. Continuous LED lights are particularly beginner-friendly because they let you see how the light interacts with your subject in real time. On the other hand, flash is great for freezing motion, like when shooting active insects. Start by positioning the flash at a 45° angle and adjust as needed. Even small changes in the height or angle of the light source can dramatically alter how textures are revealed.
Always use a diffuser to avoid harsh contrasts. If you don’t have a professional diffuser, DIY options like tissue paper can evenly spread the light. With artificial lighting, as with natural light, the goal is to emphasize textures by carefully controlling how light interacts with your subject.
Testing Different Angles and Light Intensity
Once your lighting is in place, fine-tune the angle and intensity to bring out the best texture details. Moving the light source slightly can make a big difference. For delicate textures, an almost parallel angle works best, while a moderate angle is better for more pronounced surfaces like tree bark or rough metal. Adjust the light’s distance as well - bringing it closer increases contrast, while moving it farther softens the effect.
To ensure stability while experimenting, use a tripod and a shutter release. After nailing your lighting setup, you can enhance the textures further during post-processing in Lightroom. This combination of precise lighting and careful editing will make your macro shots stand out.
Editing Side-Lit Macro Photos in Lightroom

Adjusting Texture and Contrast
Side lighting naturally creates contrast between highlights and shadows, but a little post-processing can take those textures to the next level. Start by tweaking the Whites and Highlights sliders to recover details in bright reflections - this is especially useful for shiny elements like insect wings or water droplets. These adjustments help balance the light and shadow for a more three-dimensional look.
The Texture slider is a go-to for emphasizing fine details like ridges or grooves without making the image feel overly processed. If the details appear too harsh, dial it down slightly; if the subject feels too soft, increase it to sharpen the edges. Similarly, the Clarity slider enhances mid-tone contrast across the image. Use it sparingly to make textures stand out without creating unwanted halos. As professional photographer Artur Berlin puts it, "Post-processing in Lightroom is vital to improving the look of your macro pictures... proper post-production can significantly enhance your photos". If manual adjustments feel overwhelming, preset collections can simplify the process.
Applying Presets.io Collections to Macro Photos

For an easier editing workflow, Presets.io offers specialized collections tailored for macro photography. Their cinematic and vintage presets work beautifully with the dramatic shadows and highlights created by crossf lighting. These presets incorporate advanced tweaks, like four-tone curves, to achieve balanced color correction and micro-contrast, bringing out every intricate surface detail.
New presets are added weekly, so you can keep your edits fresh. They’re compatible across Lightroom Mobile, Desktop, and Adobe Camera Raw, making it simple to maintain a consistent editing style on any device. The site provides step-by-step installation guides, and since all adjustments are non-destructive, you can experiment freely without altering your original raw files. After applying a preset, you can fine-tune specific areas to achieve the perfect balance of texture and depth.
Fine-Tuning Specific Areas
Once global adjustments are in place, targeted refinements can make your side-lit textures truly pop. Use Lightroom's Adjustment Brush or Radial Filter to highlight the illuminated parts of your subject while keeping the background smooth and out of focus. For instance, you can enhance the Texture and Clarity on a flower petal's ridges while maintaining a soft, natural backdrop.
To further separate your subject from its surroundings, increase contrast in specific areas using these tools. If the background colors feel distracting, selectively reduce Vibrance to keep the attention on your subject and its beautifully enhanced textures. These small adjustments can make a big difference in creating a polished, striking macro image.
Conclusion
Side lighting brings macro textures to life by casting shadows that add depth and dimension. This method creates a striking contrast between the lit and recessed areas, giving surfaces a rich, three-dimensional appearance rather than a flat look.
The good news? You don’t need fancy equipment to get started. Natural light during the golden hour works beautifully, or you can use everyday items like aluminum foil to bounce light into the shadows. Play around with the angle and intensity of the light to see how it interacts with different textures. As photographer Ivo Guimaraes wisely advises, "Don't be afraid to experiment, as trial and error is the best way to success".
After capturing your shots, post-processing can further enhance the details revealed by cross lighting. Tools like the Texture and Clarity sliders are excellent for emphasizing fine details and refining the overall look. This step ties your shooting process seamlessly with editing, ensuring the textures pop.
Start small - try side lighting on everyday items like fabric, leaves, or fruit to see how shadows bring out their hidden details. By combining these shooting and editing techniques, you can transform simple objects into striking images. And when you’re ready to take your editing further, check out Presets.io for tools that help your macro textures stand out, showcasing the intricate play of light and shadow that makes cross lighting so effective.
FAQs
What’s the easiest way to get true side lighting outdoors?
To create side lighting in outdoor macro photography, position your light source at an angle to the side of your subject. The best time to use natural sunlight is early morning or late afternoon when the sun sits lower in the sky, providing softer, angled light.
If natural sunlight isn't working for your setup, you can replicate this effect. Use reflectors or external lights placed at a side angle to your subject. This approach helps emphasize textures and adds depth, giving your macro shots a more striking and dynamic look.
How do I avoid harsh shadows when using side lighting?
To reduce harsh shadows when using side lighting in macro photography, place the light source at a low angle, almost parallel to your subject. This approach softens the shadows and brings out textures without introducing sharp contrasts. You can also make the light less direct to diffuse the shadows further, creating even lighting that showcases fine details beautifully.
Which Lightroom sliders best enhance side-lit textures?
When it comes to bringing out the beauty of side-lit textures in your photos, Lightroom offers three powerhouse sliders: Texture, Clarity, and Dehaze.
- Texture: This slider is perfect for accentuating medium-sized details, making surfaces and patterns pop. It's great for drawing attention to intricate textures.
- Clarity: By increasing midtone contrast, this slider adds sharpness and depth to side-lit areas, giving your image a more dynamic and defined look.
- Dehaze: This tool reduces haze and enhances contrast, making textures even more prominent and vivid in your macro shots.
Experimenting with these sliders can transform your side-lit photos, making every detail shine.