
Selective Color in Lightroom: 5 Quick Steps
Want to make one color pop in your photos while turning the rest black and white? Lightroom makes it easy with its user-friendly tools. Here’s how to create stunning selective color effects in just five steps:
- Open Your Image: Start in Lightroom’s Develop module and adjust basic settings like exposure and contrast.
- Use the HSL Panel: Highlight the color you want by increasing its saturation and desaturating all other colors.
- Refine Contrast: Boost contrast and clarity to make the color stand out against the monochrome background.
- Adjustment Brush: Fine-tune specific areas for precision using the brush tool.
- Final Touches: Review your edits and export the image in your desired format.
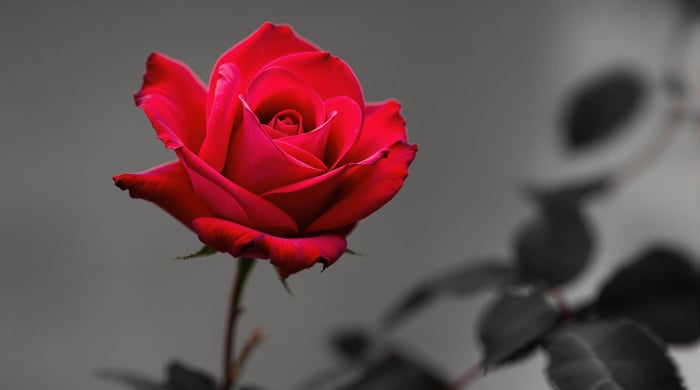
This technique works great for portraits, landscapes, and even wedding photos. Use it to highlight a red dress, vibrant foliage, or unique details in your shots. Lightroom's tools like the HSL panel and Adjustment Brush make the process straightforward, even for beginners. Let’s dive into the details!
How to Create Selective Color in Lightroom: 5 Steps

Step 1: Open Your Image and Prepare It
Start by opening Lightroom and heading to the Develop module. Before diving into color adjustments, tweak your image's basic settings. Adjust exposure, contrast, and white balance to ensure the photo has a balanced tonal range. This step lays the groundwork for how the color effect will stand out. Once the image looks good, move to the HSL panel to start isolating specific colors.
Step 2: Isolate Colors in the HSL Panel
The HSL panel is key for achieving the selective color effect. Focus on the color you want to highlight (e.g., red) by increasing its saturation. Then, reduce the saturation of all other colors to -100. Here's how to fine-tune it:
| Color Component | What It Does |
|---|---|
| Luminance | Adjusts the brightness of the highlighted color |
| Hue | Lets you tweak the tone of the selected color if needed |
Step 3: Fine-Tune Overall Contrast
To make your colored subject pop against the black-and-white background, tweak some global settings:
- Contrast: Boosts separation between the colored area and the monochrome background.
- Clarity: Adds sharpness to maintain detail in the black-and-white portions.
- Shadows and Highlights: Balances the tonal range, ensuring details aren't lost in either the highlights or shadows.
Step 4: Use the Adjustment Brush for Precision
The Adjustment Brush is perfect for refining your edits. Set it up like this:
- Size: Adjust to fit the area you're working on.
- Feather: Aim for 50-70 to create soft, natural edges.
- Flow: Keep it between 50-75 for smooth, gradual changes.
- Auto Mask: Turn this on to help keep edges clean.
Carefully paint over areas where you want to restore or remove color. If you make a mistake, hold down Alt to erase.
Step 5: Final Touches and Export
Before exporting, use the Before/After view to ensure the edits look natural. Make any final tweaks to perfect the effect. When exporting, choose settings based on your needs:
- JPEG for web or TIFF for print.
- Use sRGB for online platforms or Adobe RGB for print.
- Set resolution to 72 ppi for digital use or 300 ppi for printing.
With these steps, your color image will be ready to impress!
Helpful Tips for Better Selective Color Edits
Use Shortcuts to Save Time
Keyboard shortcuts can make your color editing in Lightroom much faster. For example, hold down the ALT key to switch to eraser mode when using the Adjustment Brush - ideal for fixing small mistakes without switching tools. Adjust your brush size quickly with [ and ] to decrease or increase it. Want to see your mask overlay? Press O, or use Control + O (Command + O on Mac) to toggle through different mask colors, which is especially helpful in detailed areas. You can even customize shortcuts in Lightroom's preferences to match your editing habits.
Once you've got shortcuts down, dialing in your brush settings is the key to taking your edits to the next level.
Experiment with Brush Settings
Fine-tuning brush settings like edge hardness, flow, and auto-mask can help you make edits that look smooth and natural. The right settings will give you cleaner edges and better transitions in your selective color work.
Best Uses for Selective Color
When used thoughtfully, selective color can transform an average photo into something eye-catching. It’s especially effective in wedding photography (like highlighting a bouquet), nature shots (to bring out vibrant foliage), or urban scenes (such as isolating street art or architectural details). Use it sparingly to make the most impact.
"Selective color photography has been around for ages. It's something that has been used in the movies – Schindler's List and Sin City come to mind." - John Davenport, Digital Photography School
Related video from YouTube
Use Presets.io to Simplify Your Workflow
Editing selective color in Lightroom can feel like a daunting task, but with the right tools, it becomes much more manageable. Presets.io is a fantastic resource that helps simplify the process and provides a solid starting point for your creative edits.
About Presets.io
Presets.io specializes in Lightroom presets designed for a variety of photography styles. Their collections include aesthetic, cinematic, vintage, and film-inspired looks, making it easier to create a consistent foundation for your selective color projects. They also release weekly updates, so you’ll always have something new to try. These presets are perfect for jumpstarting your edits, especially when working on selective color adjustments.
Get Inspired with Presets.io
The wide range of presets available on Presets.io can spark ideas for your selective color projects. With frequent updates, you’ll find plenty of options for portraits, landscapes, and more. Whether you want to highlight subtle tones in a portrait or add dramatic color contrasts to a landscape, there’s a preset that matches your creative vision.
How Presets Enhance Your Workflow
Using presets doesn’t just save time - it also opens up new creative possibilities. Check out the table below to see how Presets.io can improve your editing process:
| Workflow Stage | Without Presets | With Presets.io |
|---|---|---|
| Setup & Color Balance | Adjusting multiple parameters manually | One-click application with pre-set color tones |
| Base Tones | Customizing tone curves from scratch | Ready-made tonal adjustments |
| Fine-tuning | Starting with default settings | Refining pre-optimized settings |
Wrap-Up: Selective Color Made Simple
Quick Recap of the Steps
Creating a selective color effect in Lightroom is a straightforward process that involves five main steps. Start by opening your photo in the Develop module and making initial adjustments. Next, head to the HSL panel to desaturate colors you don't want while keeping your chosen hue intact. Once the base effect is in place, adjust the overall settings to boost contrast and clarity. Use the Adjustment Brush to fine-tune edges and specific areas by carefully desaturating them. Finally, review your edits and export the finished image.
This technique works wonders across different photography styles. Whether it's a red dress in a black-and-white portrait or vibrant autumn leaves in a landscape, selective color helps highlight key elements and creates visually striking results. Now that you understand the basics, here’s how to keep improving.
What to Do Next
To sharpen your selective color skills, focus on practicing with bold, high-contrast scenes like fall landscapes or colorful outfits. Here are a few ideas to help you advance:
- Experiment with various types of images to get a better feel for isolating colors.
- Play around with brush settings to achieve cleaner edges and more precise adjustments.
- Create a personal library of editing techniques that work best for you.
- Connect with online photography groups to showcase your work and gain new insights.
FAQs
Can you do selective color in Lightroom?
Yes, you can achieve selective color effects in Lightroom using two main tools: the HSL panel and the Adjustment Brush. While Lightroom doesn’t use layers like Photoshop, these tools are more than enough for this purpose.
Start with the HSL panel to desaturate all unwanted colors, leaving only your chosen hue. This sets the base for the selective color effect. Then, use the Adjustment Brush to fine-tune specific areas with precision. For smooth and controlled edits, set the brush feather to 50 and flow/density to 100.
This technique is perfect for emphasizing vibrant elements like autumn leaves, bright clothing, or unique features in portraits. To speed up your workflow, try these handy shortcuts:
- Press 'O' to toggle the mask overlay.
- Use 'Control + O' (Windows) or 'Command + O' (Mac) to change the mask overlay color.
With practice, these tools can help you create eye-catching selective color effects in Lightroom.