

Table of Contents
- Non-Destructive Editing in Lightroom Explained
- What is Non-Destructive Editing? Lightroom Classic Tutorial 18
- How Lightroom Implements Non-Destructive Editing
- Benefits of Non-Destructive Editing in Lightroom
- Non-Destructive vs. Destructive Editing: A Comparison
- Practical Tips for Non-Destructive Editing in Lightroom
- Conclusion
- FAQs
Non-Destructive Editing in Lightroom Explained
Non-destructive editing in Lightroom ensures your original image files remain untouched, no matter how many changes you make. Instead of modifying the actual pixels, Lightroom saves your edits as instructions in its catalog. This method allows limitless experimentation with The Master Preset Bundle, easy reversibility, and efficient file management. You can always return to the original or tweak edits later without creating multiple file versions.
Key Benefits:
- Original files stay intact: Edits are stored as metadata, not applied directly to the image.
- Reversible changes: Use the Reset button or History panel to undo adjustments anytime.
- Efficient storage: Virtual Copies let you save different edits without duplicating the file.
- RAW file flexibility: Process RAW images while preserving all original sensor data.
Lightroom achieves this through its catalog system and preview rendering, ensuring edits are applied virtually. When you're ready, exporting creates a new file with your adjustments included, leaving the original untouched.
This approach simplifies workflows, encourages experimentation, and keeps your images safe.
What is Non-Destructive Editing? Lightroom Classic Tutorial 18

sbb-itb-b27063b
How Lightroom Implements Non-Destructive Editing
Lightroom takes non-destructive editing to the next level through its clever use of catalogs and previews. This system ensures your original images remain untouched while allowing you to experiment freely. Here's a closer look at how Lightroom makes this happen.
The Role of Lightroom's Catalog System
At the core of Lightroom's workflow is the catalog - a powerful SQLite database file with a .lrcat extension. While the catalog doesn’t store your actual photos, it holds three essential elements for each imported image: the file's location on your drive, text-based editing instructions, and metadata like keywords and star ratings.
When you make adjustments - say, increasing exposure or altering white balance - Lightroom records these changes as text instructions in the catalog. These instructions are applied virtually, leaving the original file untouched. Adobe explains this process clearly:
"Lightroom Classic never changes the actual photos captured by your camera. In this way, editing in Lightroom Classic is nondestructive." (Adobe)
This system also lets you create multiple Virtual Copies of a photo. Each version has its own set of edits, but none of these require duplicating the original file. This makes it easy to explore different styles or looks without using extra storage.
One key tip: Always manage your photos (move, rename, or delete) through Lightroom's Library module. If you use your computer’s file browser instead, you risk breaking the link between the catalog and the original file, which can cause issues.
The catalog system works hand-in-hand with Lightroom’s preview rendering to give you a seamless editing experience.
Preview Rendering and Exporting
When you edit in Lightroom, you’re not working directly with your original file. Instead, Lightroom generates a preview, applying your edits in real time to a temporary version of the image. These previews are stored in .lrdata folders alongside your catalog file and come in a few varieties:
- Minimal Previews: Quick, basic thumbnails for browsing.
- Standard Previews: Optimized for your monitor’s resolution.
- 1:1 Previews: High-resolution previews for zooming in at 100%.
For even more flexibility, Lightroom offers Smart Previews. These are compressed DNG files resized to 2,560 pixels on the longest edge, allowing you to edit images even when the originals are offline. Smart Previews take up only about 2% of the original file size, making them a lightweight but powerful solution for disconnected workflows.
Your edits only become permanent when you export a photo. During export, Lightroom processes the original file, applies the catalog's stored instructions, and creates a new file (like a JPEG or TIFF) with your edits baked in. This means you can revisit and tweak your edits anytime, even years later.
| Catalog Component | File Type | Purpose |
|---|---|---|
| Database File | .lrcat | Holds metadata, editing instructions, and file paths |
| Previews Folder | .lrdata | Stores rendered thumbnails and previews |
| Smart Previews | .lrdata | Lightweight proxies for offline editing |
| Masks Data | .lrcat-data | Contains AI-generated masking details |
Benefits of Non-Destructive Editing in Lightroom
Lightroom's non-destructive editing system is a game-changer for photographers. It not only protects your original files but also transforms the way you approach editing, offering flexibility, efficiency, and creative freedom.
Reversible and Flexible Edits
One of the biggest perks of non-destructive editing is the ability to revisit and revise your edits anytime. Unlike traditional software, where undo histories vanish once you close a file, Lightroom saves every adjustment - whether it's a tweak to exposure, a crop, or a color shift - as instructions. These aren't permanent changes to the image pixels, so you can refine or remove edits even years later. As Rod Lawton explains:
Non-destructive editing sounds like a no-brainer. This is where your software stores your edits as processing instructions which can be updated, changed or removed at any time.
Lightroom's History panel makes it easy to jump back to any stage of your editing process. If you decide a previous version looked better - or if an experiment goes sideways - you can hit the Reset button in the Develop module to instantly return to the original image. This flexibility encourages a more organized and stress-free workflow.
Simplified File Management
Another standout benefit is how non-destructive editing simplifies file management. Instead of creating multiple versions of an image, Lightroom stores all edits as metadata in its catalog. This keeps your folders clean and saves storage space. Rod Lawton highlights this efficiency:
Non-destructive editing is very space-efficient. You're not creating any new image files, you're just working with the ones you've got.
There's no need for the traditional "Save As" process. Lightroom automatically tracks your edits and only generates a new file when you export a finished JPEG or TIFF for sharing or printing. This streamlined system keeps your workflow organized and lets you focus on creativity.
More Freedom to Experiment
Non-destructive editing also gives you the confidence to experiment. Since your original file is always safe, you can explore bold or unconventional edits without the fear of ruining the image. This freedom encourages creative risks that might lead to unexpected results. As Focus Photo School puts it:
I have no fear because at any point in time, no matter how many buttons I have pushed, I can always hit the big Reset button... and instantly return to my original capture.
Lightroom presets are another tool that makes experimentation easy. You can apply them as starting points for creative looks, tweak their settings, or even remove them entirely without affecting the original image. Many presets include an Amount slider, which lets you control their intensity between 0 and 200. Virtual Copies add even more flexibility, allowing you to create multiple edits of the same photo, compare them side-by-side, and decide which version works best - all without cluttering your storage or complicating your workflow.

The Master Preset Bundle: Volume II

$69.00
$990.00
The Master Preset Bundle Volume II New Looks. More Styles. Even More Creative Control. Get 66 brand-new Presets.io collections in one powerful Volume 2 bundle — crafted to expand your editing range, refresh your workflow, and deliver polished, professional results in… continue reading
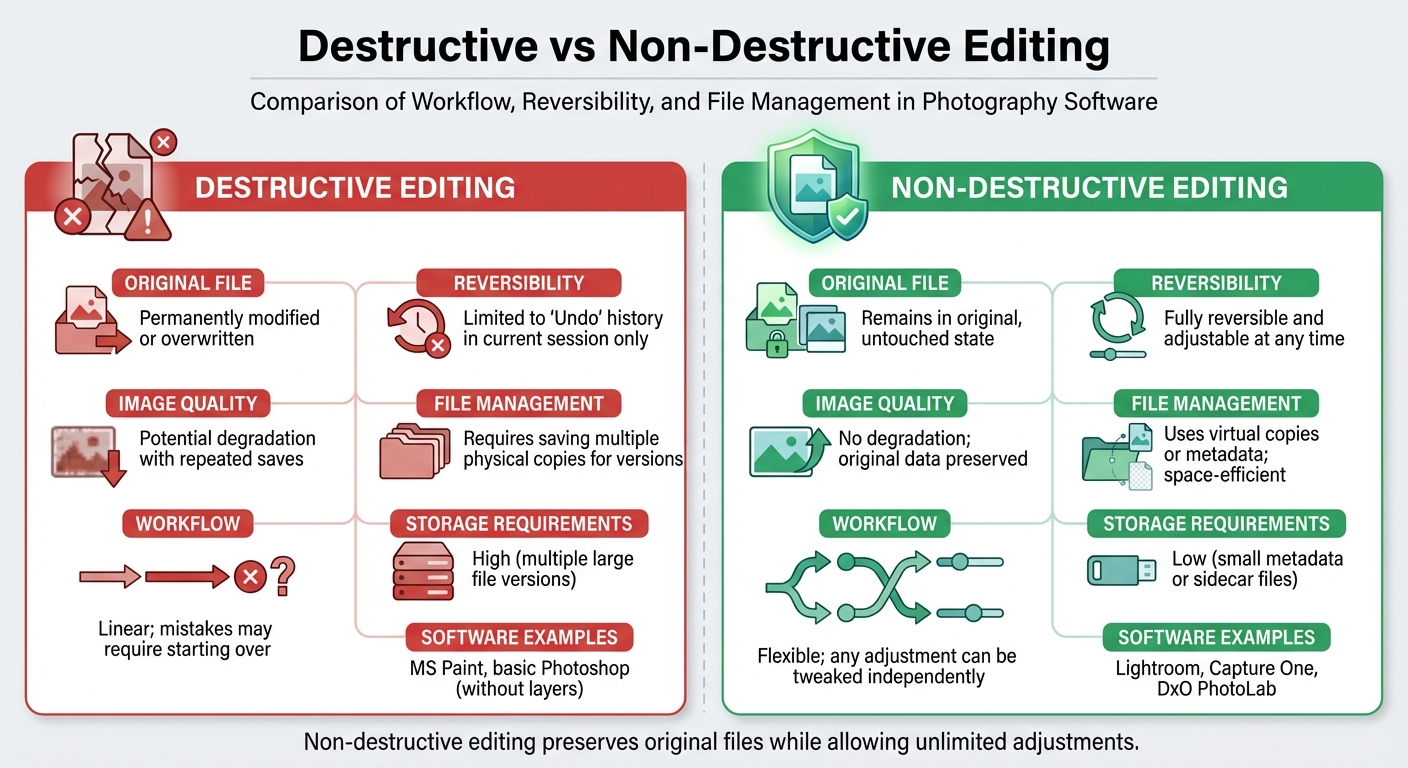
Non-Destructive vs. Destructive Editing: A Comparison
Non-Destructive vs Destructive Photo Editing Comparison
When it comes to photo editing, understanding the difference between destructive and non-destructive editing is crucial. Destructive editing permanently alters the original image file's pixels once saved, unless you've kept a backup. This is where Lightroom's non-destructive editing shines.
Non-destructive editing takes a completely different approach. Instead of modifying the original image data, Lightroom saves editing instructions as metadata. These instructions tell the software how to display your edits without altering the original file. The beauty of this method is that you can revisit, adjust, or even remove edits at any time - whether it's days, months, or years later. This approach not only ensures the original image quality remains intact but also allows for a far more flexible editing process.
On the other hand, destructive editing can lead to quality loss, particularly with formats like JPEG. Every time you save a JPEG after making edits, compression artifacts accumulate, degrading the image over time. Professional photographer Todd Marsh explains:
When you apply edits directly to your pixels, you're permanently burning those changes into the photo. Make a mistake three steps ago? You'll lose data trying to fix it.
In contrast, non-destructive editing safeguards your original file, maintaining full bit-depth precision throughout your workflow.
Comparison Table
Here’s a quick breakdown of the differences between destructive and non-destructive editing:
| Feature | Destructive Editing | Non-Destructive Editing |
|---|---|---|
| Original File | Permanently modified or overwritten | Remains in its original, untouched state |
| Reversibility | Limited to "Undo" history in the current session | Fully reversible and adjustable at any time |
| Image Quality | Potential degradation with repeated saves | No degradation; original data preserved |
| File Management | Requires saving multiple physical copies for versions | Uses virtual copies or metadata; space-efficient |
| Workflow | Linear; mistakes may require starting over | Flexible; any adjustment can be tweaked independently |
| Storage Requirements | High (multiple large file versions) | Low (small metadata or sidecar files) |
| Software Examples | MS Paint, basic Photoshop (without layers) | Lightroom, Capture One, DxO PhotoLab |
One thing to keep in mind is that non-destructive edits often rely on proprietary formats. For instance, edits made in Lightroom may not be compatible with other programs like Capture One. However, despite this limitation, Lightroom's ability to preserve image quality and offer unparalleled editing flexibility makes it a standout choice. The edits only become permanent when you export the file to formats like JPEG or TIFF.
Practical Tips for Non-Destructive Editing in Lightroom
These tips highlight how Lightroom's non-destructive editing can simplify your workflow while giving you creative control.
Using Presets for Non-Destructive Adjustments
Lightroom presets are a powerful way to streamline your editing process without altering your original files. These presets are essentially saved settings that adjust elements like exposure, contrast, and color grading. Jasmin Jade, Founder of Embrace Presets, explains:
A Lightroom preset is a saved set of develop settings you can apply to any photo to get a consistent starting point... Presets do not flatten or permanently change your file.
Manually editing a photo can take 5–10 minutes, but presets can cut this down to just 1–2 minutes, making them a huge time-saver when working with large batches of photos. Plus, every adjustment you make with a preset is reversible. If a preset feels too intense, you can adjust its strength using the Amount slider, which ranges from 0 to 200, instead of tweaking each individual setting.
For best results, set the white balance first using the eyedropper tool on a neutral area before applying a preset. You can also combine presets with Profiles to create more layered effects. Profiles act as a base - similar to film looks - and don’t move any sliders, so you can stack presets on top while keeping everything adjustable. Adaptive Presets take this further by targeting specific areas like skies, subjects, or backgrounds, allowing for precise local adjustments.
If you’re looking for inspiration, Presets.io offers a variety of Lightroom presets, from cinematic to vintage styles, to help refine your workflow. You can even create custom presets from your own edits to save time on future projects or explore new collections weekly to keep your editing process fresh.
Lightroom’s presets not only speed things up but also ensure your editing remains consistent and flexible across all your devices.
Saving and Syncing Edits Across Devices
One of Lightroom's standout features is its ability to sync edits across desktop, mobile, and web platforms. Any changes you make on one device are fully editable on another, enabling a seamless non-destructive workflow no matter where you are. This feature is especially handy for photographers who may start editing on a desktop and later fine-tune their work on a phone.
To keep your favorite presets close at hand on mobile, simply click the star icon on the presets you use most often. These will automatically sync to the Favorites group in Lightroom on your mobile device. However, note that while edits and favorites sync across devices, the visibility settings for specific preset groups are device-specific and won’t carry over.
For batch editing, Lightroom offers tools like the Sync command (Command+Shift+S on Mac, Control+Shift+S on Windows) to apply edits to multiple photos at once. You can also enable Auto Sync to apply changes simultaneously to all selected images. To ensure your workflow remains consistent, you can export your custom presets as XMP files for backup or sharing.
With these tools, Lightroom makes it easy to maintain a smooth and efficient editing process, whether you’re working on a single photo or an entire gallery.
Conclusion
Lightroom's non-destructive editing system is a game-changer for photographers. Instead of altering the actual pixels in your images, Lightroom saves adjustments as metadata instructions. This means you can experiment as much as you like without ever touching your original files.
To make this even better, tools like the Reset button, History panel, and Virtual Copies give you the freedom to backtrack or try out new ideas. Whether you're working with RAW files or JPEGs, every adjustment stays reversible until you export the final version.
Presets add another layer of convenience. They allow you to apply complex edits with a single click, and since they're non-destructive, you can easily tweak their intensity using the Amount slider. For those wanting to expand their collection, Presets.io offers a variety of styles, from cinematic to vintage, with new options added every week.
With Lightroom, you can push your creative boundaries while keeping your original images intact. It’s a tool that truly lets you edit without limits.
FAQs
Where are my Lightroom edits actually stored?
When you edit photos in Lightroom, your changes are saved in the catalog and, if needed, in sidecar files. Because Lightroom uses non-destructive editing, your original images stay completely intact. Edits are stored as metadata and settings in the catalog, allowing you to apply or undo adjustments at any time without affecting the original file.
What happens if I move or rename photos outside Lightroom?
If you move or rename photos outside of Lightroom, the software loses track of their location. This leads to missing files, often indicated by question mark icons or "Photo is missing" messages. To resolve this, you’ll need to update Lightroom’s catalog so it matches the new file paths.
Will exporting overwrite my original photo?
When you export a photo in Lightroom, it creates a completely new file while leaving your original photo intact. This is thanks to Lightroom’s non-destructive editing system, which keeps your edits stored separately from the original image. This way, you can create multiple versions of your photo without ever altering the original file.