
Table of Contents
Ultimate Guide to Wildlife Color Grading in Lightroom
Wildlife color grading in Lightroom transforms raw images into striking photos by refining colors, tones, and contrast. This process highlights details like fur and feathers while maintaining natural tones. Here's the workflow in a nutshell:
- Start with White Balance and Exposure: Set a neutral white balance, adjust shadows and highlights, and use masking tools for uneven lighting.
- Add Contrast with Tone Curves: Use an S-curve to enhance depth and balance tones without losing detail.
- Fine-Tune Colors: The HSL panel and Color Grading tools help refine hues, making subjects stand out while keeping backgrounds balanced.
- Use Local Adjustments: Tools like the Adjustment Brush and AI-powered masking isolate subjects or soften distracting elements.
- Manage Noise and Sharpening: Reduce noise first, then use the Texture slider for subtle detail enhancement.
Presets save time, offering one-click adjustments for consistent edits. Tailor them to suit lighting and textures, ensuring each shot remains visually appealing yet natural. Tools like Presets.io provide collections specifically designed for wildlife photography, from cinematic tones to vibrant colors.
This guide covers essential techniques and advanced tips for creating polished, professional wildlife photos in Lightroom.
5-Step Wildlife Color Grading Workflow in Lightroom
How to Edit your WILDLIFE Photos in Lightroom Classic!

sbb-itb-b27063b
Step-by-Step Workflow for Wildlife Color Grading
Building on earlier challenges, this guide walks you through a workflow designed to enhance the natural beauty of wildlife images. The process involves adjusting white balance and exposure, refining contrast with tone curves, and fine-tuning individual colors for a polished, vibrant result.
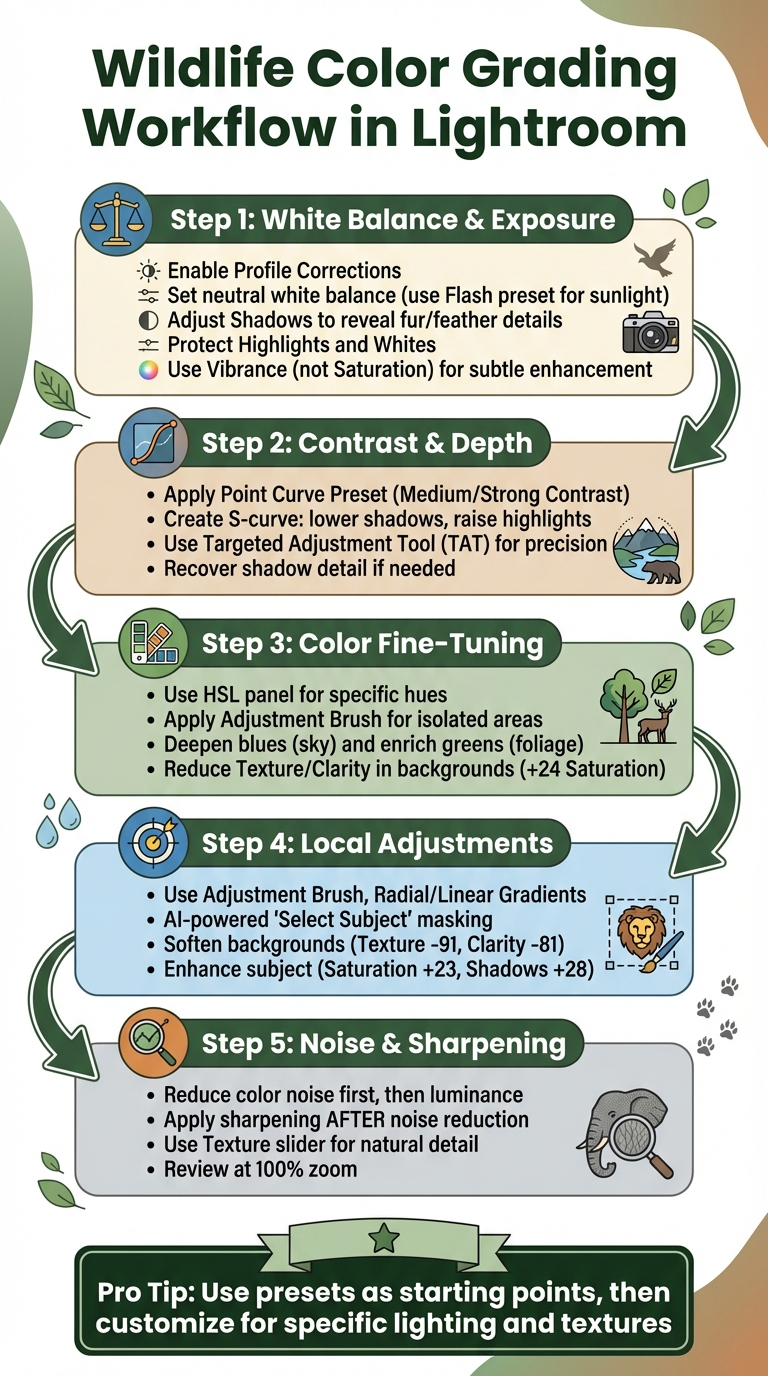
Step 1: Adjusting White Balance and Exposure
White balance is where it all starts - it sets the stage for how colors will appear throughout your image. Begin by enabling Profile Corrections in the Lens Corrections panel. This step removes vignetting and distortion, ensuring these issues don’t interfere with how you perceive the image’s exposure. Set a neutral white balance for a clean foundation.
For wildlife photos taken in full sunlight, the Flash white balance preset often produces more neutral tones compared to Daylight, avoiding unwanted green or magenta casts. If your subject is lit unevenly - sunlit on one side and shaded on the other - use the Masking panel with linear or radial gradients to apply different white balance settings to specific areas. As Gareth Evans from Park Cameras explains:
When you stop treating white balance as a simple correction and start using it with masks, you gain precise control over how color moves across the frame.
Next, focus on exposure. Wildlife images often feature subjects in sidelight or deep shade, so increase Shadows to bring out details in fur, feathers, or scales while keeping the subject’s natural look intact. Use the Highlights and Whites sliders to protect bright areas, like plumage or fur, from losing texture. To establish a natural range of contrast, set your black and white points using the Whites and Blacks sliders. Finally, use the Vibrance slider (instead of Saturation) to subtly enhance muted tones like shaded oranges or soft blues without overdoing it.
Once the white balance and exposure are balanced, you’re ready to enhance contrast for added depth.
Step 2: Adding Contrast and Depth with Tone Curves
The Tone Curve is your go-to tool for controlling tonal ranges and adding depth without compromising detail. John Davenport from PhoGro describes its purpose:
The Tone Curve tool is designed to allow you to modify the various light levels found within an image in a way that will give you greater control over the tonal range and contrast of your photograph.
Start by applying a Point Curve Preset like "Medium Contrast" or "Strong Contrast" to expand the tonal range. Next, create an S-curve by lowering a point in the shadows and raising one in the highlights - this boosts contrast while maintaining tonal balance. For precise adjustments, use the Targeted Adjustment Tool (TAT) to click directly on areas like fur or feathers and tweak their tonal values. If shadows appear too dark after these changes, adjust the Shadows section of the Tone Curve or use the Shadows slider in the Basic panel to recover detail. As Davenport suggests:
In my eyes the tool is designed to be a final adjustment to your images. Need a little extra shadow detail? Pull them down just a hair. Need some stronger highlights? Pull up on the highlights slider just a bit.
With tonal contrast set, you can now refine the colors using the HSL and Color Grading tools.
Step 3: Fine-Tuning Colors with HSL Panel and Color Grading Tools
Once tones are balanced, turn your attention to fine-tuning colors. The HSL panel and Color Grading tools allow you to target specific hues in your wildlife subject and its surroundings. As noted by aaapresets.com:
Vibrance is a more subtle way to enhance colors... it prioritizes skin tones and prevents them from becoming overly saturated. This can be particularly helpful when editing images with animals that have complex fur patterns or unique coloration.
Use the Adjustment Brush to isolate specific areas and adjust color channels. For example, you can deepen blues in the sky or enrich greens in foliage to make the scene feel more immersive. If the background feels too distracting, reduce Texture and Clarity while slightly increasing Saturation (around +24). This approach keeps the colors vibrant while softening unnecessary details.
The Master Preset Bundle: Volume II

$69.00
$990.00
The Master Preset Bundle Volume II New Looks. More Styles. Even More Creative Control. Get 66 brand-new Presets.io collections in one powerful Volume 2 bundle — crafted to expand your editing range, refresh your workflow, and deliver polished, professional results in… continue reading
Advanced Techniques for Precision Wildlife Editing
Once you've got the basics down, it's time to dive into some advanced methods for wildlife photo editing. These techniques give you pinpoint control over details, helping you bring out the best in your subject while managing tricky backgrounds and challenging lighting.
Using Local Adjustments for Targeted Edits
Local adjustment tools like the Adjustment Brush, Radial Gradient, and Linear Gradient allow you to make precise edits to specific parts of your image. By combining masks using "Add" or "Subtract" functions, you can achieve even more control. Photographer Dave Miller highlights this in his approach:
Masking is basically a way to apply selective edits to part of the image without impact other areas... one of the most powerful tools with masking is using what I call compound masks.
For example, in May 2024, Miller demonstrated this with a photo of a Pine Siskin in flight. He used a Radial Gradient behind the bird and applied the Subtract Subject command to brighten the background while leaving the bird untouched. To enhance the scene further, he added a Linear Gradient on the left side, creating a dramatic "flying into darkness" effect.
In busy compositions, the Adjustment Brush can be used to tone down Texture and Clarity in the background, achieving a soft, bokeh-like effect. Fstoppers showcased this in 2021 by editing a honeybee in flight: they reduced Texture to -91 and Clarity to -81 in the background while boosting the bee's saturation by +23 and shadows by +28 to highlight details on its shaded side. This method ensures the subject stands out without distractions.
AI-powered masking tools like "Select Subject" can automatically isolate your subject, allowing you to refine or invert the selection to edit the background instead. For example, Color Range masks are great for enhancing specific hues, like a bird's plumage or fur tones. You can also use Dehaze selectively to restore contrast in subjects shot from a distance or in misty conditions, all while keeping the overall color balance intact.
Once the subject and background are fine-tuned, the next step is to focus on balancing detail and reducing noise effectively.
Balancing Detail and Noise Reduction
After refining local adjustments, it's crucial to manage noise while preserving details, especially in high-ISO wildlife shots. Wildlife photographer Nick Dale stresses the importance of the order in which you apply edits:
Apply sharpening after noise reduction, not before.
Start by reducing color noise in the Detail panel, followed by addressing luminance noise. Tools like AI-based noise reduction and luminance range masks work particularly well for shadowy areas. For sharpening, use the Texture slider to enhance fine details in fur or feathers without adding harsh contrast. Unlike Clarity, which can make midtones look overly sharp and unnatural, Texture preserves a more natural look.
To further refine the image, create a "Select Subject" mask to sharpen your subject while softening the background. This minimizes visible noise in out-of-focus areas, ensuring the subject remains the focal point. Always review your work at 100% zoom to make sure the textures look realistic and lifelike.
These advanced techniques, when combined, can bring a professional polish to your wildlife photos, making your subjects stand out while maintaining a natural feel. For those using different software, Luminar Neo collections offer similar professional-grade enhancements.
Streamlining Your Workflow with Lightroom Presets

When it comes to editing wildlife photography, presets can be a game-changer. They act as a shortcut to consistent edits, especially when you're dealing with hundreds of images from a single shoot. Once you've grasped advanced editing techniques, presets are the next step to simplify your workflow.
How Presets Simplify Wildlife Color Grading
Presets allow you to apply a set of adjustments - like exposure, contrast, saturation, and color grading - with just one click. This is particularly handy for large batches of images, such as sequences of birds in flight or safari shots .
Wildlife-specific presets are designed to enhance details like fur and feathers while maintaining natural tones, such as forest greens or sky blues. Many modern presets come with an Amount slider, letting you control the intensity of the effect (from 0 to 200) . Adobe Sensei AI also steps in with "Recommended Presets", which suggest edits tailored to the content of your photo. This combination of automation and customization significantly speeds up the editing process.
Even better, the workflow is non-destructive, meaning your original image remains untouched as you explore different styles. For those still honing their editing skills, presets created by seasoned professionals offer a solid starting point for achieving polished results .
Customizing Presets for Wildlife Photography
While presets are a great starting point, fine-tuning them is often necessary to adapt to specific lighting and textures. For instance, after applying a preset, you might need to tweak the White Balance to suit the lighting conditions - like the warm tones of golden hour or the cooler hues of shaded forests.
For bright subjects, such as white birds or animals with light-colored fur, adjusting the Highlights slider can help avoid overexposed areas . Adding a touch of Texture brings out intricate details in fur or feathers without making the image look overly sharp. Similarly, tweaking the Shadows and Blacks sliders can help your subject stand out while preserving detail in darker areas. Instead of using Saturation, the Vibrance slider is a better choice for enhancing colors selectively, ensuring natural tones remain intact.
Exploring Presets.io Collections for Wildlife Editing

For those looking to elevate their wildlife photography, Presets.io offers collections designed specifically for this genre. These ready-made adjustments cater to the unique textures and tones found in nature.
The Wildlife Cinematic pack, for example, is perfect for safari shots or storytelling images, offering film-like depth with earthy tones and crisp contrast. If your work involves lush environments, the Nature/Landscape presets enhance greens and blues, blending your subject seamlessly into the backdrop. For vibrant subjects like tropical birds, the Vibrant/Vivid collection brings bold colors and high saturation to life.
| Preset Collection Type | Best For | Key Visual Characteristics |
|---|---|---|
| Wildlife Cinematic | Safari, birds, and storytelling | Film-style depth, natural earth tones, and defined contrast |
| AI-Adaptive | Specific subjects or backgrounds | Uses AI to target subjects, skies, or backgrounds for precise grading |
| Nature/Landscape | Wildlife in scenic environments | Enhances greens and blues while harmonizing the subject with the backdrop |
| Vibrant/Vivid | Tropical birds or lush forests | Bold colors and high saturation to make subjects "pop" |
These presets are available in XMP format for Lightroom Desktop and Camera Raw, as well as DNG format for Lightroom Mobile, ensuring compatibility across devices . High-quality collections also use refined color science to enhance your images while keeping them true to life.
"It's like having a seasoned photographer guide your editing decisions, helping you achieve a polished and professional look for your wildlife photos." - AAA Presets
With over 500,000 downloads and a growing community of 10,000 photographers, Presets.io has become a go-to resource for wildlife photography enthusiasts. Weekly updates and simple installation guides make it easy to dive in and start editing.
Conclusion
Getting the hang of wildlife color grading in Lightroom comes down to having a clear, step-by-step approach. Start with the basics - adjusting white balance, exposure, and tackling noise - before diving into the creative side of color grading. This approach helps you avoid overdoing it and keeps your wildlife shots looking natural and balanced.
Think of your workflow in two parts: Quality and Creativity. First, focus on the technical aspects like noise reduction and sharpness to ensure your image is clean. Once that's done, you can move on to the artistic tweaks, like adjusting tones and colors, to bring your vision to life. This split approach not only makes your edits more predictable but also ensures a polished final result.
Presets can be a huge time-saver here, giving you a consistent look across your portfolio. They’re especially helpful for batch processing, but remember - they’re just a starting point. After applying a preset, fine-tune settings like exposure, highlights, and shadows to match the specific lighting and mood of your shot. This balance between precision and creativity ensures your photos stay both eye-catching and realistic.
"An image is not just about what you saw, but how it made you feel." - Sheen Watkins, Wildlife Photographer and Instructor
For wildlife photographers wanting to simplify their edits, Presets.io offers collections tailored for nature and wildlife photography. Whether you’re after cinematic safari vibes or bold tropical bird tones, their weekly updates make it easy to maintain a cohesive editing style without starting from scratch.
FAQs
What’s the best order to color grade a wildlife photo in Lightroom?
When it comes to color grading wildlife photos in Lightroom, there’s a simple two-step process that works wonders:
- Start with Corrections: Begin by creating a neutral base. This involves applying lens corrections, reducing noise, and selecting appropriate color profiles. If you want to save time, import presets can help automate these initial adjustments.
- Move to Creative Grading: Once the base is set, it’s time to bring the photo to life. Adjust the colors, tweak the contrast, and add stylistic touches to enhance the overall look of the image.
Following this workflow ensures your final photo feels polished and visually striking.
How can I enhance animal fur and feathers while keeping them natural?
To bring out the natural beauty of fur and feathers in Lightroom, focus on using masking tools to target specific areas for adjustments. This allows you to refine details without affecting the entire image. Use the color mixer to carefully tweak hues and enhance vibrancy while preserving the textures and realistic appearance of your subject. Be cautious with saturation - overdoing it can make your edits look unnatural. For the best results, compare your adjustments to the subject’s real-life colors to keep your wildlife photos looking authentic and polished.
When should I use presets vs. manual adjustments for wildlife edits?
Presets are a fantastic way to achieve a cohesive, polished look across multiple images with minimal effort. They’re especially useful when you’re short on time or need to process a batch of photos quickly while maintaining a consistent style.
On the other hand, manual adjustments give you the flexibility to fine-tune details like white balance or contrast. This approach is perfect for making precise edits tailored to unique lighting conditions or specific subjects. Think of presets as the go-to for efficiency, while manual edits are ideal for adding that personal touch to individual images.