
Table of Contents
AI Batch Retouching: Save Time on Portraits
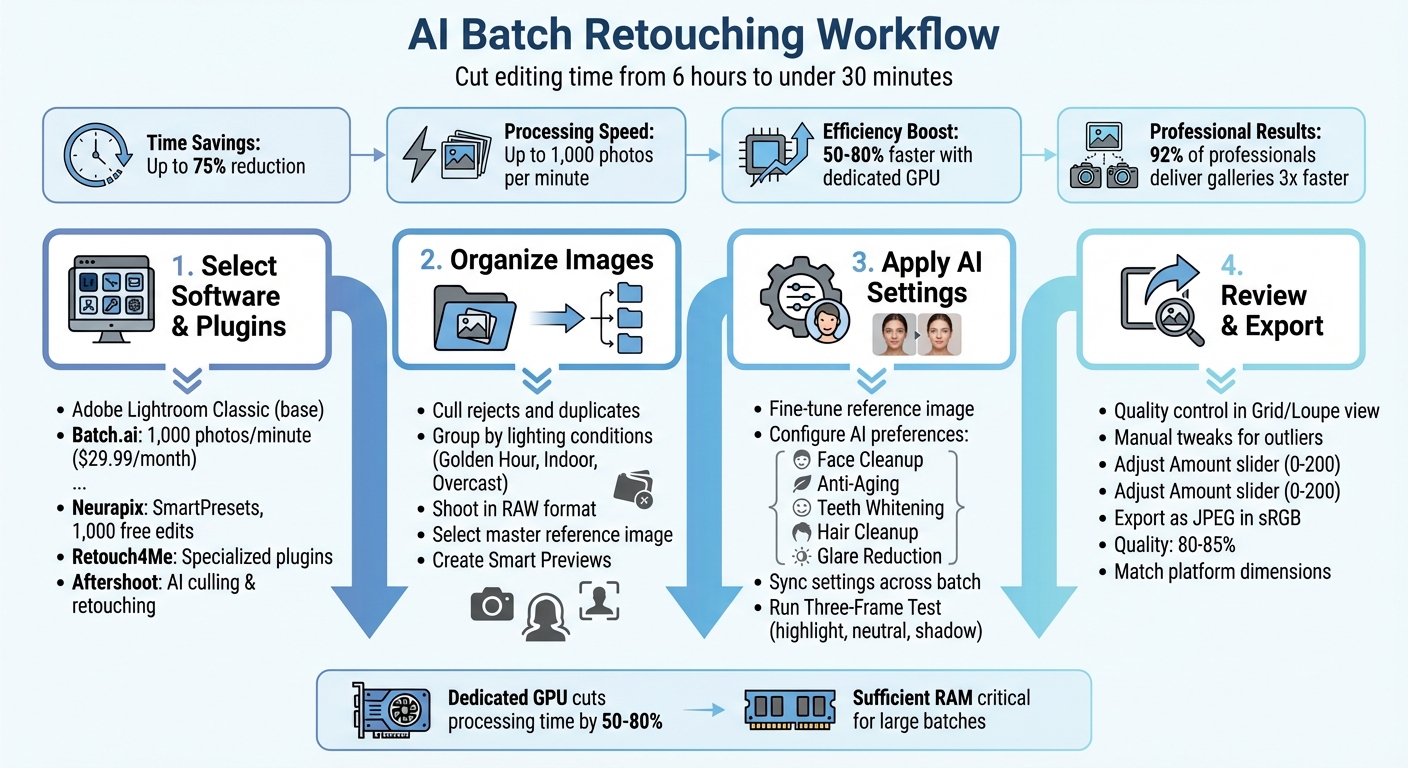
Editing portraits takes time - hours per session. But with AI batch retouching, you can cut that down to under 30 minutes without losing quality. Here's how AI tools streamline your workflow:
- Automated Retouching: AI detects facial features, skin textures, and imperfections, applying natural corrections like blemish removal and skin smoothing across hundreds of images.
- Customizable Adjustments: Fine-tune one "master" image, and AI applies those settings intelligently to the rest.
- Time Savings: Reduce editing time by up to 75%, processing up to 1,000 photos per minute with tools like Batch.ai and Neurapix.
- Hardware Tips: A dedicated GPU and sufficient RAM can speed up processing by 50–80%.
Workflow Overview:
- Select software like Lightroom and plugins (e.g., Retouch4Me, Aftershoot).
- Organize your images by lighting conditions and use a reference image to guide adjustments.
- Apply AI settings, review results, and make minor tweaks for consistency.
- Export optimized files in sRGB for platforms like Instagram and Facebook.
AI simplifies repetitive editing tasks, letting you focus on the artistic aspects of your work. Whether you're a wedding photographer or working on large projects, this method saves time while maintaining professional results.
AI Batch Retouching Workflow: 4-Step Process for Portrait Photographers
Getting Ready for AI Batch Retouching
Selecting Your Software and Plugins
For professional AI batch retouching, Adobe Lightroom Classic is your go-to starting point. But the real magic happens when you integrate plugins. For instance, Batch.ai can process and fine-tune up to 1,000 photos in just about a minute. Meanwhile, Neurapix takes it a step further with its "SmartPresets", which learn your unique editing style and apply it dynamically to large galleries. Unlike traditional presets that only handle around 30% of the final look, these AI-powered tools can automate up to 90% of the process.
If you're looking for specialized tools, Retouch4Me offers plugins for tasks like Heal, Dodge & Burn, Skin Tone adjustments, and Eye enhancements. These can function as standalone apps or integrate seamlessly with Photoshop, Lightroom, or Capture One. On the other hand, Aftershoot focuses on AI-driven culling and retouching presets tailored for face cleanup, hair adjustments, and anti-aging edits. Pricing varies: Batch.ai starts at $29.99 per month for 1,000 photos, while Neurapix provides 1,000 free AI edits for new users.
For smoother and faster processing, a dedicated GPU can cut AI processing time by 50% to 80% compared to relying solely on a CPU. Don’t overlook the importance of having enough RAM, as it plays a critical role in handling large batches. Before diving into high-volume workflows, test your setup with a small batch of 20 RAW images. This will help ensure your system performs well under real-world conditions, as vendor speed claims often assume top-tier hardware setups.
Once your software and hardware are ready, the next step is to organize your images effectively for batch processing.
Organizing Your Portrait Images
A well-organized workflow is essential for efficient batch retouching. Start by culling out rejects and duplicates - this prevents wasting processing time on unnecessary files. In fact, about 92% of professionals using batch presets report delivering photo galleries three times faster than those who don’t.
Organize your images into collections based on lighting conditions, such as "Golden Hour", "Indoor Reception", or "Overcast Outdoor." This helps the AI apply corrections more accurately. Always shoot in RAW to give the AI as much data as possible for exposure and color adjustments. Select a "master" image from each group, edit it to perfection, and use it as a reference to sync settings across the batch. As Shawn Hawkins, Founder and CEO of batch.ai, explains:
"batch.ai processes your LR catalogues based on individual sneak peek and anchor images edited by you"
For handling large volumes, consider generating Smart Previews, increasing your Camera Raw Cache to 20–50 GB, and using descriptive file names (e.g., "01_Portrait_BrightSkin") to keep everything organized and easy to manage. These steps will help ensure a more seamless and efficient workflow.
sbb-itb-b27063b
How to Batch Retouch Portraits with AI
Setting Up AI Retouching Preferences
Start by selecting a reference image that captures the overall lighting, tone, and mood of your photo session. This image will act as your guide for fine-tuning AI adjustments such as blemish removal, wrinkle softening, teeth whitening, face brightening, glare reduction, and hair cleanup. Tools like Aftershoot provide individual sliders for each of these tasks, making it easy to customize.
For group portraits, configure the AI to apply tailored retouching based on categories like Masculine, Feminine, Elderly, or Child. This ensures that every face receives appropriate adjustments while maintaining natural textures and eliminating distractions such as acne or stray hairs. As Team Aftershoot puts it:
"Think of Aftershoot as your first-pass retouching: it handles the repetitive cleanup, then hands files back for creative polish."
– Team Aftershoot
Before applying your settings to an entire batch, run a Three-Frame Test. Test your adjustments on three key images - one with highlights, one neutral, and one with shadows - to ensure consistency. If skin tones appear overly orange, reduce the orange saturation by 5–15 points and adjust the white balance toward a cooler tone. To streamline future sessions, create a personal library of presets with clear names like "Portrait_Base_Warm" or "Portrait_HighKey_Bright."
| AI Preset/Slider | Primary Function | Best Use Case |
|---|---|---|
| Face Cleanup | Removes light blemishes while keeping texture intact | Weddings, family portraits |
| Anti-Aging | Reduces wrinkles and fine lines | Corporate headshots, senior portraits |
| Face Pop | Enhances eyes, teeth, and overall facial clarity | Beauty shots, close-ups |
| Hair Cleanup | Eliminates flyaways and stray hairs | Windy outdoor sessions, bridal portraits |
| Glare Reduction | Minimizes face shine and glasses glare | Indoor events, office headshots |
Once your preferences are set, you’re ready to apply these adjustments across your entire batch.
Starting the Batch Process
After perfecting your reference image, apply the same settings to the rest of your images using the "Sync" or "Paste Settings" command. On Mac, you can use Cmd+C/V, and on Windows, Ctrl+C/V, to speed up this step. When syncing, remember to uncheck options like "Crop" and "Spot Removal" to avoid applying image-specific changes universally.
If you're using tools like Retouch4Me, you can run multiple plugins - such as Heal, Skin Tone, and Eye - simultaneously in the background. This lets you continue working while the software processes your images, simplifying repetitive tasks without sacrificing quality.
Before applying any AI settings, make sure basic exposure and white balance are corrected. AI tools work best with properly lit images. Most batch processes are non-destructive, so you’ll always have the option to fine-tune individual photos later.
Reviewing and Adjusting Results
Once the batch adjustments are complete, go through your images for quality control. Use Loupe and Grid views (press G) and toggle the Before/After mode to ensure textures and exposures look natural across the board. As professional wedding photographer Paul Waring advises:
"Presets are a great starting point, but they might not fit every photo perfectly. After applying one, tweak the settings to refine the final look - especially for exposure or white balance."
– Paul Waring
As you review, look for any outliers - images where lighting or composition caused inconsistent results. Use local adjustment brushes for manual fixes. If a portrait feels over-edited, adjust the Amount slider (which ranges from 0 to 200) to tone down the intensity without resetting individual sliders.
For more complex adjustments, create virtual copies of your images before making heavy edits. AI masks can also be a game-changer, letting you brighten subjects or darken skies across multiple photos at once. This hybrid workflow - AI for foundational edits and tools like Lightroom or Photoshop for creative refinements - can save photographers 70–80% of their editing time.
The Master Preset Bundle: Volume II

$69.00
$990.00
The Master Preset Bundle Volume II New Looks. More Styles. Even More Creative Control. Get 66 brand-new Presets.io collections in one powerful Volume 2 bundle — crafted to expand your editing range, refresh your workflow, and deliver polished, professional results in… continue reading
Using Presets.io Collections for Portrait Enhancement
Explore Presets.io Collections
Once you've tackled the technical edits with AI tools, it's time to add a creative touch to your portraits using presets from Presets.io. This platform offers 56 collections tailored to specific artistic styles, boasting an impressive average rating of 4.8/5 stars from 1,431 reviews. Some standout options include:
- Natural Preset Collection: Perfect for achieving flawless, natural-looking portraits.
- Cinematic Bundle: Packed with 192 presets and LUTs, ideal for adding depth and storytelling elements.
- Vintage Film Bundle: Features authentic retro looks inspired by classics like Kodak Portra and Fuji Film.
With individual collections starting at just $15.00, you can experiment with various styles without breaking the bank. Once you've chosen a collection that matches your aesthetic, seamlessly integrate these presets with your AI-enhanced images to take them to the next level.
Blending Presets.io with AI Tools
After setting the creative tone with Presets.io, it's essential to combine these presets with AI tools for a polished result. The most effective workflow involves applying AI cleanup first, followed by artistic presets. This method ensures your images have a clean, uniform base before diving into creative enhancements.
Here’s how to streamline your process:
- Export your AI-retouched images.
- Import them into Lightroom and select a target photo.
- Apply your chosen Presets.io collection - whether you're going for a cinematic vibe, a vintage feel, or a modern aesthetic.
- Use the Sync command (Ctrl/Cmd + Shift + S) to apply the preset across your gallery for a consistent look.
This hybrid approach can cut a manual 6-hour retouching session down to just 30 minutes.
Keep in mind that presets may behave differently depending on the lighting in each photo. Make minor tweaks to exposure or white balance as needed. To experiment with multiple styles, create virtual copies of your AI-retouched images before applying different presets. This way, your originals remain untouched.
Professional wedding photographer Paul Waring offers this advice:
"Whether you're an established professional or looking to up your game, these tips will help you edit smarter, not harder."
– Paul Waring
Exporting and Sharing Your Retouched Portraits
Best Export Settings for Portraits
Once you've fine-tuned your portraits using AI tools and natural presets, the way you export them can make or break their appearance on social media or in client deliveries. To ensure your work looks its best, export your images as JPEG in sRGB color space. Why? As Joey Kamphuis from The Editing Studio points out:
"Instagram prefers sRGB. If you export in Adobe RGB or ProPhoto RGB, Instagram converts the file automatically, which causes dull colors, slight warmth shifts, and muted saturation."
For quality, aim for a setting between 80–85%. This strikes a balance between keeping the file size manageable and avoiding unnecessary platform re-compression. According to Kamphuis:
"Higher quality files often trigger heavier recompression, not less. 80–85 is the sweet spot."
Also, turn off output sharpening. Many platforms apply their own sharpening, and combining this with your edits can result in an overly processed look.
To ensure your portraits display properly, match the platform’s recommended dimensions and aspect ratios. Here’s a quick guide:
| Platform/Post Type | Recommended Resolution (Long Edge) | Aspect Ratio |
|---|---|---|
| Instagram Vertical | 1080 x 1350 px | 4:5 |
| Instagram Square | 1080 x 1080 px | 1:1 |
| Instagram Stories/Reels | 1080 x 1920 px | 9:16 |
| 2048 px | N/A | |
| X (Twitter) | 2048 px | N/A |
| 1000 x 1500 px | 2:3 |
Sharing Your Retouched Work
After exporting, the way you upload your portraits is just as important as your export settings. Always upload the original exported JPEGs to avoid further compression by the platform. Additionally, manually resizing your images to match the platform’s native dimensions ensures better control over how details like edges and contrast are displayed.
For accurate color viewing, disable blue-light filters like Night Shift on your device. By sticking to sRGB color space, setting quality to 80–85%, and skipping output sharpening, you’ll preserve the integrity of your portraits across all platforms.
How I Batch Retouch Portraits in Minutes | EVOTO AI
Conclusion
AI batch retouching has revolutionized portrait editing, slashing the typical 6-hour editing session to under 30 minutes. Professionals report a 50% or more reduction in total post-production time. By automating tasks like blemish removal, skin smoothing, and flyaway hair cleanup, it allows you to focus on the creative aspects that truly define your style - like color grading and composition.
"You spend your time in Lightroom and Photoshop on the edits that actually require your eye, not on repetitive corrections that AI can handle consistently."
With AI batch taking care of the repetitive groundwork, you’re free to perfect your artistic vision. Pair this efficiency with tools like preset collections to ensure a cohesive and polished aesthetic across hundreds of images. This hybrid workflow is a game-changer for high-volume projects, such as weddings and school portraits, where maintaining a professional and consistent look is crucial.
Curious to see the difference? Try the three-frame method: select one highlight-heavy, one neutral, and one shadow-heavy image. Test AI batch retouching on these, and you'll quickly realize how much time it saves for the creative parts of your work. Start today, and transform how you approach photography by spending less time on repetitive edits and more on what truly matters - your art.
FAQs
Will AI batch retouching make skin look fake?
AI batch retouching has the potential to produce lifelike results when set up thoughtfully. But if the settings are too harsh or improperly adjusted, the skin can end up looking unnatural. The key to success lies in carefully fine-tuning the AI settings to make subtle adjustments that preserve the subject's authentic look.
What computer specs do I need for fast batch retouching?
For quick AI batch retouching, you'll need a setup that can handle the workload efficiently. Aim for a high-performance CPU, such as an Intel Core i7/i9 or AMD Ryzen 7/9, paired with at least 16GB of RAM - though 32GB is better for larger batches. A dedicated GPU, like an NVIDIA GeForce RTX or AMD Radeon RX, is crucial for speeding up processing. Additionally, a fast SSD is a must to minimize loading and saving times. These components work together to keep your workflow smooth and efficient.
How do I keep edits consistent across mixed lighting?
To keep your portraits consistent under mixed lighting conditions, presets can be a game-changer. Begin by perfecting a single reference image - adjusting its color, contrast, and tone to your liking. Once you're happy with it, save those settings as a preset and apply it across all your portraits. This approach ensures a unified look by standardizing elements like color temperature and overall mood. Afterward, you can make small adjustments as needed to ensure each photo feels natural and polished.