
Table of Contents
- Lightroom Texture Tools: Macro Use Cases
- 7 easy macro editing tips for beginners or experts (Lightroom tutorial)
- Case Study 1: Water Droplets on Leaves
- Case Study 2: Surface Details in Macro Landscapes
- Case Study 3: Flower Petals and Plant Structures
- Case Study 4: Smoothing Fur and Fine Hairs
- Using Presets.io for Macro Texture Adjustments
- Summary
- FAQs
Lightroom Texture Tools: Macro Use Cases
Lightroom's Texture slider is a powerful tool for macro photography. It helps refine mid-frequency details like leaf veins, flower petals, or water droplets without adding noise or harsh effects. Unlike Clarity or Sharpening, Texture offers subtle adjustments that enhance fine details while maintaining natural tones.
Key Takeaways:
- Positive Texture: Highlights mid-sized details such as petal veins or water droplets.
- Negative Texture: Smooths distracting backgrounds or softens fur without blurring.
- Local Adjustments: Use the Brush or Radial tools for precise edits on specific areas.
- Presets: Tools like Presets.io save time by applying consistent Texture settings across photos.
Whether you're working with intricate surfaces or soft backgrounds, Texture provides control to make your macro images stand out naturally.
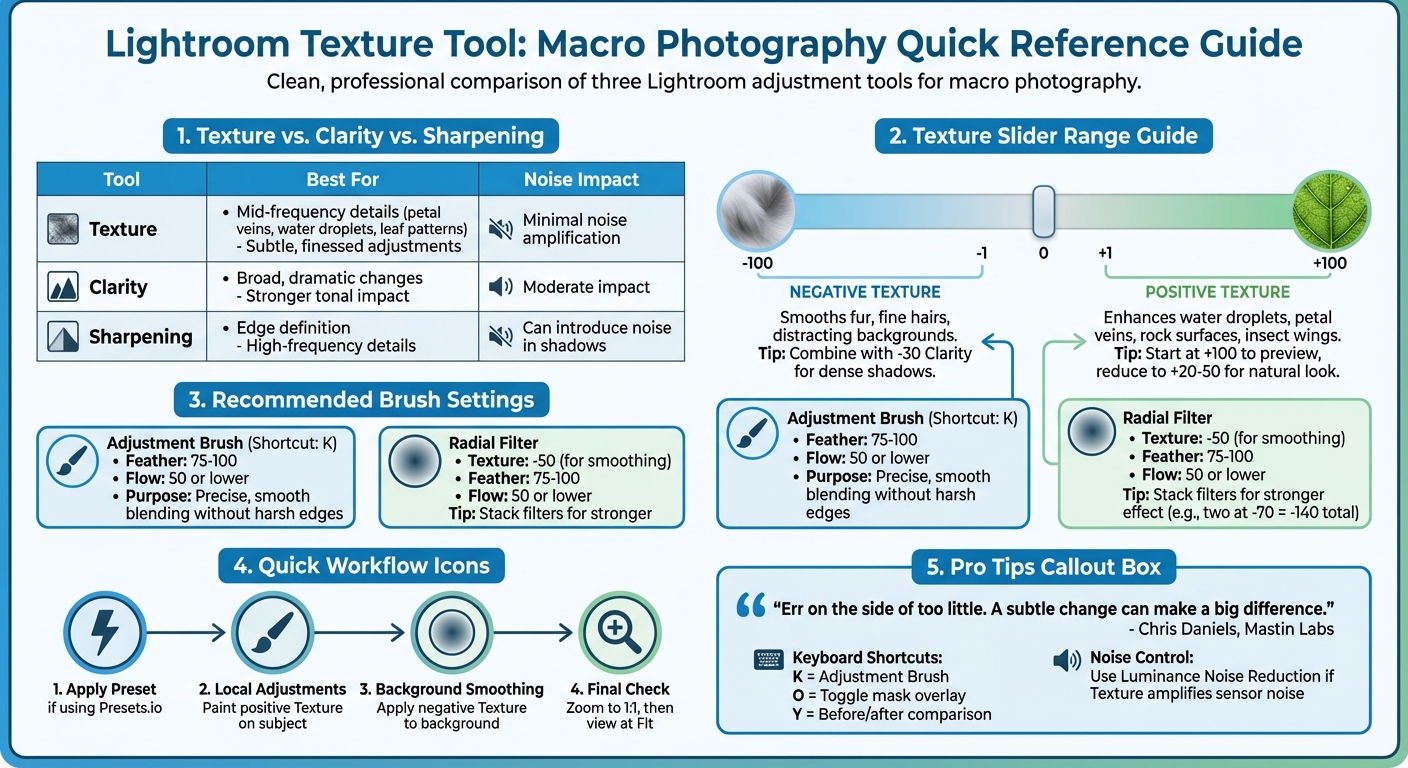
Lightroom Texture vs Clarity vs Sharpening: Macro Photography Comparison Guide
7 easy macro editing tips for beginners or experts (Lightroom tutorial)

sbb-itb-b27063b
Case Study 1: Water Droplets on Leaves
When it comes to macro photography, capturing water droplets on leaves can be tricky. Without the right adjustments, they might look flat and lifeless. This is where the Texture slider becomes a game-changer. It enhances the mid-frequency details - like the subtle refractions and surface tension of droplets - without creating the overly harsh effect often associated with Clarity adjustments.
Step-by-Step Texture Adjustment
The secret to making water droplets stand out lies in selective application. Applying Texture across the whole image can make it look overdone, so it's better to use the Adjustment Brush (shortcut: 'K'). Set the brush Feather to 75–100 and Flow to around 50. These settings ensure smooth blending without harsh edges.
Begin by painting positive Texture directly onto the droplets. You can start with a high value, like +100, to preview the effect, then reduce it to a more natural level. As photographer Chris Daniels recommends:
"Err on the side of too little. As you can see in many of the examples here, a subtle change can make a big difference".
After enhancing the droplets, apply negative Texture to the leaf surface or background. This helps smooth out distracting elements, like micro-textures or "backscatter" - tiny imperfections that can detract from the main subject. Finally, tie these selective tweaks together with some global adjustments to enhance the overall shine.
Combining Texture with Other Adjustments
To make those droplets pop even more, pair positive Texture with slight increases in Contrast and Highlights. Be gentle with these adjustments to maintain the natural sparkle. The specular highlights - those bright, reflective spots - are what give water its dynamic, lifelike quality.
For a cleaner, more dramatic effect, consider desaturating the background colors while boosting the greens or yellows of the leaf. This creates a striking contrast that makes the transparent droplets stand out. Keep in mind, though, that adding Texture can sometimes amplify sensor noise in macro shots. To counter this, use Luminance Noise Reduction to keep the image clean.
Case Study 2: Surface Details in Macro Landscapes
When working with macro landscapes - those intimate close-ups of rocks, moss, and plant surfaces - it's all about bringing out the patterns and textures without making the image feel overdone. These shots require a careful touch to highlight the details while keeping the overall look natural. The Texture slider is a great tool for this job because it focuses on mid-frequency details, like the grain of a rock or the veins of a leaf, without affecting the tonality or giving the image an overly "crunchy" look.
Balancing Texture with Background Blur
To maintain a natural feel, selective adjustments are essential. Applying Texture globally can make the entire photo look overly processed, so it’s better to use local tools. The Adjustment Brush is your best friend here, allowing you to fine-tune specific areas.
- Use positive Texture on the subject, like a rock or plant surface, to enhance mid-frequency details.
- Apply negative Texture to the background, such as blurred water or soft-focus foliage, to deepen the blur and create a stronger contrast between the sharp subject and its surroundings.
As Chris Daniels from Mastin Labs explains:
"The texture tool is much more finessed than its clunky counterpart [Clarity]".
Always double-check your adjustments. Zoom in to 1:1 (100%) to inspect the details, and then view the image at "Fit" to ensure the overall balance remains natural. If you need more than +100 Texture in a specific area, you can stack local adjustments by applying another brush over the same spot. This approach is particularly effective for emphasizing textures on rock and plant surfaces.
Example: Rock and Plant Surface Textures
In May 2019, Max Wendt, a Senior Computer Scientist on the Adobe Camera Raw team, showcased how the Texture tool works wonders on landscape elements. He demonstrated this by applying +100 Texture to a photo of shrubs, which brought out the mid-frequency patterns beautifully. Unlike Sharpening, which introduced noise in the shadowed areas, the Texture adjustment enhanced the shrub details without amplifying noise. Wendt’s findings highlight that Texture is ideal for subtle, detailed enhancements, while Clarity is better suited for broader, more dramatic changes.
However, be mindful that Texture adjustments can sometimes highlight sensor noise, especially in macro photography. If this happens, use the Luminance Noise Reduction slider to clean up the image while keeping the enhanced details intact. This ensures that the textures of rock grains and plant structures stand out without tipping into an unnatural look. The goal is to make those intricate details pop while keeping the overall image balanced and realistic.
Case Study 3: Flower Petals and Plant Structures
Capturing flower petals in macro photography can be tricky. Their delicate veins and textured surfaces, which are visually stunning, often end up looking soft or blending into the background. This is where Lightroom's Texture slider shines. It focuses on medium-sized details - perfect for highlighting the fine structures in petal veins and leaf surfaces - without the overly harsh effect that sometimes comes with using the Clarity tool.
Using the Adjustment Brush for Precision
For detailed edits in flower macro shots, the Adjustment Brush (shortcut: K) is your best friend. Set the Feather to 75–100 and keep the Flow at 50 or lower for greater control over adjustments. Start with a high Texture value (like +100) to see the effect clearly, then ease it back to a more subtle range, such as +20 to +50. Photographer Chris Daniels explains:
"In areas of images where texture already stands out, adding just a little more with the brush and texture tool can be a nice little pop".
Use the "O" key to toggle the mask overlay and "Y" to compare before-and-after views. These fine-tuned adjustments highlight how Lightroom’s Texture slider can bring out the intricate details in macro photography.
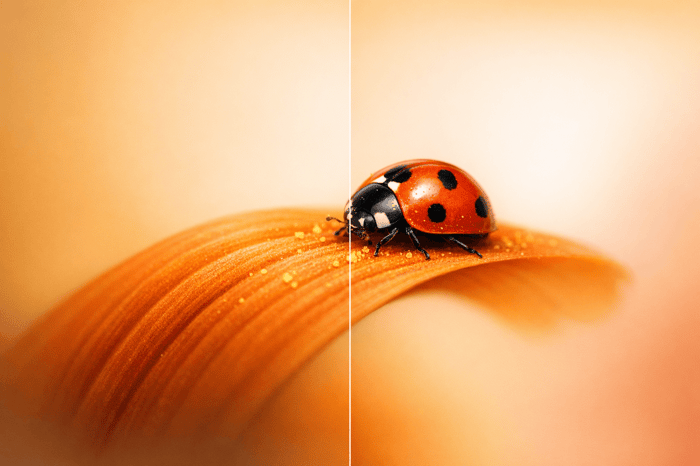
Before-and-After Comparison
Once you’ve made precise local adjustments, comparing the before-and-after images reveals a dramatic improvement. Before using the Texture slider, the petal veins might seem muted, blending into the background. After applying targeted adjustments, those veins become more defined, giving the photo a crisp, detailed look that draws attention to the flower's natural beauty. Photographer Natalia Robert underscores this:
"The texture slider is a new tool in Lightroom and also helps to add crispness and detail to a photograph. Try raising the texture and see if it helps your subject stand out even more!".
The secret lies in subtlety - small, careful adjustments often produce results that feel polished and professional. Overdoing it, on the other hand, can detract from the natural elegance of the subject.
Case Study 4: Smoothing Fur and Fine Hairs
While bringing out texture in macro photography is often the goal, there are times when softening fine details can create a more polished and visually pleasing image. This is especially true with subjects like animal fur, insect hairs, or fuzzy plant structures. In these cases, overly sharp details can dominate the frame and detract from the overall composition. The Texture slider, when used in its negative range (from -1 to -100), provides a controlled way to smooth these details without resorting to traditional blurring techniques.
Negative Texture for Smoothing
Using the Texture slider in the negative range focuses on mid-frequency details - like fur or plant fibers - reducing their harshness while keeping the subject's natural appearance intact. To avoid an overly smooth or artificial look, always review your adjustments at 1:1 zoom before assessing the full image. For areas with dense shadows or thick clumps of fur, combining a moderate negative Texture adjustment with a slight negative Clarity (around -30) can help balance the tonal range and create a more even appearance.
As with other macro photography techniques, blending global and local adjustments ensures you retain the subject's natural details while refining the overall focus of the image.
Using Radial Filters for Local Adjustments
To prevent the entire image from looking overly softened, it’s a good idea to limit the effect to specific areas. Radial Filters are a great tool for this. Set the filter to around -50 Texture, with a Feather of 75–100 and a Flow of 50 or lower, to selectively smooth parts of the frame.
For areas that need extra softening, you can stack local adjustments. For example, applying two Radial Filters at -70 Texture creates a combined effect of -140, offering a stronger smoothing effect. To maintain sharpness in critical details like eyes or key structural edges, use the Brush tool within the local adjustment to erase the effect selectively. This ensures your subject remains sharp and engaging while the softer areas enhance the overall aesthetic.
The Master Preset Bundle: Volume II

$69.00
$990.00
The Master Preset Bundle Volume II New Looks. More Styles. Even More Creative Control. Get 66 brand-new Presets.io collections in one powerful Volume 2 bundle — crafted to expand your editing range, refresh your workflow, and deliver polished, professional results in… continue reading
Using Presets.io for Macro Texture Adjustments

Tweaking the Texture slider for every macro shot can feel like a never-ending task. That’s where texture-enhanced presets, like those from Presets.io, come in handy. These presets offer a quick, one-click solution to apply consistent macro-specific adjustments across an entire series of images. Instead of spending time guessing the right values for Texture, Clarity, and Sharpening, these presets provide a professionally calibrated starting point. They’re perfect for enhancing subjects like flower petals, insect wings, or water droplets. Plus, they work hand-in-hand with the editing techniques mentioned earlier, helping you maintain a cohesive look across all your macro shots.
Benefits of Texture-Enhanced Presets
Using presets simplifies the editing process while delivering polished, consistent results. Unlike manual adjustments, which can be time-intensive, Presets.io is designed to handle large batches efficiently. These presets are tailored for macro photography, enhancing fine details without compromising natural colors or oversaturating your images. They also use non-destructive editing, meaning you can tweak or scale back the effects after applying them. For example, if a preset sharpens background textures too much, you can adjust Vibrance or use local tools to soften specific areas.
"Macro is made to help your close-up photos look sharper, cleaner, and more professional while keeping colors natural and detailed." - AAA Presets
After applying a preset, it’s a good idea to adjust the White Balance to match your lighting conditions for accurate color representation. You can then refine sliders like Texture and Clarity, especially when working with reflective surfaces such as wet leaves or metallic objects.
Installation and Application Guide
Installing Presets.io presets is straightforward, whether you’re using Lightroom on desktop or mobile. The presets come in two formats: XMP files for desktop (Lightroom Classic or CC) and DNG files for mobile (iOS/Android). Both formats are compatible with the free version of Lightroom Mobile.
For desktop installation:
- Open Lightroom and go to the Develop module.
- Click the "+" icon near the Presets panel and select "Import Presets."
- Choose your XMP files, and they’ll appear in your preset list.
For mobile installation:
- Import the DNG files into your Lightroom library.
- Open one of the DNG images, copy its settings, and paste them onto your target photo.
Once installed, applying a preset is as simple as a single click. From there, you can fine-tune settings like exposure and Texture using local adjustment tools. This seamless workflow ensures your macro portfolio maintains a consistent and professional look.
Summary
Lightroom's Texture tool is designed to refine mid-frequency details in macro photography, offering a way to enhance images without overprocessing. As Chris Daniels from Mastin Labs explains:
"The new Texture tool is much more finessed than its clunky counterpart [Clarity]".
Case studies, including examples like water droplets on leaves and the fine hairs of flower petals, highlight the effectiveness of using local adjustments. Tools like the Adjustment Brush or Radial Filters provide better results compared to global sliders. Positive Texture settings bring out intricate details such as leaf veins or insect wings, while negative values smooth backgrounds and surfaces without sacrificing critical fine details.
Achieving natural-looking results requires precision. Applying Texture locally with a high feather (75–100) and a low flow (50 or below) ensures subtle, controlled enhancements. Max Wendt demonstrated how stacking local adjustments - such as applying a Texture brush at -70 twice - can offer even greater control in macro photography.
Streamlined workflows can further elevate editing efficiency. Using Presets.io simplifies the process by offering texture-enhanced presets tailored for macro photography. Instead of manually adjusting Texture, Clarity, and Sharpening for each shot, these presets provide a professional starting point with a single click. Designed to enhance fine details while preserving natural colors, they allow photographers to quickly achieve consistency. Once a preset is applied, local adjustments can be fine-tuned to achieve polished results across an entire portfolio.
Texture works in harmony with Clarity and Sharpening, each tool serving a distinct purpose. As Max Wendt puts it:
"Texture and Clarity are fundamentally different tools, and they each have their own strengths".
FAQs
When should I use Texture instead of Clarity or Sharpening in macro photos?
The Texture tool is perfect for highlighting intricate details and surface textures in macro photography. It offers a way to fine-tune these elements with precision, enhancing the natural look of your subject. Unlike tools like Clarity or Sharpening, which can sometimes create overly intense or harsh effects, Texture allows for more subtle and controlled adjustments. This makes it a go-to option for achieving refined edits without compromising the overall softness or balance of your image.
How can I prevent my macro photos from looking too textured or noisy?
When working on macro photos in Lightroom, it's important to use the Texture slider with care. Start with small tweaks and regularly check the before-and-after views to ensure the image maintains a natural appearance. Pair these adjustments with noise reduction techniques to keep the overall quality intact. The secret lies in making subtle, gradual changes to enhance details without introducing unnecessary noise or over-processing effects.
What’s the fastest way to apply consistent Texture edits across a macro series?
The fastest way to make consistent Texture adjustments in Lightroom is by using presets or copying adjustments. You can create a custom preset with your ideal Texture settings and apply it across your macro photo series. Another option is to fine-tune the Texture on one image, then copy those settings and paste them onto the rest. Both approaches help maintain uniformity and save time when editing multiple images.