
Table of Contents
Ultimate Guide to Ethereal Light Photography
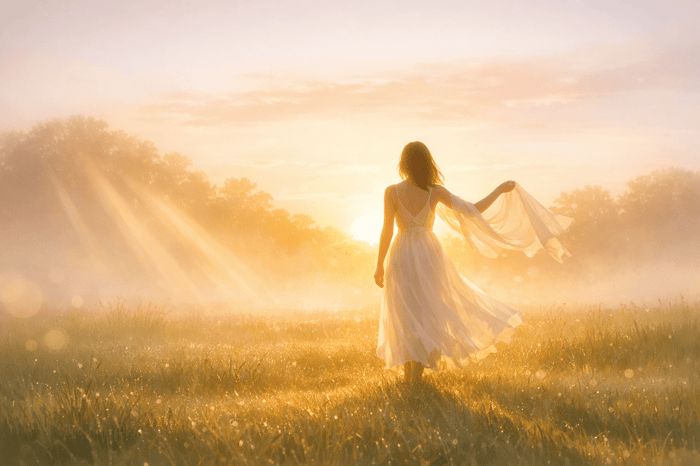
Ethereal light photography transforms ordinary scenes into soft, dreamlike visuals. It focuses on glowing highlights, muted colors, and gentle focus to evoke emotion and atmosphere. This guide covers everything you need to know to achieve this style, from camera settings and lighting techniques to post-processing tips.
Key Takeaways:
- Wide Apertures: Use f/1.4–f/2.8 for a shallow depth of field and soft backgrounds.
- Golden & Blue Hour: Shoot during these times for natural, diffused light.
- Lighting: Backlighting and fog/mist enhance the dreamy effect.
- Post-Processing: Adjust white balance, use negative Dehaze, and apply subtle vignettes to refine the look.
Focus on soft light, pastel tones, and thoughtful editing to create ethereal, otherworldly images.
5 Tips for Creating Ethereal, Dreamy Landscape Photos
To simplify your post-processing, you can also use Light & Airy presets to achieve this look instantly.
sbb-itb-b27063b
Camera Settings for Ethereal Light
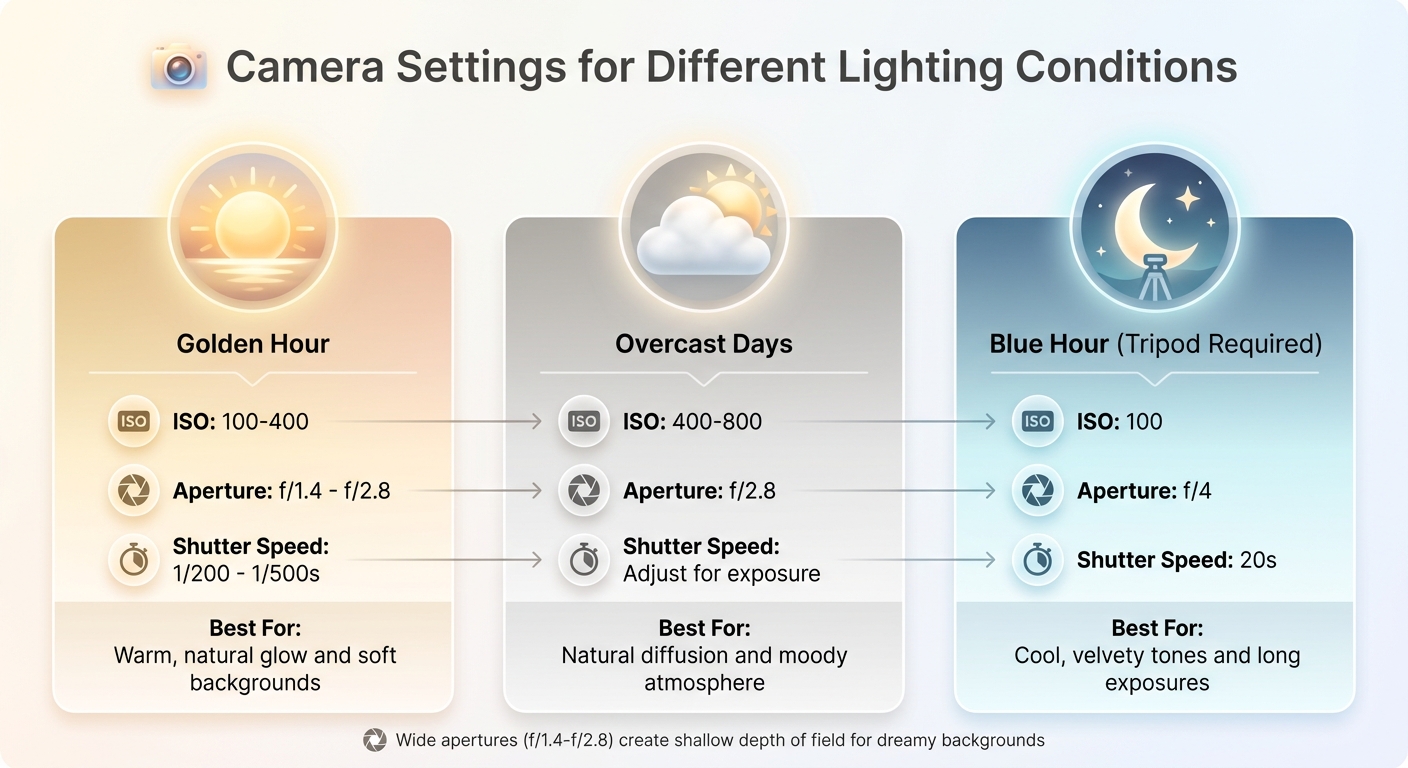
Camera Settings Guide for Ethereal Light Photography by Lighting Condition
Capturing ethereal light in your photos is all about fine-tuning your camera settings to create that dreamy, glowing effect. The key lies in balancing three main settings: aperture, ISO, and shutter speed. Together, they help you achieve a soft, glowing background while keeping your subject sharp and defined.
Wide Apertures for Soft Backgrounds
Your aperture is the star player in achieving the ethereal look. Using a wide aperture - typically between f/1.4 and f/2.8 - creates a shallow depth of field, which softens the background and adds a natural glow to your images. A lower f-number allows more light to enter the lens, giving your photo that signature dreamy effect.
Photographer More Beatty sums it up perfectly:
"Lower f/stop (like f/1.4 – f/2.8) = More blur, dreamier background".
Prime lenses, such as a 50mm f/1.8 or 85mm f/1.8, are excellent choices for this style. If you want even more compression and a stronger background blur, consider using longer focal lengths like 85mm or 135mm. For the best results, place your subject several feet away from the background to enhance the blur effect.
In backlit scenarios, meter for the brightest part of the frame to prevent blown-out highlights. Once your aperture is set, you can adjust ISO and shutter speed to fine-tune the exposure.
Balancing ISO and Shutter Speed
After setting a wide aperture, the next step is to balance ISO and shutter speed for proper exposure. Keep your ISO between 100 and 400 to preserve smooth, clean highlights and avoid introducing grain or noise. This is especially critical for ethereal images, where clarity and softness are key.
Because wide apertures let in a lot of light, you'll often need faster shutter speeds - ranging from 1/500s to 1/4000s - to prevent overexposure, especially when shooting into direct sunlight. If you're shooting handheld during golden hour, a combination of ISO 100–400 and shutter speeds between 1/200s and 1/500s works well.
Here’s a quick reference for common lighting conditions:
| Lighting Condition | ISO | Aperture | Shutter Speed |
|---|---|---|---|
| Golden Hour | 100–400 | f/1.4 – f/2.8 | 1/200 – 1/500s |
| Overcast Days | 400–800 | f/2.8 | Adjust for exposure |
| Blue Hour (Tripod) | 100 | f/4 | 20s |
For long exposures, such as creating misty water effects, use a sturdy tripod and either a remote shutter release or a 2-second timer to avoid any camera shake. Start by opening your aperture to its widest setting to let in as much light as possible, and only increase ISO if absolutely necessary to avoid introducing unwanted grain.
Lighting Techniques for Ethereal Effects
Lighting has the power to elevate a simple photograph into something magical. Whether you're using natural light or artificial setups, knowing how to shape and control light is essential for creating that dreamy, ethereal look.
Shooting During Golden and Blue Hour
Golden hour - just after sunrise or before sunset - offers soft, warm light that’s perfect for ethereal photography. During this time, the sun sits low on the horizon, casting a diffused, golden glow. Photographer Anabel DFlux describes it as:
"The golden hour refers to (roughly) the first hour after sunrise and the last hour before sunset... the light looks soft, warm, and absolutely magical."
To enhance this look, position the sun behind your subject to create a glowing halo effect. Adjust your camera’s white balance to "Cloudy" or "Shade" for warmer tones.
Blue hour, on the other hand, happens just before sunrise and right after sunset. The sky takes on cool, velvety shades of blue and purple, with soft, directional light. As photographer Dena Haines explains:
"Photographers love the blue hour, not least because it provides velvety, stunning, ethereal light."
For this effect, set your white balance to "Tungsten" and underexpose slightly to retain highlight detail. Since exposures are longer during blue hour, a sturdy tripod is essential. Apps like PhotoPills or The Photographer's Ephemeris can help you plan for sunrise and sunset times. Photographer Nick Rufo advises:
"Shooting during these two times of day can be difficult because the sun moves quickly, so if you aren't in the right place at the right time and fully focused, you might miss what you came for."
Don’t forget about overcast skies or foggy weather either. Clouds and mist act as natural diffusers, softening light and creating a moody atmosphere. Check the weather forecast about 24 hours in advance to see if conditions will complement your vision.
If natural light isn’t enough, artificial lighting techniques can help you achieve a similar glow.
Creating Soft Light with Modifiers
To mimic or enhance soft, ethereal light with artificial sources, modifiers are your best friend. The larger the light source relative to your subject, the softer the light will appear. Tools like softboxes, reflective umbrellas, or even DIY diffusers (like white sheets) can help you create an even, gentle glow. Position the light at a 45° angle for flattering results, and use color gels to add warm or cool tones that match your desired mood.
For a dramatic backlit halo effect, place a light source directly behind your subject and shoot toward it. If professional equipment isn’t available, simple DIY solutions - such as translucent shower curtains or tissue paper stretched over a frame - can diffuse light just as effectively.
Adding Atmospheric Elements
Want to take your ethereal photos to the next level? Adding fog, mist, or haze can amplify the dreamy quality by diffusing light and simplifying the background. These elements soften harsh contrasts and create a sense of depth through aerial perspective, where distant objects appear lighter and softer. Photographer Jenn Richardson explains:
"Fog acts like a giant diffuser. It softens light, reduces contrast, and creates atmospheric depth."
Natural fog is most likely to occur during late fall, winter, and early spring, especially when the ground is wet, temperatures are low, and winds are calm. In foggy conditions, you may need to adjust exposure compensation by +0.3 to +1.0 stops to prevent underexposure. Autofocus can struggle in low-contrast scenes, so manual focus or focus peaking is often more reliable. For landscapes, try an aperture between f/8 and f/11 to maintain depth, or use a wider aperture (f/2.8 to f/5.6) to isolate your subject against the mist. To create a smooth, cloud-like effect, experiment with long exposures of 10 to 30 seconds.
If natural fog isn’t an option, artificial fog machines like smokeGENIE, Colorkey Dazzler, or Chauvet Hurricane can produce a controlled haze. For the best results, backlight the fog by placing your light source behind it. This positioning makes the fog "glow" and adds a surreal, otherworldly feel to your images.
Advanced Techniques for Ethereal Light
Once you've got the basics down, these advanced methods can help refine your approach to ethereal photography and take your work to the next level.
Long Exposure with ND Filters
Neutral Density (ND) filters are game-changers for long exposure photography. They cut down the amount of light entering your lens without affecting color, allowing you to use ultra-slow shutter speeds even in broad daylight. This technique is perfect for creating dreamy effects like blurred motion while keeping static elements sharp .
For instance, a 10-stop ND filter (ND1000) reduces light by 1,000 times, enabling exposures that last several minutes . Imagine waterfalls turning into silky ribbons, clouds stretching into soft streaks, or the ocean transforming into a mist-like surface. A 5-second exposure softens waves, while a 30-second exposure can make the sea appear completely smooth. Moving water typically smooths out within 1–8 seconds, while still streams can develop a foggy effect in about 15–20 seconds.
Before attaching the ND filter, set your focus and composition. Switch to manual focus, use a sturdy tripod, and trigger the shutter remotely or with a 2-second timer to minimize camera shake. Apps like PhotoPills or LE Calculator can help you calculate the correct shutter speed once the filter is in place .
| Filter Strength | Stops Reduced | Typical Use Case |
|---|---|---|
| 3‑Stop (ND8) | 3 Stops | Adds slight motion to foregrounds during golden hour |
| 6‑Stop (ND64) | 6 Stops | Overcast days; 1–2 minute exposures for silky water |
| 10‑Stop (ND1000) | 10 Stops | Bright daylight; 2–8 minute exposures for cloud streaks |
| 15‑Stop (ND32000) | 15 Stops | Extreme daylight; 10–30 minute exposures for surreal effects |
As Martino Harly from PolarPro puts it:
"The moment you snap an ND filter onto your camera lens... everything changes... [you] arrive at some awesome whimsical effects."
For an added layer of softness, consider experimenting with diffusion filters.
Using Light Diffusion Filters
Diffusion filters are a fantastic tool for softening the sharpness of digital images. By reducing contrast and creating a subtle bloom around highlights, they deliver a natural, film-like glow . These filters are particularly effective in portrait photography, where they can soften skin tones and reduce the visibility of blemishes directly in-camera.
Filter strengths are usually measured in fractions (like 1/8 or 1/4) or percentages (10%, 20%, etc.). Lower values provide a subtle effect, while higher strengths can sometimes appear overly hazy . A 1/8 filter or 10% diffusion is a great starting point for a timeless, understated look.
Golden hour lighting works beautifully with these filters, adding warmth to your shots. At night, they pair wonderfully with streetlights or neon signs, creating a cinematic atmosphere .
Photographer Rick Bebbington captures it perfectly:
"Modern lenses are almost too good - they resolve everything perfectly, which can make images feel clinical and too real, the opposite of dreamy."
Once you've mastered this technique, try pushing the boundaries by combining images through double exposure.
Double Exposure Techniques
Double exposure photography is an artful way to create surreal and abstract visuals by merging two separate images into one frame . This technique is ideal for adding depth and contrast to your work, such as blending a human profile with clouds or juxtaposing natural elements with urban structures .
For in-camera double exposures, start with a dark subject against a bright background (like a silhouette). The second image will fill the darker areas, creating a controlled yet surreal effect .
When editing, blending modes like "Screen" or "Lighten" can help seamlessly merge images. Tools like Photoshop or Luminar Neo allow for fine-tuning - use a soft brush on a layer mask to reveal or hide specific parts of the overlay, ensuring the focus remains intentional .
Marc Newton, Founder of The School of Photography, emphasizes the creative potential:
"Double exposure photography allows you to juxtapose contrasting scenes, textures, or subjects, resulting in images that can spark curiosity, ignite the imagination or tell a poignant message."
Post-Processing for Ethereal Light
Once you've captured the essence of ethereal light in your photos, post-processing helps refine that dreamlike atmosphere. With the right adjustments, you can transform your raw images into stunning, otherworldly works of art.
Adjusting White Balance
White balance plays a key role in setting the mood of your ethereal photos. By shifting the temperature slider to a range of +40 to +50, you can achieve a warm, golden glow that enhances the dreamy quality of your image.
After setting the white balance, consider using presets to simplify your editing process and maintain a cohesive look across your work.
Luminar Neo Perpetual Desktop Software

$99.50
$119.00
Luminar Neo Perpetual Desktop Software Luminar Neo is a visionary AI-powered photo editor that redefines creativity with cutting-edge technology. Effortlessly achieve studio-quality results with next-gen tools designed to empower and inspire. Harness the power of GenAI to erase distractions, expand… continue reading
Using Presets.io for Faster Editing
Presets can save you time while ensuring consistency in your ethereal photography. Platforms like Presets.io offer collections specifically tailored for soft and airy aesthetics. These presets handle key adjustments automatically, such as:
- Negative Dehaze: Softens sharp edges and introduces a gentle, dreamy blur.
- Color Temperature Shifts: Adds warmth for that signature ethereal glow.
- HSL Adjustments: Enhances specific colors to make them subtly stand out.
Photographer Jason Row highlights the importance of these techniques:
"Using combinations of minus dehaze, exposure, contrast and color temperature you can make any suitable image look other-worldly."
Since reducing Dehaze can brighten your image, presets often include adjustments to lower exposure and boost contrast, ensuring your photo retains depth. Many also apply pre-configured vignettes (around -8) to subtly draw the viewer's eye to the subject.
Once you've applied a preset, fine-tune the exposure and temperature to match your creative vision.
Adding Haze and Glow Effects
To further enhance the ethereal mood, explore haze and glow effects. The Dehaze slider, when used in reverse (negative values), is an excellent tool for softening harsh edges and creating a delicate, hazy ambiance.
For more precision, try the Adjustment Brush with selective masking. This allows you to add haze and warmth to the background while keeping your subject sharp. Use a large brush (50% feather, 75% flow) with Auto Mask enabled to ensure smooth transitions between areas.
The HSL panel is another great tool for refining your image. You can selectively increase the saturation and luminance of specific colors - like the blues in a sky or the pinks in flowers - to make them pop gently without overpowering the soft aesthetic. Finally, applying a slight vignette (around -8) helps center the viewer's attention on your main subject.
| Tool | Adjustment | Effect |
|---|---|---|
| Dehaze Slider | Negative Value (-) | Adds soft haze and reduces harsh edges |
| Temp Slider | Positive Value (+40 to +50) | Creates warmth and a golden glow |
| Adjustment Brush | Selective Application | Isolates subjects while softening backgrounds |
| Vignette | Slight Negative (-8) | Focuses attention on the central subject |
| HSL Panel | Increased Saturation/Luminance | Adds subtle vibrancy to specific colors |
Conclusion
Ethereal light photography thrives on the seamless blend of shooting techniques and thoughtful editing. As photographer Rick Bebbington aptly puts it:
"Dreamy photos = how you shoot + how you edit".
It all starts with your camera settings. Wide apertures (f/1.4 to f/4) create that soft, dreamy background separation, while shooting during golden hour or using backlighting introduces a warm, natural glow. From there, post-processing takes over - adding haze, warmth, and subtle adjustments that elevate a good photo into something truly captivating.
The goal here isn’t technical perfection; it’s about evoking emotion. Hyper-sharp details can feel sterile, so tools like diffusion and selective editing help create a delicate, almost otherworldly feel. Photographer Jenna Bechtholt explains it well:
"The editing is a necessary step to finishing my vision, but it's actually just the final touch".
Presets.io offers a solid foundation with adjustments for softness and color, but achieving the perfect ethereal aesthetic requires personal tweaks - adjusting exposure, temperature, and masking to match your creative vision.
Shooting in RAW is essential for preserving details in highlights and shadows. Combine backlighting, atmospheric elements, and low Clarity and Dehaze values during editing to craft that signature ethereal look. The result? A soft focus, glowing light, and a serene sense of mystery that defines this enchanting style.
FAQs
How do I get glow without blowing highlights?
To achieve a soft, glowing effect without losing highlight details, take a balanced approach during post-processing. Start by slightly lowering the highlights and whites to retain texture and detail. Then, gently increase the exposure or brightness to introduce that dreamy glow. Reducing clarity and texture can amplify this soft look. If you're looking for a shortcut, using presets designed for an ethereal style can streamline the process while keeping the highlights intact.
What lens works best for ethereal portraits?
An 85mm f/1.4 lens is a go-to choice for creating dreamy, ethereal portraits. The wide aperture allows for a beautifully soft and blurred background, making your subject stand out with a magical, almost otherworldly quality. This combination of sharp focus on the subject and creamy bokeh in the background gives your photos a truly captivating feel.
How do I add haze but keep my subject sharp?
To achieve a hazy look while keeping your subject sharp, post-processing tools like Lightroom can be your best friend. Adjusting the tone curve - specifically by lifting the blacks - creates that soft, dreamy haze without losing the crisp details of your subject.
If you prefer an in-camera approach, try placing translucent materials, like chiffon, over your lens. This naturally softens the image while ensuring your subject remains in focus. Striking the right balance between haze and sharpness is key to achieving the desired effect.