
Table of Contents
- Lightroom Presets vs Profiles: Key Differences
- Presets vs. Profiles (Which one should you use?)
- What Are Lightroom Presets?
- What Are Lightroom Profiles?
- Key Differences Between Presets and Profiles
- Pros and Cons of Presets and Profiles
- When to Use Presets vs Profiles
- Managing Presets and Profiles in Lightroom
- Presets and Profiles from Presets.io
- Conclusion
- FAQs
Lightroom Presets vs Profiles: Key Differences
Presets and profiles in Lightroom serve different purposes and can transform your photo editing workflow. Here's the key difference: presets adjust sliders to predefined settings, while profiles apply a visual effect without altering sliders. Both tools save time, but they work in distinct ways.
- Presets: Great for batch editing and consistent styles. They tweak sliders like exposure, contrast, or color settings, and you can further adjust them manually.
- Profiles: Act as a base layer for edits, using advanced 3D LUTs for color grading. They leave sliders untouched, offering full flexibility for manual adjustments.
Quick Highlights:
- Presets are customizable and ideal for learning editing techniques.
- Profiles are faster, non-destructive, and include an intensity slider (0–200%).
Best Use: Combine profiles for a color base and presets for stylistic tweaks to achieve professional results efficiently. If you use other software, you can also find Luminar Neo presets to streamline your workflow.
Presets vs. Profiles (Which one should you use?)
sbb-itb-b27063b
What Are Lightroom Presets?
Lightroom presets are pre-saved collections of editing adjustments (saved as .xmp files) that you can apply to an image with a single click. These adjustments include settings like exposure, contrast, highlights, shadows, and color tweaks - all applied simultaneously.
"A preset is a saved group of photo-editing settings in Adobe Lightroom that transforms your images with just a click of the preset." - REFINED Co
The beauty of presets is that they’re non-destructive and completely customizable. Even after applying a preset, you can still adjust every slider in Lightroom to fine-tune your photo based on its specific lighting and details. This flexibility makes them much more versatile than the fixed filters you might find in social media apps.
How Presets Work
When you use a preset, Lightroom automatically adjusts multiple sliders in the Develop module to predetermined values. For instance, a cinematic preset might tweak exposure, highlights, shadows, and HSL (Hue, Saturation, and Luminance) settings all at once.
"Lightroom Develop Presets are one-click shortcuts to applying Develop/Edit settings. A preset might be as simple as setting exposure, or as complicated as adding a complete look to a photo." - Prolost Store
Modern Lightroom versions even include an Amount slider, allowing you to control how strongly the preset is applied. You can adjust the intensity from 0 to 200, making it easy to dial in the perfect look without manually changing every setting.
Common Uses for Presets
Photographers often use presets to speed up batch editing and ensure consistency across large photo collections. For example, Lightroom's Sync feature allows you to apply the same preset to hundreds of images at once, which is especially helpful for projects like weddings or travel photography where a cohesive look is essential.
Presets are also a go-to choice for creating distinct visual styles. Whether you're aiming for a vintage film aesthetic, dramatic cinematic tones, or clean, bright portraits, presets give you a polished starting point that you can tweak further. Some photographers even set presets to apply automatically during image import, ensuring every photo has a consistent baseline before manual edits.
What Are Lightroom Profiles?
Lightroom profiles act as a starting point for your edits, redefining colors and tones in your images, much like picking a specific film stock for a particular aesthetic.
"One way to think of Lightroom Profiles is as 'virtual film stocks.'" - Prolost Store
What sets profiles apart is that they don't touch your slider settings. Instead, they establish a base look while leaving all the controls in the Develop module - like Exposure, Contrast, Highlights, and Shadows - at zero. This gives you complete freedom to tweak those settings afterward without any overlap or interference.
These profiles can create complex color transformations using advanced tools like RGB curves, gradient maps, and color balance adjustments, which go far beyond what standard Lightroom sliders or presets can achieve.
"Profiles are created using LUTs (3D Look Up Tables) which contain advanced features like RGB curves, color balance, gradient maps, and other adjustments that go far beyond what Lightroom or a preset can do all by itself." - Gayle Vehar, Lightroom Instructor
Many creative profiles also include an Amount slider, allowing you to control their intensity from 0% to 200%. This flexibility makes it easy to experiment and refine their impact on your photos.
How Profiles Work
Profiles work beneath your manual edits, setting the color and tonal foundation before you even touch the sliders. This approach is fundamentally different from presets.
"I like to think of these Creative profiles being applied 'before' the sliders. Moving the sliders doesn't mess up what you applied with your Creative Profile - they are completely separate edits." - Scott Kelby, Author and Photographer
One key advantage is how quickly profiles render changes. Instead of recalculating adjustments for every slider, profiles apply their effects instantly through direct color remapping. This means your workflow stays intact - if you've already adjusted exposure or white balance, applying a profile afterward won't undo those changes. Instead, the profile adds its color foundation beneath your existing edits.
Unlike presets, which adjust multiple parameters at once, profiles provide a consistent starting point, making them ideal for creative customization and precise manual adjustments.
Common Uses for Profiles
Photographers often use profiles to set the tonal and color foundation at the start of their editing process. This ensures consistency across different camera models and establishes the overall mood before diving into finer adjustments.
Camera Matching profiles are especially handy for RAW files, as they replicate the look of your camera's built-in JPEG styles. For instance, you can apply Canon's "Standard" or Nikon's "Vivid" profiles to make your RAW files resemble the JPEGs your camera produces.
In professional workflows, profiles are frequently paired with other adjustments. For example, you might start with a cinematic profile to establish a color grade and then fine-tune exposure and contrast to suit the lighting conditions of each photo. This layered editing approach combines creative consistency with the flexibility to adapt to each image's unique needs.
Key Differences Between Presets and Profiles
Lightroom Presets vs Profiles Comparison Chart
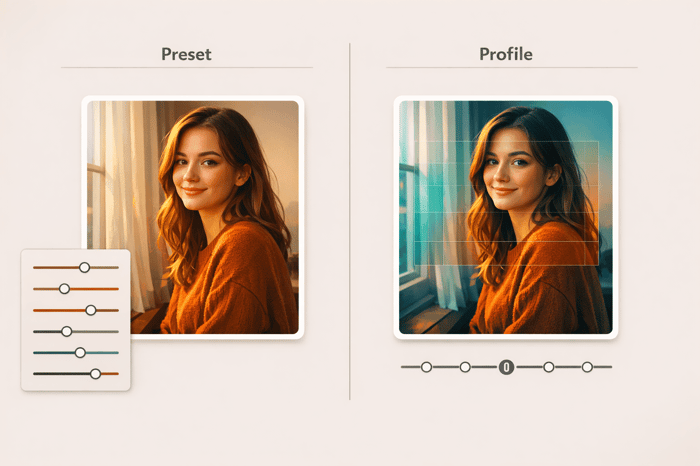
Presets and profiles serve distinct purposes in photo editing, and their differences can significantly impact your workflow. The main contrast lies in how they interact with Lightroom's sliders and the technical methods used to achieve their effects.
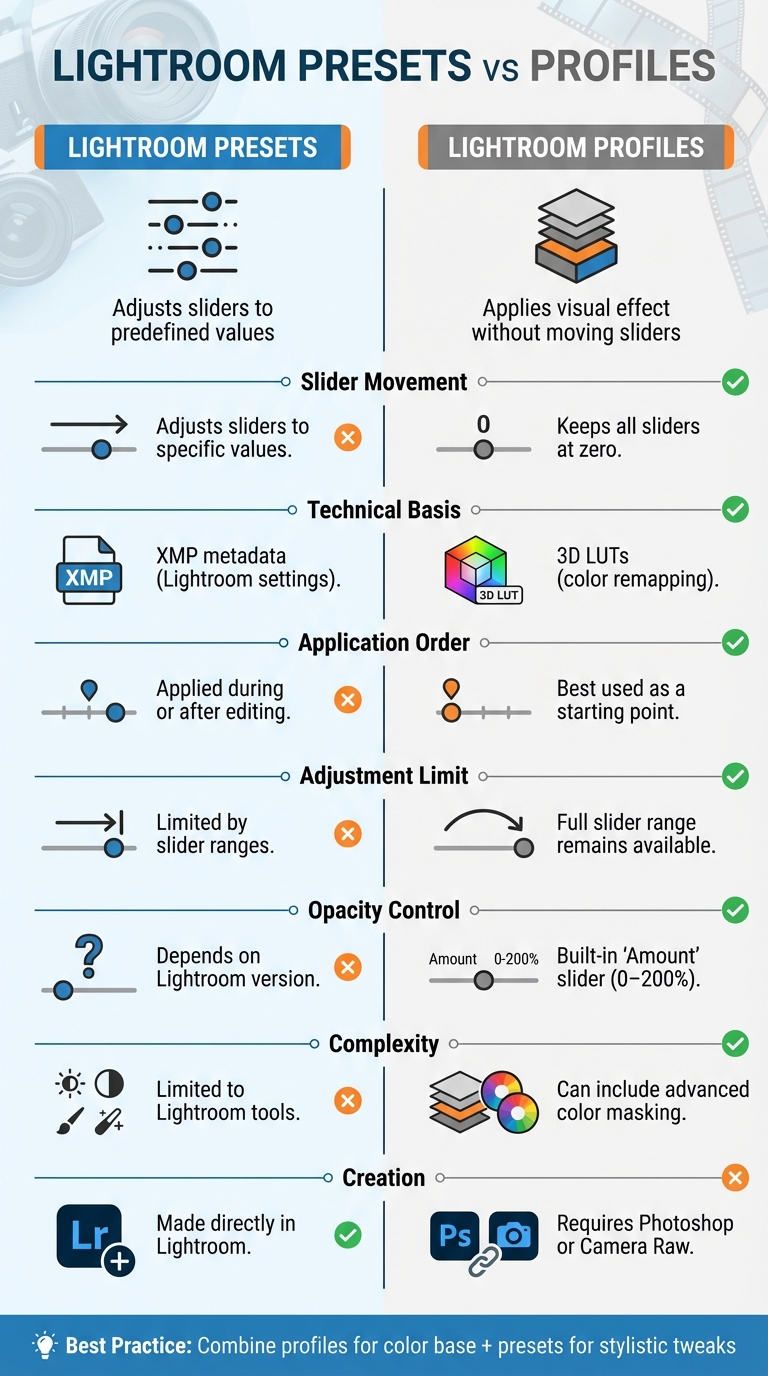
Presets adjust specific develop sliders - like Exposure, Contrast, or HSL - to predefined values. On the other hand, profiles apply a visual transformation without touching any sliders. This means all sliders remain set to zero, offering a unique editing approach.
"Presets move your sliders for you to a 'preset' location... Creative profiles apply this look to your image WITHOUT moving any sliders whatsoever." - Scott Kelby, CEO, KelbyOne
This distinction leads to practical differences in editing flexibility. For example, if a preset sets the Blacks slider to -100, your ability to adjust that slider further is restricted. Profiles, however, work through color remapping, leaving every slider fully adjustable, so you retain complete control over fine-tuning.
From a technical standpoint, presets (saved as XMP files) modify Lightroom settings, while profiles rely on 3D Look Up Tables (LUTs) to remap colors. This makes profiles faster to render and more versatile. Profiles also include an Amount slider (ranging from 0% to 200%), giving you direct control over their intensity, a feature presets typically lack.
Here's a quick comparison to break it down further:
Comparison Table
| Feature | Lightroom Presets | Lightroom Profiles |
|---|---|---|
| Slider Movement | Adjusts sliders to specific values | Keeps all sliders at zero |
| Technical Basis | XMP metadata (Lightroom settings) | 3D LUTs (color remapping) |
| Application Order | Applied during or after editing | Best used as a starting point |
| Adjustment Limit | Limited by slider ranges | Full slider range remains available |
| Opacity Control | Depends on Lightroom version | Built-in "Amount" slider (0–200%) |
| Complexity | Limited to Lightroom tools | Can include advanced color masking |
| Creation | Made directly in Lightroom | Requires Photoshop or Camera Raw |
Grasping these differences is essential to decide which tool fits your editing style and goals. Each has its strengths, but understanding how they work ensures you can make the most of them.
Pros and Cons of Presets and Profiles
Presets and profiles each have their own strengths and weaknesses. Knowing these can help you decide which one suits your editing needs better.
Presets are great for transparency. They show you exactly which sliders have been adjusted and by how much, making them fantastic for learning editing techniques. However, this clarity has its drawbacks. As Janelle Joy, a Private Photo Editor, points out:
"The downside to having the preset use my adjustment sliders is that it can limit how much more I can push those sliders."
When sliders like Blacks are maxed out at -100 or Exposure hits +100, you're left with little room for further adjustments.
Profiles, on the other hand, don’t have this issue. They leave all sliders at zero, giving you full control over edits and faster performance thanks to LUT-based color remapping. Denny, Founder of Denny's Tips, highlights their advantages:
"Lightroom profiles solve the biggest problems with Lightroom presets. They protect your workflow, render super fast… even on a mobile phone, and let you achieve results that were never possible."
However, profiles come with their own challenges. They work like a "black box", where the exact adjustments are hidden, and creating them requires external tools like Photoshop or Camera Raw.
Here's a quick comparison of their pros and cons:
Pros and Cons Table
| Aspect | Lightroom Presets | Lightroom Profiles |
|---|---|---|
| Transparency | High - slider changes are visible | Low - adjustments are hidden |
| Editing Range | Limited by slider boundaries | Full range available |
| Workflow Protection | May overwrite existing adjustments | Non-destructive, preserves settings |
| Intensity Control | Fixed in older versions | Adjustable with Amount slider (0–200%) |
| Performance | Slower - requires multiple calculations | Faster - uses efficient LUT remapping |
| Creation | Simple - can be made in Lightroom | Complex - needs Photoshop or Camera Raw |
| Capabilities | Limited to Lightroom tools | Allows advanced 3D color grading |
| Learning Value | Excellent for studying techniques | Minimal due to hidden adjustments |
When to Use Presets vs Profiles
Deciding between presets and profiles comes down to your editing goals - each serves a unique purpose and can streamline your workflow. While presets adjust sliders to specific values, profiles apply a visual effect without changing any slider settings. Here's how to determine which tool fits your needs best.
Best Times to Use Presets
Presets shine when you want to apply a complete look across multiple photos quickly and consistently. They’re particularly handy for large projects like wedding or portrait sessions, where maintaining a cohesive style across hundreds of images is essential. Photographer Brenda Bergreen explains:
"Presets are a great way to speed up your workflow and gain consistency in your editing whether you're making minor adjustments to all of your photos or using them more heavily in your editing."
Beyond efficiency, presets are an excellent learning resource. They reveal exactly which sliders have been adjusted, helping you understand how professional edits are constructed. As Private Photo Editor Janelle Joy puts it:
"If you are still trying to figure out lightroom and trying to nail down your own editing style, then I would stick with a preset for now. This is because you can really study what the preset is doing to your image..."
Presets are also ideal for achieving specific artistic effects, such as vintage tones, black-and-white conversions, or dramatic landscape enhancements. Since you can see the precise changes made, they allow for easy fine-tuning afterward.
Best Times to Use Profiles
Profiles are perfect when you want to add a stylistic touch without altering your current slider adjustments. Scott Kelby, CEO of KelbyOne, explains their unique advantage:
"I like to think of these Creative profiles being applied 'before' the sliders. Moving the sliders doesn't mess up what you applied with your Creative Profile - they are completely separate edits."
Profiles are the go-to choice for those who prefer full manual control. Since they leave all sliders untouched, you retain maximum flexibility for further adjustments. Additionally, profiles are optimized for speed, especially on mobile devices, thanks to efficient LUT-based processing.
Another benefit is the Amount slider (ranging from 0–200%), which allows you to control the intensity of the effect. For example, you can apply a cinematic grade at just 50% for a subtle look or dial it up for a more dramatic result.
Luminar Neo Perpetual Desktop Software

$99.50
$119.00
Luminar Neo Perpetual Desktop Software Luminar Neo is a visionary AI-powered photo editor that redefines creativity with cutting-edge technology. Effortlessly achieve studio-quality results with next-gen tools designed to empower and inspire. Harness the power of GenAI to erase distractions, expand… continue reading
Managing Presets and Profiles in Lightroom
Importing and Organizing
Getting your presets and profiles into Lightroom is a breeze, no matter the version you're using. In Lightroom Classic, head to File > Import Develop Profiles and Presets, select your zipped folders, and Lightroom will handle the installation automatically. If you prefer a hands-on approach, go to Preferences > Presets and click "Show Lightroom Develop Presets." This opens the storage directory, where you can copy your preset folders directly.
For the cloud-based Lightroom, the process is even simpler. Use File > Import Profiles and Presets, and the software will organize everything for you. Profiles will show up in the Basic panel, while presets will appear in the Presets panel. If you're editing on the go, presets and profiles imported into Lightroom (Cloud) on your desktop sync automatically to your mobile device via Creative Cloud. Android users can also import ZIP files directly through the "Profiles" tab in the mobile app.
Keeping things organized saves time. Mark presets or profiles you frequently use as favorites by clicking the star icon when you hover over them. To declutter your interface, use the "Manage Presets" option in the Presets panel to hide groups you rarely touch. Activating Single-Group Mode collapses other preset groups when you open a new one, keeping your workspace tidy. With everything in order, you’re ready to use your tools more effectively.
Applying and Adjusting
Once your presets and profiles are organized, it’s time to put them to work. Start by applying a profile to set the foundation for your photo. Profiles adjust the color tone without affecting the sliders, making them a great first step. After that, layer on a preset or fine-tune manually for more detailed adjustments. Lightroom instructor Gayle Vehar explains the relationship between profiles and presets:
"Think of Profiles as an advanced and improved preset that can be used independently or combined with presets and/or other slider adjustments to enhance an image even further."
If a preset feels too strong, use the Amount slider (0–200) to adjust its intensity. For batch editing, select multiple photos in Grid view and apply a preset to all of them at once - this creates a consistent look across your gallery. And if you’re always tweaking a particular preset the same way, right-click it and choose Update with Current Settings to save your adjustments as the new default.
Presets and Profiles from Presets.io
Looking to elevate your photo editing game? Presets.io offers a massive selection of presets and profiles tailored for photographers of all skill levels. With over 60,000 users and an impressive 4.8/5-star rating from 1,425 reviews, these tools stand out by starting with custom profile foundations. Each preset begins with a carefully designed profile that sets the color baseline before adding style-specific tweaks. This layered approach offers more creative control compared to standard presets. Incorporating these tools into Lightroom can take your edits to the next level.
The variety here is incredible. For cinematic vibes, you’ll find options like the Movie Preset Collection, Cinematic Light, and Neon Light - ideal for dramatic or urban shots. Prefer a vintage feel? Collections like the Vintage Film Bundle, Kodak Portra, Fuji Film, and Analog bring classic film tones to life. For a softer, polished look, the Aesthetic Collection includes Light & Airy, Minimalist, and Matte Dream presets, perfect for portraits and lifestyle photography.
If you’re looking for the ultimate deal, the Master Preset Bundle offers 604 presets across 56 collections for $57.00 (a combined value of ~$672.00). The Volume II bundle includes 687 fresh presets across 66 collections for $67.00 (normally ~$990.00). Individual collections are priced at $15.00 (usually $27.00), while themed bundles like Cinematic, Aesthetic, and Vintage Film are available for $39.00.
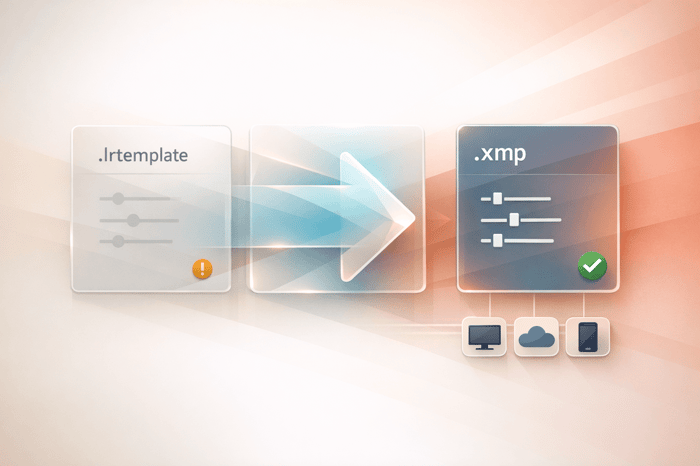
These presets are compatible with LR (Classic, CC, Mobile), Photoshop, Luminar Neo, and Capture One. Desktop versions come in XMP and LRTemplate formats, mobile presets are delivered as DNG files (here is how to import presets to Lightroom on Android), and video LUTs are provided in CUBE format. To keep your creativity flowing, new collections are released weekly.
Conclusion
Understanding the difference between presets and profiles can transform how you use LR. Presets adjust your sliders to achieve a specific look, making them ideal for quick stylistic edits or batch processing. On the other hand, profiles add a base color grade using 3D Look Up Tables (LUTs), giving you a starting point that doesn't interfere with manual adjustments. This distinction allows you to apply a profile for color grading while still having full control over exposure, contrast, and other settings without conflicting with preset adjustments.
"Lightroom profiles solve the biggest problems with Lightroom presets. They protect your workflow, render super fast... even on a mobile phone, and let you achieve results that were never possible." - Denny, Photographer and Tutorial Creator
This separation of functions opens the door to a more efficient and versatile editing process. By combining both tools, you can maximize your control. Start with a profile to establish your color foundation - similar to selecting a virtual film stock - then layer a preset on top for the finishing touches. This workflow not only speeds up editing but also helps maintain consistency throughout your work.
Profiles also come with the Amount slider, which lets you fine-tune their impact (from 0–200%) with ease. Presets, unless specially adapted, don’t offer this level of flexibility. Another advantage of profiles is their faster rendering, as they remap colors directly instead of recalculating multiple slider adjustments - an especially useful feature when editing on mobile devices. This streamlined process ensures you retain full creative control, a key theme emphasized throughout this guide.
Whether you're aiming for cinematic tones, vintage film vibes, or minimalist aesthetics, exploring high-quality tools from Presets.io can elevate your editing game. Use a profile to set your color foundation, add a preset for stylistic flair, and adjust the Amount slider to refine your vision. Together, these tools offer a seamless way to achieve professional results.
FAQs
Will a preset overwrite my edits?
When you use a preset, it replaces your current edits by shifting the sliders to match the preset's settings. That said, you’re not locked in - after applying the preset, you can still fine-tune the adjustments to get the exact look you want.
Can I stack a profile and a preset?
Yes, in Lightroom, you can use both a profile and a preset together. Profiles serve as a base adjustment layer, setting the overall tone or look of your photo. You can then apply presets on top of that for further tweaks and refinements to achieve your desired edit.
Why do profiles feel faster than presets?
Profiles create a sense of speed because they function as a non-destructive, global adjustment layer. Unlike presets, they don’t alter sliders or involve rendering several adjustments, which can demand more system resources. This simplified approach makes profiles a more efficient option for editing.