
Table of Contents
- Lightroom Presets: Importing from Previous Versions
- How To Import Presets Into Lightroom - Full Guide
- Common Problems When Importing Presets from Older Versions
- How to Find and Transfer Presets from Older Versions
- Converting .lrtemplate Files to .xmp Format
- How to Import Presets into Lightroom Classic and Lightroom CC
- Fixing Import Problems
- Conclusion
- FAQs
Lightroom Presets: Importing from Previous Versions
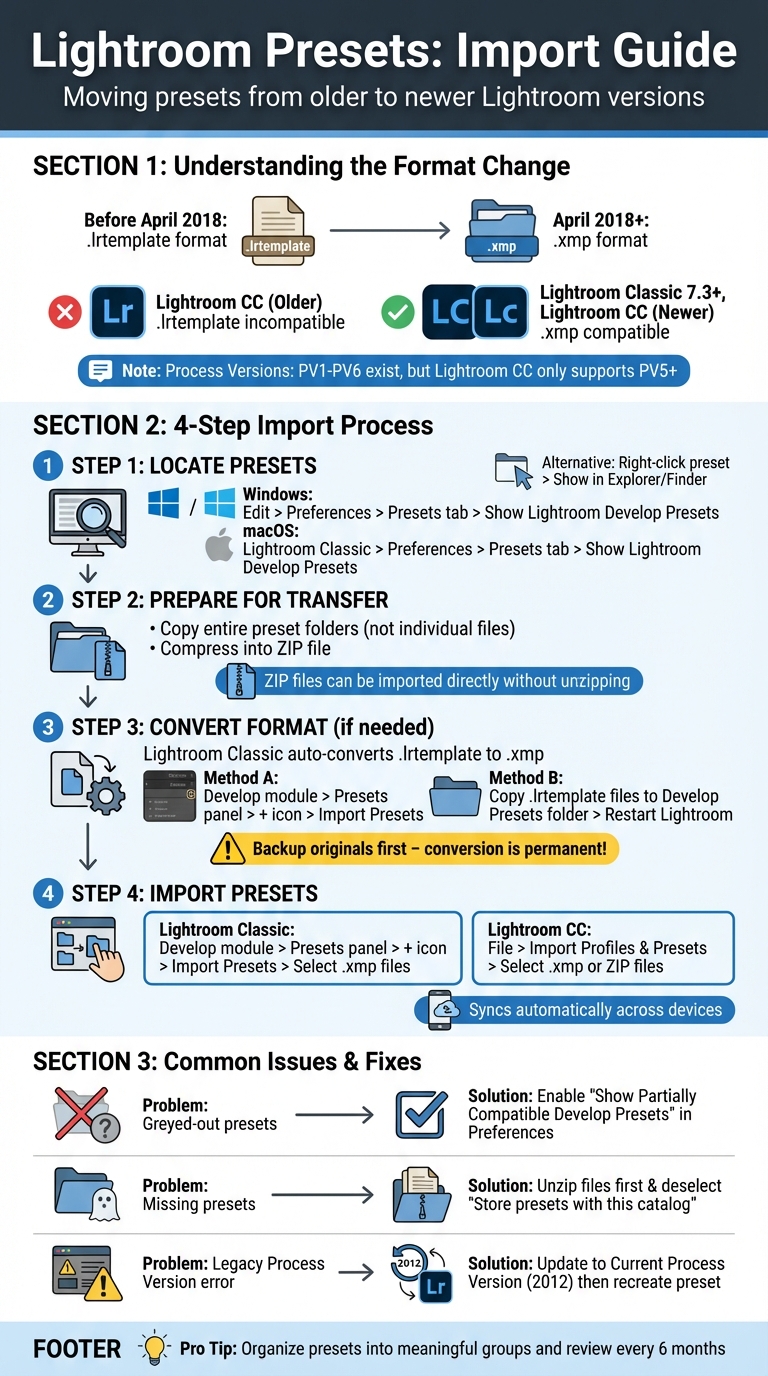
When moving Lightroom presets from older Lightroom versions to newer ones, the main challenge is file format compatibility. Since April 2018, Adobe shifted preset formats from .lrtemplate to .xmp, which sync across devices but are incompatible with older Lightroom versions. Issues like greyed-out Lightroom presets, missing files, or "file cannot be read" errors often stem from this format change or mismatched Process Versions (PV).
Here’s a quick guide to address these problems:
- Locate Presets: Use Lightroom’s Preferences to find preset folders on your computer.
- Convert Old Formats: Lightroom Classic automatically converts
.lrtemplatefiles to.xmpon import. Back up originals before converting. - Import Presets: Use the Develop module in Lightroom Classic or the Import option in Lightroom CC. ZIP files can be imported directly without unzipping.
- Fix Compatibility Issues: Update Lightroom presets using older Process Versions to the latest version (PV5 or newer) for compatibility with Lightroom CC.
Complete Guide to Importing Lightroom Presets from Older Versions
How To Import Presets Into Lightroom - Full Guide
sbb-itb-b27063b
Common Problems When Importing Presets from Older Versions
Bringing Lightroom presets from older Lightroom versions into newer ones can sometimes lead to a few headaches. Here are some common hurdles you might encounter and why they happen.
File Format Incompatibilities
In April 2018, Adobe introduced a major change, switching from the older .lrtemplate format to .xmp files with Lightroom Classic 7.3 and Lightroom CC 1.3. This shift allowed presets to sync across devices. However, older Lightroom versions, like Lightroom 6 and earlier, don’t recognize .xmp files.
If you’re using Lightroom Classic 7.3 or later, the software automatically converts .lrtemplate files to .xmp. But keep in mind, this conversion is permanent, and the updated .xmp files won’t work with older versions of Lightroom.
Presets Not Visible or Greyed Out
Sometimes, Lightroom presets import successfully but don’t show up in your panel - or they appear greyed out. This can happen for a couple of reasons. One common issue is discrepancies between the preset’s internal naming and its folder location. As Adobe Community Legend johnrellis explains:
The displayed name and group of a preset are stored inside the preset's .xmp file, and there is no necessary relation between the filename and containing folder.
Other culprits include improperly extracted files or Lightroom presets categorized incorrectly, making them harder to find.
Process Version Mismatches
Lightroom uses different Process Versions (PVs) to handle how edits are rendered. There are six Process Versions (PV1–PV6). While Lightroom Classic supports all legacy PVs, the cloud-based Lightroom CC only works with Process Version 5 and newer.
If you try to import a preset created with an older processing engine - like PV1, PV2, or PV3 - into Lightroom CC, you’ll likely get a "Legacy Process Version" error, and the import will fail.
Up next, discover how to locate and transfer your Lightroom presets from previous versions.

The Master Preset Bundle: Volume II

$69.00
$990.00
The Master Preset Bundle Volume II New Looks. More Styles. Even More Creative Control. Get 66 brand-new Presets.io collections in one powerful Volume 2 bundle — crafted to expand your editing range, refresh your workflow, and deliver polished, professional results in… continue reading
How to Find and Transfer Presets from Older Versions
Sorting out file locations and transferring Lightroom presets can help address any compatibility issues you might face during the import process.
Locating Preset Files on Your Computer
You can easily find your presets directly within Lightroom. On Windows, go to Edit > Preferences, and on macOS, head to Lightroom Classic > Preferences. From there, click on the Presets tab and select Show Lightroom Develop Presets. This will open the folder containing your Lightroom presets, saving you the hassle of digging through hidden system directories.
Another quick method is to use the Develop module. Right-click on a preset, then select Show in Explorer (Windows) or Show in Finder (macOS) to jump straight to its location.
Here’s a quick reference for preset file paths based on Lightroom versions:
| Lightroom Version | Windows Path | macOS Path |
|---|---|---|
| LR 4, 5, 6 & early Classic | C:\Users[username]\AppData\Roaming\Adobe\Lightroom\Develop Presets | ~/Library/Application Support/Adobe/Lightroom/Develop Presets/ |
| LR Classic (v12+) | C:\Users[username]\AppData\Roaming\Adobe\CameraRaw\Settings | ~/Library/Application Support/Adobe/CameraRaw/Settings |
If you can’t access these paths, make sure hidden folders are visible on your system.
Now that you’ve located your Lightroom presets, the next step is to prepare them for transfer.
Getting Presets Ready for Transfer
To keep things organized and functional, copy entire preset folders instead of just individual files. This approach ensures that your categories remain intact and minimizes the risk of errors during the transfer. Additionally, copying instead of moving files keeps your original Lightroom setup unaffected.
For smoother transfers, compress your preset folders into a ZIP file. Both Lightroom CC and Lightroom Classic support importing ZIP files directly, so you won’t need to unzip them beforehand. This method is also useful if you need to import presets to Lightroom on Android devices. On Windows, right-click the folder and select Send to > Compressed folder, or on macOS, right-click and choose Compress.
Once you’ve copied the ZIP file, transfer it to the new system and restart Lightroom to load the Lightroom presets.
Converting .lrtemplate Files to .xmp Format
If you're running into issues importing your old Lightroom presets, converting them is a must. Thankfully, Lightroom Classic takes care of the .lrtemplate to .xmp conversion automatically - no extra tools required.
Important: This process can't be undone. If you're still using an older standalone version of Lightroom (pre-v7.3), make sure to back up your original .lrtemplate files to an external drive before proceeding.
Here’s a breakdown of two ways to handle the conversion:
Using Lightroom Classic to Convert Presets

Lightroom Classic offers two straightforward ways to convert your old Lightroom presets.
- Through the Develop Module
Open Lightroom Classic and head to the Develop module. On the left sidebar, find the Presets panel. Click the + icon at the top right, then choose Import Presets. Select your .lrtemplate files, click Import, and Lightroom will automatically convert them to .xmp format and add them to your library. - Copying Files Directly
For an even quicker method, copy your .lrtemplate files directly into the Develop Presetsfolder on your hard drive. Then, restart Lightroom Classic. According to Lightroom expert Johan Elzenga:
Once converted, Lightroom will mark the original files by adding a double tilde (~~) to their filenames.Each time that Lightroom starts, it looks for old lrtemplate files that have not yet been converted. So if you place the restored files in the correct folder, they should be converted the next time Lightroom starts.
Other Conversion Options
If Lightroom Classic isn’t available, you can try alternative methods like online converters such as PresetPanda. Another option is to use Adobe Camera Raw, which also converts .lrtemplate files automatically.
For those using Lightroom Mobile, the process is a bit different since the app doesn’t work with .xmp files directly. Instead, you’ll need DNG files with the preset settings embedded. Import the DNG file into Lightroom Mobile, tap the three-dot menu, and choose Create Preset to save the settings. If you purchased presets in the past, it’s worth reaching out to the creator - many offer updated .xmp versions of their older packs through customer portals.
How to Import Presets into Lightroom Classic and Lightroom CC
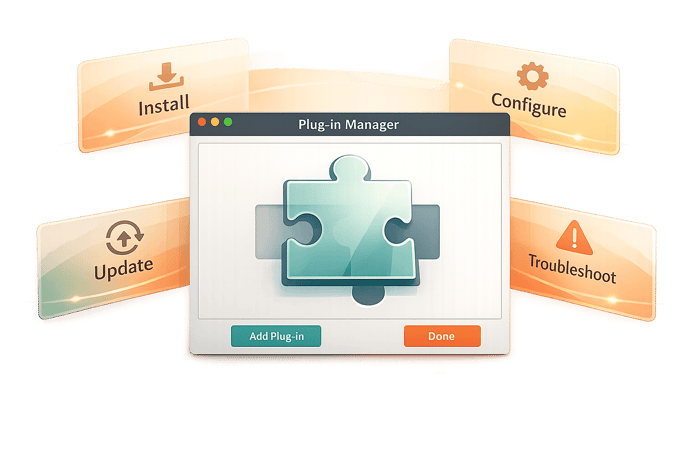
Getting your presets into Lightroom is a simple process once they’re in the .xmp format. While the steps vary slightly between Lightroom Classic and Lightroom CC, both versions make it easy to start using your Lightroom presets. Here’s how to do it for each version.
Importing Presets in Lightroom Classic
Before you begin, make sure to unzip your downloaded preset files. If you’re working with older presets, check the earlier section for converting them to .xmp format. Once ready, open Lightroom Classic and head to the Develop module (presets won’t show up in the Library module). On the left side, in the Presets panel, click the + icon and choose Import Presets. Then, locate your unzipped .xmp files and hit Import.
If you’re importing older .lrtemplate files, Lightroom Classic will automatically convert them for you.
Importing Presets in Lightroom CC and Mobile
Lightroom CC makes the process even easier. On the desktop version, go to File > Import Profiles & Presets. You can import individual .xmp files or entire ZIP files without unzipping - Lightroom CC will handle the extraction for you.
"Any preset that you import into Lightroom on a computer automatically syncs to Lightroom on your mobile devices too, so you can apply the same Lightroom presets to photos no matter where you are."
For mobile-only imports, open an image in Lightroom Mobile, tap Presets, then access the three-dot menu and select Import Presets. Find the downloaded preset or ZIP file on your device, and it’ll install directly. This ensures your Lightroom presets sync across all devices. However, if you’re using the free version of Lightroom Mobile or dealing with older preset formats, you’ll need to rely on the DNG method mentioned earlier.
If you run into any problems during the import process, check the following section for troubleshooting tips.
Fixing Import Problems
When dealing with file format and Process Version issues, these steps can help resolve common import problems in Lightroom.
Fixing Greyed-Out or Missing Presets
If your presets are greyed out or missing, the first thing to check is whether the downloaded files have been unzipped. Lightroom can't read presets stored inside a .zip archive.
To ensure Lightroom presets with minor metadata mismatches (like RAW-only presets applied to JPEGs) are visible, enable "Show Partially Compatible Develop Presets" under Preferences > Presets.
Presets disappearing when switching catalogs? Deselect "Store presets with this catalog" in Preferences > Presets to make them accessible across all catalogs.
For missing local adjustment presets, such as brush settings, use the "Restore Local Adjustment Presets" option in the Presets tab of the Preferences menu. If they still don't appear, restart Lightroom.
Finally, confirm that the preset's Process Version is compatible with your Lightroom version.
Checking Compatibility Across Lightroom Versions
Presets created with older Process Versions might not work seamlessly. To fix this, apply the preset to an image, right-click in the Develop module, and select "Update to Current Process Version (2012)." After updating, recreate the preset. The new version will work in both Lightroom Classic and Lightroom CC.
Also, remember that presets designed for RAW profiles won't apply to JPEG files. Double-check your file type if a preset doesn't seem to work.
Conclusion
Bringing presets from older Lightroom versions into your workflow doesn't have to be a headache. The process is straightforward: unzip the files, check the format (.lrtemplate or .xmp), and follow the correct steps for your version of Lightroom.
"Mastering preset importation is a fundamental step in building a fast, efficient, and creative editing workflow." - Silas, Founder, Flavor365
Once your presets are imported, take the time to organize them into meaningful groups. Instead of dumping everything into one folder, create collections based on styles or creators. Rename presets with clear, descriptive names like "Warm Sunset Glow" instead of generic titles like "Preset 01." It’s also a good idea to review your presets every six months - delete the ones you don’t use to keep your workspace streamlined and clutter-free. These small habits can make editing sessions smoother and more productive.
Whether you're using Lightroom Classic, CC, or Mobile, knowing how to handle file formats and compatibility will ensure your presets work seamlessly across platforms. With these tips, you’ll spend less time troubleshooting and more time crafting beautiful edits.
For a selection of premium presets and step-by-step installation guides, check out Presets.io.
FAQs
Will converting .lrtemplate to .xmp break my old Lightroom setup?
When converting .lrtemplate files to .xmp, your existing Lightroom setup stays intact. Lightroom Classic manages the conversion process effortlessly, and the original .lrtemplate files remain usable with older versions of Lightroom. This means you can keep using your presets as usual, without any complications.
Why are my imported presets greyed out or missing?
If your imported presets appear grayed out or seem to be missing, it could be due to compatibility issues or incorrect import settings. Here’s what to check:
- Compatibility with Lightroom Version: Make sure the presets are designed for the version of Lightroom you're using. Presets from older versions or different platforms (like Lightroom Classic vs. Lightroom CC) may not work seamlessly.
- Correct Import Location: Verify that the presets were imported into the appropriate group or folder within Lightroom.
- "Store Presets with This Catalog" Setting: If this option is enabled, presets may not appear unless they’re stored within the specific catalog you're working on.
Double-check these settings to ensure the presets function as intended. Compatibility is especially crucial when working across different Lightroom versions or platforms.
How can I make legacy presets work in Lightroom CC and Mobile?
To make legacy presets usable in Lightroom CC and Mobile, you’ll need to convert them into a format that works seamlessly. Start by exporting the presets as DNG files from Lightroom Classic or Lightroom CC on your desktop. Once you have the DNG files, transfer them to your mobile device. From there, open Lightroom Mobile, navigate to the Presets menu, and use the "Import Presets" option to bring them in. This process ensures the presets work smoothly across all your devices.