
Table of Contents
Checklist for Editing Landscapes with HDR Presets
Editing landscape photos can be overwhelming, but HDR presets simplify the process by balancing highlights and shadows while enhancing details. Here's a quick guide to get started:
- HDR Presets: These pre-designed tools improve dynamic range, making images look more vibrant and detailed.
- Shooting Tips: Use exposure bracketing with a tripod to capture a wide tonal range. Merge these exposures for a balanced base image.
- Editing Workflow: Apply HDR presets in Lightroom or Photoshop, adjust settings like white balance and shadow details, and use local edits for precision.
- Export Settings: Optimize your final image for web or print with appropriate file formats, resolutions, and sharpening options.
HDR presets save time and create polished results, but starting with high-quality source images is key. Use these steps to transform dull landscapes into stunning visuals.
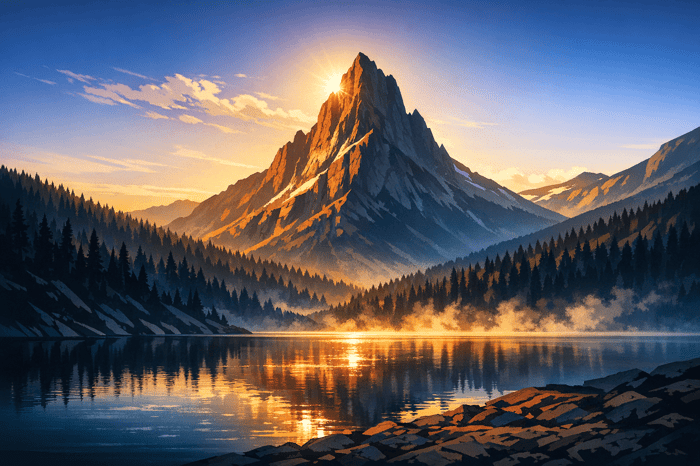
Creating HDR Images in Lightroom - Day 11
sbb-itb-b27063b
Preparing Your Landscape Photos for HDR Presets
Getting your landscape photos ready for HDR presets is all about starting with the right foundation. The quality of your final result hinges on how well you prepare your images beforehand. To make the most of HDR presets, focus on capturing sufficient detail in both highlights and shadows through careful shooting and merging.
Select High-Quality Source Images
Begin by determining if your scene requires bracketing. A good rule of thumb is the "One Stop Rule": if your scene is over or underexposed by more than one stop, bracketing is the way to go. While modern cameras can handle a stop of dynamic range, anything beyond that benefits from bracketing.
To ensure consistency across your shots, always use a tripod. When bracketing, adjust only the shutter speed - keep your aperture and ISO the same to maintain consistent depth of field and noise levels. A typical bracket set includes three exposures: one correctly exposed, one underexposed by 2 stops, and one overexposed by 2 stops.
Minimize camera shake by using a remote shutter release or setting a self-timer. This approach ensures your bracketed shots capture the full tonal range of the scene.
Use Exposure Bracketing When Shooting
The human eye can perceive roughly 21 stops of dynamic range, while even the best digital cameras capture about 16 stops. This gap makes exposure bracketing essential for capturing a scene's full tonal range. By merging bracketed exposures, you can achieve richer colors, better detail in shadows, and more vibrant highlights than you would by trying to recover those areas from a single RAW file.
| Feature | Single Exposure Recovery | Merged HDR Image |
|---|---|---|
| Shadow Detail | Noisy or muddy when lifted | Cleaner shadows with richer details |
| Highlight Detail | Limited recovery in blown areas | Vibrant detail in skies and clouds |
| Color Quality | Desaturation when pushed | Maintains richer, more vibrant colors |
HDR images, saved in 32-bit format, can handle over 4 billion colors compared to the 256 colors in 8-bit images. This expanded data range gives HDR presets more to work with, resulting in more polished and professional edits.
Merge Exposures for a Balanced Base Image
Once you've captured your bracketed shots, the next step is merging them into a single, balanced image. Select your exposures, right-click, and choose Photo Merge > HDR with the "Auto Align" option enabled.
For scenes with movement, like flowing water or drifting clouds, adjust the "Deghost Amount" setting to avoid ghosting artifacts. If your scene was completely static, leave it set to "None". Enable "Auto Settings" to let the software create a neutral, balanced starting point. Click "Merge" to generate your HDR file, which will typically save as a DNG and appear in your catalog, ready for further editing.
"The blended image has much better saturation, richness, and details than the single exposure." - Mark Denney, Landscape Photographer
A flat HDR file may look unimpressive at first glance, but it retains all the details you’ll need for enhancing with HDR presets.
Applying HDR Presets to Landscape Photos
Now that you’ve created a balanced HDR base image, it’s time to take it to the next level with the right preset. This step helps transform your detailed but flat file into a polished landscape photo. Think of it as bridging the gap between your initial adjustments and more advanced editing techniques.
Choose the Right Preset for Your Scene
Lightroom offers a helpful starting point with its AI-driven "Recommended" presets. Found under the "Recommended" tab, these suggestions are tailored to your photo, factoring in elements like lighting, composition, and metadata. It’s a quick way to explore options that align with your scene.
For landscapes featuring striking skies, consider using "Adaptive: Sky" presets. These are designed to enhance the sky without affecting the foreground, keeping the overall image balanced. If the effect feels overdone, simply dial it back using the Amount slider. You can also filter presets by their intensity - opt for "Subtle" for a more natural look or "Strong" for a bolder, high-contrast HDR style.
| Preset Type | Purpose for Landscapes |
|---|---|
| Recommended | AI-driven suggestions based on the photo’s content |
| Adaptive: Sky | Enhances skies while leaving the foreground untouched |
| Adaptive: Landscape | Boosts textures and colors typical in outdoor scenes |
| Premium (Travel/Cinematic) | Adds stylized color grading for specific moods |
Once you’ve chosen a preset, use the "More like this" feature to explore variations that might better fit the scene’s lighting or weather conditions.
The Seasons Bundle

$39.00
$135.00
The Seasonal Bundle brings together a versatile range of Lightroom presets inspired by the shifting tones and textures of the year — from cool, muted winter scenes to rich, golden autumn light. Inside, you’ll find collections like Winter, Gingerbread, Old… continue reading
Adjust Settings After Applying the Preset
Presets are a great starting point, but they rarely deliver perfection without some fine-tuning. Begin by applying lens corrections to remove chromatic aberration and correct distortion - this is especially important for images with a clear horizon. Then, tweak the highlights to avoid overexposing the sky.
"The key is knowing which adjustments actually make a difference. A few simple changes can turn a flat raw file into something that reflects the scene as you remember it." – William Patino
Keep an eye on shadow details to maintain depth and avoid a flat look. Use the white balance color picker on a neutral area to fix any color casts introduced by the preset. For a more dynamic feel, warm up the highlights slightly while cooling down the shadows.
Regularly compare your edits to the original image to ensure the adjustments look natural. Finally, zoom in to 100% resolution to check for sensor dust spots, which can become more noticeable after increasing contrast.
Layer Presets for Custom Effects
Once you’ve nailed the global adjustments, refine your image further with local edits. While presets often overwrite global settings, you can layer effects for a more tailored result. Start by applying a camera profile, like "Portrait" or "Landscape", to adjust the overall look without touching the basic sliders. This gives you a solid foundation for additional tweaks.
Use tools like the adjustment brush to selectively brighten certain areas or darken the sky without affecting the foreground. These local adjustments can add depth and draw attention to key parts of the image. After finalizing your edits, save your custom settings by right-clicking and selecting "Update with Current Settings." This allows you to reuse the same refined HDR look in the future.
For consistency across a series of photos, batch-apply your custom preset to the entire album. This keeps your collection visually cohesive while still allowing room for individual tweaks where needed.
Refining and Polishing the Edited Image
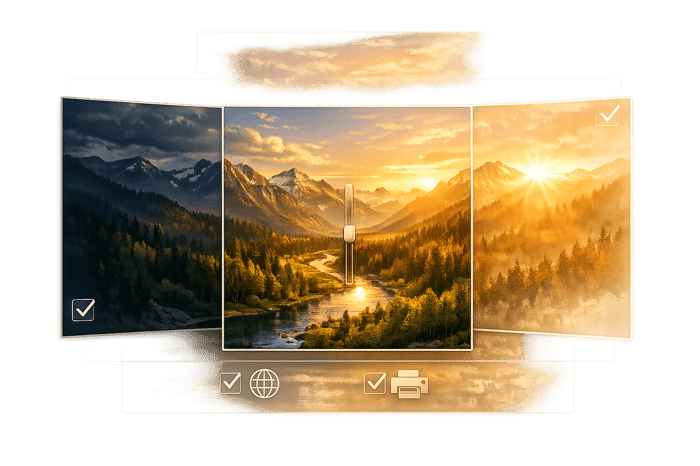
Export Settings Guide for HDR Landscape Photos: Web vs Print
Wrap up your landscape editing process by focusing on the finer details, perfecting colors, and setting up the right export parameters.
Fine-Tune Details and Textures
Before diving into the final tweaks, save a high-resolution master file. This ensures you can make adjustments later without compromising image quality. When refining textures, use the clarity slider with caution - too much can make the image look overly processed. Instead, apply light sharpening to bring out the textures in elements like rocks, foliage, and water.
Zoom in to check how sharpening affects the image. Ensure it enhances textures without introducing unwanted noise. For noise reduction, pay attention to shadow areas, as they often show more grain after exposure adjustments. Sticking to a methodical workflow helps avoid over-editing, which can lead to unnatural results. These steps build on your earlier HDR preset edits, keeping the image balanced and realistic.
Check Color Balance and Consistency
Once textures are polished, shift your attention to color balance. Use AI-powered masks to handle the sky and foreground separately, adding depth without creating an artificial HDR feel. After applying presets, tweak individual colors manually if they seem too intense. The white balance tool is particularly useful - sample neutral areas like clouds or rocks to fix any color casts.
Start by adjusting the overall exposure and tone, then refine specific colors. If you captured the shot during golden or blue hour, presets tailored to those lighting conditions can help you maintain a natural look. Always compare your edited version to the original image to ensure the colors stay true to life. This approach complements your preset adjustments, ensuring the image retains its authenticity.
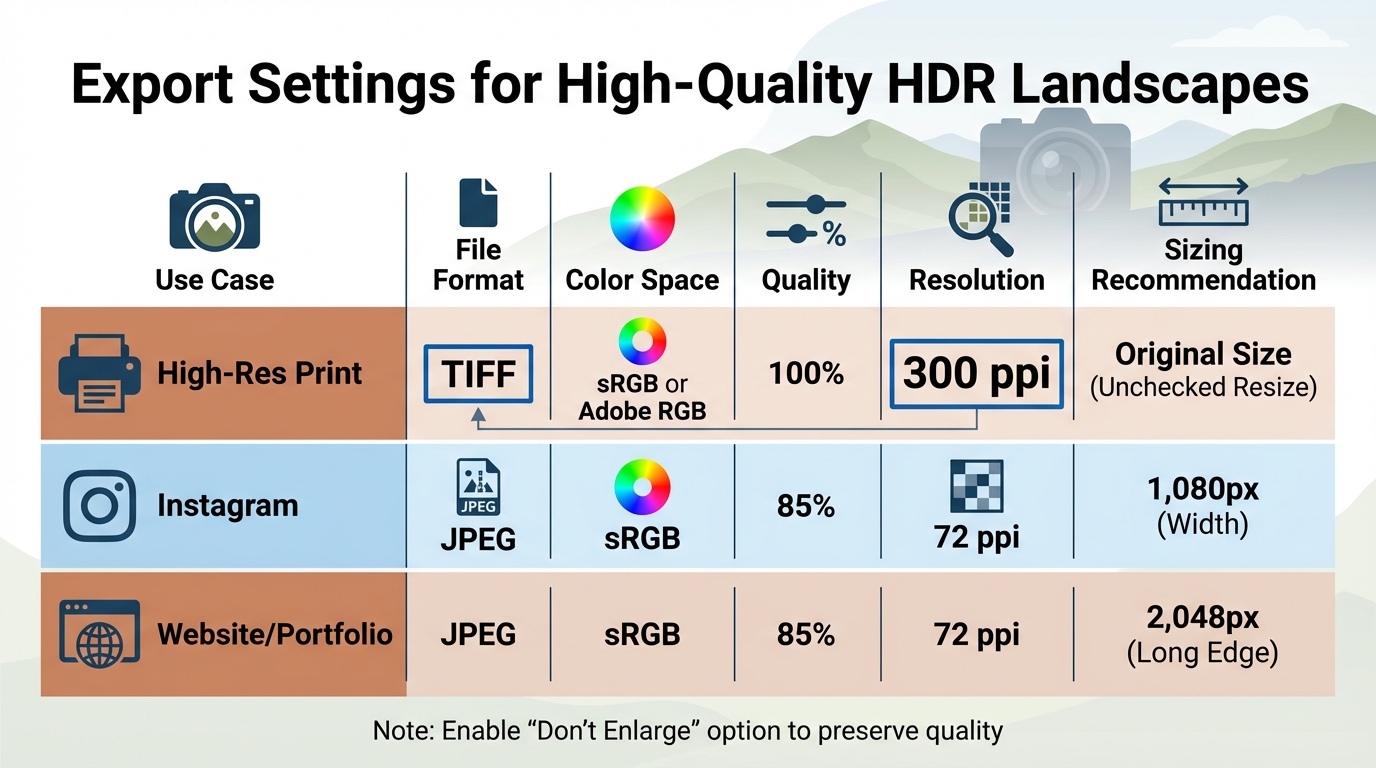
Export Settings for High-Quality Results
Once you're satisfied with the visual and color adjustments, focus on the export settings to ensure your image looks great across various platforms. The export settings determine how your photo will appear online or in print. For sharing on the web, opt for JPEG format (sRGB, 85% quality, 72 ppi). For high-quality prints, use the TIFF format at 300 ppi to preserve fine details.
| Use Case | File Format | Color Space | Quality | Resolution | Sizing Recommendation |
|---|---|---|---|---|---|
| High-Res Print | TIFF | sRGB or Adobe RGB | 100% | 300 ppi | Original Size (Unchecked Resize) |
| JPEG | sRGB | 85% | 72 ppi | 1,080px (Width) | |
| Website/Portfolio | JPEG | sRGB | 85% | 72 ppi | 2,048px (Long Edge) |
For output sharpening, Lightroom offers presets like "Screen", "Matte Paper", or "Glossy Paper", which you can adjust based on the final use. Always enable the "Don't Enlarge" option to avoid artificial upscaling, which can harm quality. Before exporting, press "J" to activate clipping indicators and ensure highlights and shadows are preserved. This final check ensures your image is ready for any platform or medium.
Conclusion and Next Steps
Editing HDR landscapes becomes much more manageable with a structured workflow. The process begins well before you open your editing software. By capturing at least three exposures - underexposed, neutral, and overexposed - you ensure that both highlights and shadows hold all the necessary detail. Merging these exposures creates a balanced starting point for further edits, setting the stage for effective use of HDR presets.
Presets can be a great foundation for your edits. As Marc Newton, Founder of The School of Photography, explains:
"I'll be looking at adjusting the basics first then how to enhance specific colors and balance the exposure."
Once a preset is applied, refine the basics, bring out muted colors, and ensure the exposure is well-balanced across the frame. Start with broader adjustments like exposure and white balance, then move on to fine-tuning specific colors and textures. This step-by-step approach keeps your edits intentional and cohesive.
Careful attention at every stage ensures your final image captures the vibrancy and essence of the original scene.
Key Takeaways from the HDR Editing Checklist
The way you shoot is just as important as how you edit. Without proper exposure bracketing during the capture phase, even the best presets won’t deliver professional results. With high-quality source files, focus on enhancing your work through thoughtful adjustments. After applying presets, review the color balance and exposure to ensure they align with the mood and lighting of your scene.
Browse HDR Presets on Presets.io

Want to simplify your editing process? Check out the expertly designed Lightroom presets available at Presets.io. The site offers a wide selection of presets tailored for landscape photography, including collections optimized for HDR. Whether you’re looking for subtle, natural tones or bold, cinematic effects, you’ll find something to suit your creative vision.
New presets are added weekly, so you can keep expanding your editing toolkit. Each preset comes with easy-to-follow installation guides for both desktop and mobile Lightroom versions, making it simple to integrate them into your workflow. Explore the collections at Presets.io to find the perfect presets for your HDR landscape photography and take your editing to the next level.
FAQs
How many bracketed shots do I need for HDR landscapes?
When shooting HDR landscapes, the number of bracketed shots you need depends on the tonal range of the scene and what your camera can handle. A typical approach is to take three shots at varying exposures, such as 2 stops apart. However, if you're using a modern camera with a high-performance sensor, you might not need as many shots. Evaluate the scene and check the histogram to make an informed choice - scenes with high contrast may require more exposures, while less complex ones might not need bracketing at all.
When should I use Deghost when merging HDR?
When merging HDR images in Lightroom, use the Deghost feature if your scene involves movement - like swaying trees, moving objects, or people - which can result in ghosting artifacts. Deghost analyzes the differences between exposures and chooses the best data to produce a clean final image. You can adjust the Deghost strength to Low, Medium, or High, depending on how much movement is present, ensuring a balance between removing ghosting and maintaining tonal details.
Why does my merged HDR file look flat before presets?
When you first merge HDR files, the result can look a bit dull or lifeless. This happens because the image requires fine-tuning of exposure, contrast, and tones to bring out its best features. That’s where presets come in - they’re specifically crafted to boost these aspects, helping your image pop with vibrant colors and rich details.