
Table of Contents
- 10 Tips For Better Preset Workflow
- 12 Ways to use Presets in Lightroom Classic to Automate Your Workflow
- 1. Apply Presets Automatically During Import
- 2. Sort Presets into Folders by Style
- 3. Arrange Develop Module Panels for Easy Access
- 4. Load Only Your Most-Used Presets
- 5. Apply Presets to One Image, Then Sync to Others
- 6. Create Utility Presets for Common Adjustments
- 7. Use Smart Collections to Organize Your Workflow
- 8. Adjust Preview Settings to Test Presets Faster
- 9. Sort and Select Photos Before Applying Presets
- 10. Create Export Presets That Match Your Editing Style
- Conclusion
- FAQs
10 Tips For Better Preset Workflow
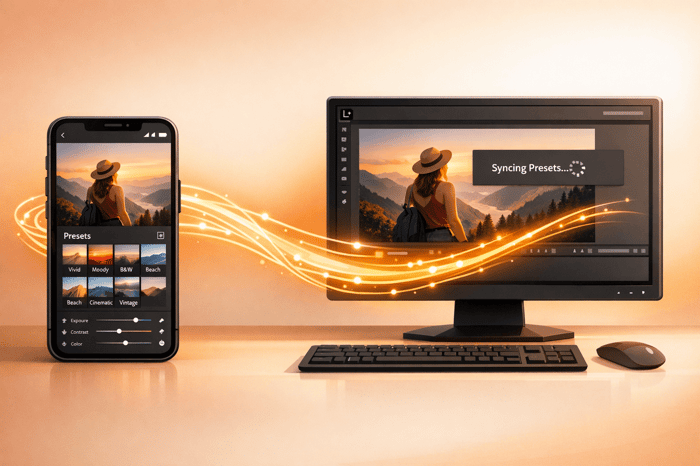
If you're spending too much time navigating presets instead of editing, it's time to optimize your workflow. Lightroom presets can save significant time by automating repetitive tasks like lens corrections, metadata application, and bulk adjustments. Here’s a quick breakdown of how to refine your preset workflow:
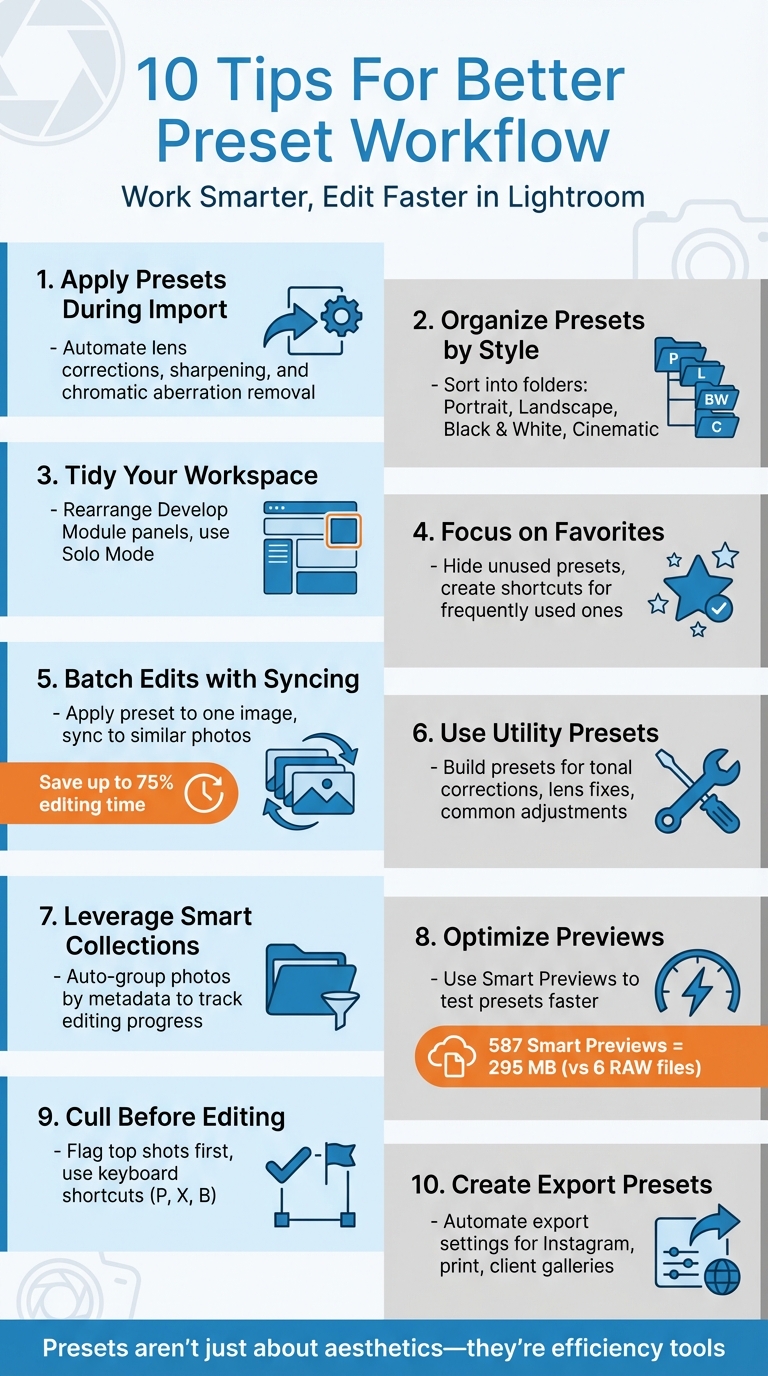
- Apply Presets During Import: Automate technical fixes like lens corrections and sharpening right from the start.
- Organize Presets by Style: Sort presets into folders (e.g., Portrait, Landscape) for faster access.
- Tidy Your Workspace: Rearrange Develop Module panels and use shortcuts like Solo Mode to reduce clutter.
- Focus on Favorites: Hide unused presets and create shortcuts for frequently used ones.
- Batch Edits with Syncing: Apply presets to one image, then sync settings across similar photos.
- Use Utility Presets: Build presets for common adjustments, like tonal corrections or lens fixes.
- Leverage Smart Collections: Automatically group photos by metadata to track editing progress.
- Optimize Previews: Use Smart Previews to test presets faster without slowing down Lightroom.
- Cull Before Editing: Flag top shots first to focus on the best images.
- Create Export Presets: Automate export settings for consistent results across platforms.
Lightroom presets aren’t just about aesthetics - they’re tools to simplify your editing process, save time, and improve efficiency. Whether you’re editing a few photos or hundreds, these tips will help you work smarter and finish faster.
10 Tips to Optimize Your Lightroom Preset Workflow
12 Ways to use Presets in Lightroom Classic to Automate Your Workflow

1. Apply Presets Automatically During Import
Lightroom can simplify your workflow by automatically applying a preset during the import process. This handy feature saves time and spares you from making the same adjustments over and over, especially when dealing with hundreds of photos.
To enable this in Lightroom Classic, open the Import window and find the Apply During Import panel. Under Develop Settings, click the dropdown menu to view your installed presets and select the one you want. Once set, Lightroom will apply those adjustments to each photo as it imports, giving you a head start on your editing.
The trick is selecting the right preset for this step. Avoid heavy, stylistic filters and stick to technical fixes that benefit every photo, such as Lens Corrections, Sharpening, Chromatic Aberration removal, and Auto Tone. These adjustments save you from repeating basic edits, freeing up time for more creative work.
However, steer clear of including Exposure or White Balance in your import preset. These settings vary depending on the lighting conditions of each shot, so it’s better to address them individually later. Instead, create a custom import preset tailored to universal fixes. Pair this with the Build 1:1 Previews option during import, allowing Lightroom to process high-resolution previews while you take a break.
This method also solves a common frustration for RAW shooters: the moment when a vibrant preview turns flat as the RAW data loads. By applying a base preset during import, your images retain a polished look from the start, making it easier to sort and organize them. Once this is done, you can move on to fine-tuning your folder structure to speed up your workflow even more.
2. Sort Presets into Folders by Style
Once you've streamlined your import process, the next step is to organize your presets. A well-structured system not only keeps things tidy but also saves you from wasting time scrolling endlessly. As Robin Whalley, author at Lenscraft, says:
"Organising Lightroom Presets isn't just about neatness; it's about improving your editing speed and workflow."
To make your editing process smoother, sort your presets into folders based on style. Think about how you work and create folders that align with your needs - like Black & White, Portrait, Landscape, or Cinematic. To do this, simply right-click in the Presets panel and select "New Group." This setup allows you to quickly access the perfect aesthetic for each project without wading through irrelevant options. You can even create folders for specific adjustments, such as Clarity or Warming, enabling you to stack multiple presets for a custom look.
Lightroom organizes folders alphabetically, so numbering your most-used folders (e.g., "01 Portraits") can keep them at the top for easy access. Another handy trick: right-click a preset and select "Add to Favorites" to create a shortcut in a dedicated top folder without moving the preset from its original location.
If default Adobe collections are cluttering your workspace, hide them using the Manage Presets feature. For Lightroom Classic v7.3 and later, remember that all reorganization must be done within the app. Dragging files around in your computer's file explorer won’t work anymore since Lightroom now relies on an internal database to manage .XMP preset files.
With your presets neatly organized, you'll be ready to tackle the next step: optimizing the Develop module for even faster editing. A clean workspace makes all the difference.
3. Arrange Develop Module Panels for Easy Access
Keeping your Develop Module workspace tidy isn’t just about aesthetics - it’s about efficiency. A cluttered interface can slow you down, especially when switching between presets and fine-tuning adjustments. As professional photographer Kevin Mullins puts it:
"The less visual clutter there is, the less your eye has to work every time you move between tools."
Start by customizing your Develop Module layout to align with how you edit. Right-click on any panel header to reorder or hide panels. For instance, placing the Basic panel first lets you quickly access key adjustments like exposure, contrast, and white balance - the settings you’re most likely to tweak after applying a preset. Follow this with other panels, like Tone Curve, Detail, or HSL, in the sequence that works best for you. Keep in mind that Lightroom Classic will require a restart for these changes to take effect.
To reduce unnecessary scrolling, enable Solo Mode by right-clicking on a panel header. This keeps only one panel open at a time. Julieanne Kost, Adobe's Digital Imaging Evangelist, highlights its benefits:
"Solo Mode... eliminates the need to scroll through several open panels to access options."
For smoother navigation, take advantage of shortcuts: press Tab to hide side panels, Shift-Tab for a full-screen workspace, and F to toggle through screen modes. You can also declutter the Module Picker by hiding unused modules like Book or Slideshow. These small tweaks streamline your interface, speeding up individual edits and making your preset workflow more efficient overall.
4. Load Only Your Most-Used Presets
An organized workspace is just the start - loading only your most-used presets can take your editing speed to the next level. If you have a massive library of presets, scrolling through endless options can quickly eat up your time. Lightroom instructor Gayle Vehar summed it up perfectly:
"I have many presets and sometimes find it overwhelming. Add to that the fact that Lightroom recently added a bunch of default presets, which made it even more challenging to find favorite presets."
What’s the fix? Hide the ones you don’t use. It’s easy to do and makes a big difference. Start by clicking the "+" icon in the Presets panel, then choose Manage Presets. From there, uncheck any default Lightroom collections or third-party presets that don’t fit your editing style. Don’t worry - this doesn’t delete them; it just hides them from view until you need them again.
To speed things up even more, you can create shortcuts for your go-to presets. Right-click on your favorites and select "Add to Favorites." This places them right at the top of the panel, so you don’t have to scroll endlessly during edits. Vehar highlights the impact of this feature:
"This new feature saves me SO much time! I no longer have to scroll through my collections, looking for my favorites."
Make it a habit to review your presets regularly. Hide or remove outdated styles that no longer fit your aesthetic. A clean and focused preset panel reduces clutter, helps you make quicker decisions, and ensures your essential tools are always within easy reach. It’s a simple change that sets you up for smoother edits every time.
5. Apply Presets to One Image, Then Sync to Others
Editing each photo one by one is a time sink. Instead, fine-tune your preset on a single image and then sync those settings to similar photos in just a few clicks. This approach can cut your editing time by as much as 75%. For instance, a wedding photographer editing 500 photos could trim an 8-hour job down to only 2 hours.
Here’s how it works: apply your preset to one image and make any necessary refinements. Once satisfied, select that image along with the others you want to edit (use Shift-click for a continuous range), and hit the Sync button. A dialog box will pop up, allowing you to pick which adjustments to apply. Be sure to deselect options like Crop or Spot Removal, as these settings are often unique to each frame. This simple process lets you carry over your adjustments to multiple photos with ease.
For an even faster workflow, try Auto-Sync. Toggle the switch next to the Sync button to enable it. With Auto-Sync active, any changes you make to your primary photo will instantly apply to all selected images in real time. Keep in mind that this works best when your photos share similar lighting conditions and white balance - applying a sunset preset to indoor shots, for example, might not give you the results you’re after.
You can also use Ctrl/Cmd+Click to select non-consecutive images or switch to Grid view for quick batch editing. Grouping photos by lighting conditions before syncing ensures your preset adjustments look consistent and require minimal tweaking afterward.

The Master Preset Bundle

$57.00
$672.00
The Master Preset Bundle Every Style. Every Platform. One Download Get 56 high-quality Presets.io collections in one complete bundle — designed to help you edit faster, stay consistent, and get professional-looking results in seconds. Get All High-Quality Preset Collections For… continue reading
sbb-itb-b27063b
6. Create Utility Presets for Common Adjustments
Utility presets are a game-changer for handling specific technical tasks, like correcting lens distortion or recovering highlights, while leaving you free to focus on creative edits. Wedding and portrait photographer John Bosley explains it best:
"Presets are not meant to be one‑click solutions... instead, they are meant to save you time and give you a starting point for image corrections."
To get started, consider building a lens correction preset. This can automatically enable profile corrections and remove chromatic aberration - perfect for applying during import. Another idea is to create tonal presets, such as “Highlights -50 / Shadows +50,” which can help you quickly balance high-contrast scenes without messing with your white balance or exposure.
Here’s a handy tip: use the "Check None" option when saving a preset. This allows you to manually select only the adjustments you’ve made - like sharpening or lens corrections - so you don’t accidentally overwrite other fine-tuned settings. For example, if you’re creating a sharpening preset, check only the Detail panel settings, leaving exposure and color untouched.
AI masking can also take your utility presets to the next level. You can create a preset using the "Select Subject" mask (inverted) to darken backgrounds or enhance skies automatically. These targeted adjustments can be stacked, as long as they don’t interfere with the same sliders, giving you precise control over your edits.
Finally, make sure to name your utility presets in a way that keeps your workflow organized. Names like "1 Lens Correction" or "2 Shadow Recovery" can help you quickly locate them in the right order. And if your editing approach evolves, you can easily update a preset by right-clicking its name and choosing "Update with Current Settings."
7. Use Smart Collections to Organize Your Workflow
Smart Collections are a powerful way to keep your photo library organized and efficient. They automatically group images based on metadata, acting as dynamic searches that update as your metadata changes. For instance, if you create a Smart Collection for photos rated three stars or higher, any photo that meets this rating will be added instantly. Similarly, setting up a Smart Collection with the rule "Has Adjustments is false" will show all unedited photos in your catalog. This makes it easy to spot images that still need a preset.
Photographer Andrew Childress puts it simply:
"Smart Collections are saved searches based on metadata rules."
Color labels can also play a key role in managing your workflow. Assign red to photos that need presets, yellow to those in progress, and green to completed edits. Then, create a Smart Collection for each label to track your progress. Photographer Sean McCormack explains:
"Labels can be used to imply a status with your photos. For example, you could use red to mean 'selected, but needs editing', yellow to mean 'processing' and green for 'final image'. By creating smart collections for each stage, you can see what needs to be done with each image."
For more technical organization, you can set up Smart Collections based on camera metadata. For example, a rule like "Focal Length is less than 35mm" will automatically group wide-angle shots, making it easy to apply specific edits in bulk. You can also combine multiple rules, such as filtering for "Rating is 3 stars or higher" and "Keywords contains Portrait", to isolate your top portrait shots for detailed editing.
Here’s a handy tip: add a prefix like "01_" or "02_" to your Smart Collection names (e.g., "01_Needs_Presets") to control their order, as Lightroom organizes them alphabetically by default.
Using these Smart Collection strategies can simplify your workflow, letting you focus more on creative editing and less on manual organization.
8. Adjust Preview Settings to Test Presets Faster
If testing presets feels sluggish because full-resolution files take too long to load, there’s a simple fix: tweak your preview settings in Lightroom. By using Smart Previews, you can work with smaller, faster-loading versions of your images. These low-resolution copies - 2,540 pixels on the longest edge - let you experiment with presets without the delays caused by massive RAW files loading in the background. This adjustment keeps your workflow smooth and responsive.
Photographer Kristen Tomkowid breaks it down:
"Smart previews are low res copies of your photos that enable you to edit in Lightroom without being connected to the originals/RAWS. They get built into your Lightroom catalog and speed up the editing process because you no longer have to wait for each full resolution image to load."
Here’s a practical example: 587 Smart Previews take up just 295 MB of storage, which is less than the space needed for six RAW files from a high-resolution camera like the Canon R5. To create Smart Previews, check the "Build Smart Previews" option in the File Handling panel during import. If you want to add them for photos you’ve already imported, go to the Library tab, select the photos, and click the status box under the Histogram.
Smart Previews aren’t just about saving storage - they also make testing presets easier. In the Develop module, you can hover over presets in the Presets panel to see an instant preview of their effect on your image without applying anything. N Constant from ExpertPhotography explains:
"You can hover over the different presets to see their effect on your image. This is helpful because you can quickly get a rough idea of the style best suited to your photograph."
To further optimize performance, consider increasing the Camera Raw cache size to 20 GB. You can adjust this in Preferences > File Handling, which helps the Develop module run more efficiently. Additionally, set the Standard Preview Size to Auto in the Catalog Settings. This ensures Lightroom matches previews to your monitor’s resolution, avoiding unnecessary processing of oversized files.
Once you’re done editing, don’t forget to delete Smart Previews to free up disk space. Your edits will still remain saved in the catalog, so you won’t lose any work.
9. Sort and Select Photos Before Applying Presets
When it comes to applying presets, it’s best to focus on your top shots - those that truly stand out. Portrait photographer Tammy Porter puts it perfectly:
"Culling means sorting through your images, selecting the best ones, and eliminating those that aren't good or you won't be using."
Start by streamlining your workflow. Use Grid View in Lightroom to sort your photos quickly since it loads previews much faster than the Develop Module. As you go through your images, flag the ones you want to keep by pressing P and reject the rest with X. To save time, enable Auto-Advance from the Photo menu - this makes Lightroom automatically move to the next image after you flag or reject one, cutting down on unnecessary clicks.
Once you’ve flagged your favorites, press B to add them to a Quick Collection for batch editing. For the rejects, clean up your catalog by pressing Cmd/Ctrl + Delete to remove them. This method ensures that presets are applied only to the photos that truly deserve them, keeping your workflow efficient and your catalog uncluttered.
Another pro tip: group your photos by lighting conditions. For example, presets designed for golden hour won’t work as well for midday shots. A travel photographer shared that organizing photos by similar lighting helped cut their editing time in half. By focusing on your best images first, you can put your energy into enhancing the shots that matter most - without getting bogged down by an overwhelming number of raw files.
10. Create Export Presets That Match Your Editing Style
To wrap up your editing workflow, export presets can be a game-changer. They simplify the process by automating export settings like file naming, sizing, watermarking, and sharpening. This ensures your results remain consistent, whether you're prepping images for Instagram, client galleries, or print labs.
Consider creating specific export presets tailored to different needs. For instance, an "Instagram" preset could have a short edge of 1,080 pixels, use the sRGB color space, and apply "Screen (High)" output sharpening to counteract compression. For print projects, a "High-Res Print" preset might include settings like 300 pixels per inch resolution, with sharpening adjusted for glossy or matte paper. If you're preparing images for album prints, a "Main Gallery" preset with a 6,000-pixel long edge works well.
Keep your presets flexible by setting the "Export To" option as "Choose folder later." For file naming, the "Custom Name - Sequence" feature is handy for automatically labeling exports (e.g., "ClientName-1.jpg"). A JPEG quality setting of 85 strikes a great balance between visual quality and file size.
Using export presets not only ensures consistency but also saves time. You can even apply multiple presets simultaneously and update them easily by right-clicking and selecting "Update with Current Settings".
Conclusion
Streamlining your preset workflow can dramatically speed up photo editing. Automating repetitive tasks like entering metadata or naming files, organizing presets into clear folders, and using smart collections to track progress allows you to focus more on the creative aspects of your work. As highlighted earlier, it's often the workflow - not the actual editing - that eats up the most time.
These strategies create a balance where efficiency meets consistent quality. Applying presets during import, syncing adjustments across similar images, and using export presets tailored to specific outputs aren't shortcuts - they're tools that establish a solid foundation for your creativity to flourish. Think of presets as the launchpad, not the finish line, giving you the flexibility to fine-tune each image while maintaining a cohesive style throughout your project.
From automated imports to customized exports, every tip contributes to a more efficient editing process. Whether you're speeding up culling with keyboard shortcuts, experimenting with looks using optimized preview settings, or creating utility presets for frequent adjustments, these techniques can save you countless hours over time.
Once your workflow is optimized, you can dive deeper into tools that enhance your creative vision. For example, Presets.io offers an extensive range of collections tailored to different photography styles - whether you're after film-inspired tones, cinematic vibes, or bundles designed for weddings, food, or landscapes. With new presets released weekly and compatibility across Lightroom Mobile, Desktop, and other editing platforms, you'll always have fresh tools to match your evolving style.
FAQs
How can I automatically apply adjustments to photos during import in Lightroom?
You can speed up your Lightroom workflow by using a Develop preset during the import process. This handy feature lets you automatically apply adjustments - like sharpening, clarity, lens corrections, or noise reduction - to every photo as they're brought into Lightroom.
Here’s how to set it up: Start by creating a Develop preset. Make the adjustments you want on a sample image in the Develop module, then save those settings as a preset. Next, go to the Import dialog, find the Apply During Import panel, and choose your preset from the Develop Settings dropdown menu. Once selected, Lightroom will take care of applying those adjustments to all the images you import.
Want to take it a step further? Pair this with other import presets, like metadata or file renaming, to make your workflow even smoother. And if you’re short on time or need technical adjustment presets, check out pre-made options on platforms like Presets.io - they can help simplify things even more.
What are utility presets, and how can they improve my photo editing workflow?
Utility presets in Lightroom are like handy shortcuts for repetitive tasks, focusing on functionality rather than adding a specific style to your photos. They’re designed to simplify actions such as resetting edits, applying lens corrections, or toggling certain settings, making your editing process faster and more consistent.
For instance, a Reset Preset can quickly bring your photo back to its original state with a single click. Similarly, a Lens Correction Preset ensures your images are free of distortion before you dive into detailed editing. These presets cut down on manual adjustments, minimize mistakes, and help keep your workflow running smoothly and efficiently.
What are Smart Collections, and how can they help organize my photo library?
Smart Collections in Lightroom are like having a personal assistant for your photo library. These dynamic groups automatically sort your photos based on criteria you choose - like keywords, camera model, star ratings, or even dates. The best part? They update themselves in real time. As soon as a photo matches the rules you've set, it gets added to the collection without you lifting a finger.
This feature can be a game-changer for keeping your workflow smooth and your library organized. Want quick access to your 5-star shots? Done. Need to gather all the photos flagged for edits? Easy. Prefer to see images taken with a specific lens? No problem. Lightroom does the heavy lifting, so you can focus on your creative work without worrying about missing or misplacing important files.