

Table of Contents
- What Are Lightroom Adaptive Presets?
- What Are ADAPTIVE PRESETS in LIGHTROOM?
- What Are Lightroom Adaptive Presets?
- Types of Built-in Adaptive Presets in Lightroom
- How to Apply Adaptive Presets in Lightroom
- Creating Custom Adaptive Presets
- Benefits of Using Adaptive Presets for Photographers
- Conclusion
- FAQs
What Are Lightroom Adaptive Presets?
Lightroom(LR) Adaptive Presets are AI-powered tools designed to make photo editing faster and more precise. Unlike traditional presets that apply the same adjustments to every image, these presets analyze each photo's unique elements - like faces, skies, or subjects - and create custom masks to apply targeted changes. This means you can edit specific areas, such as whitening teeth or enhancing skies, with a single click, saving time and ensuring consistent results.
Here’s what you need to know:
- AI Masking Technology: Automatically detects features like faces, skies, and backgrounds for precise edits.
- Dynamic Adjustments: Tailors effects to each photo, even in batch edits.
- Types of Presets: Includes Portrait, Sky, and Subject presets, each focusing on specific areas.
- Customizable: Adjust intensity with the Amount slider (0-200%) or create your own presets.
- Compatibility: Works with Lightroom Classic (v12.0+), Lightroom CC (v6.0+), Adobe Camera Raw (v24.0+), and Lightroom Mobile (premium).
These presets streamline editing for photographers, especially for large projects like weddings or events, by automating advanced adjustments. They’re ideal for achieving polished results efficiently, whether you're fine-tuning facial features or enhancing landscapes.
What Are ADAPTIVE PRESETS in LIGHTROOM?
What Are Lightroom Adaptive Presets?
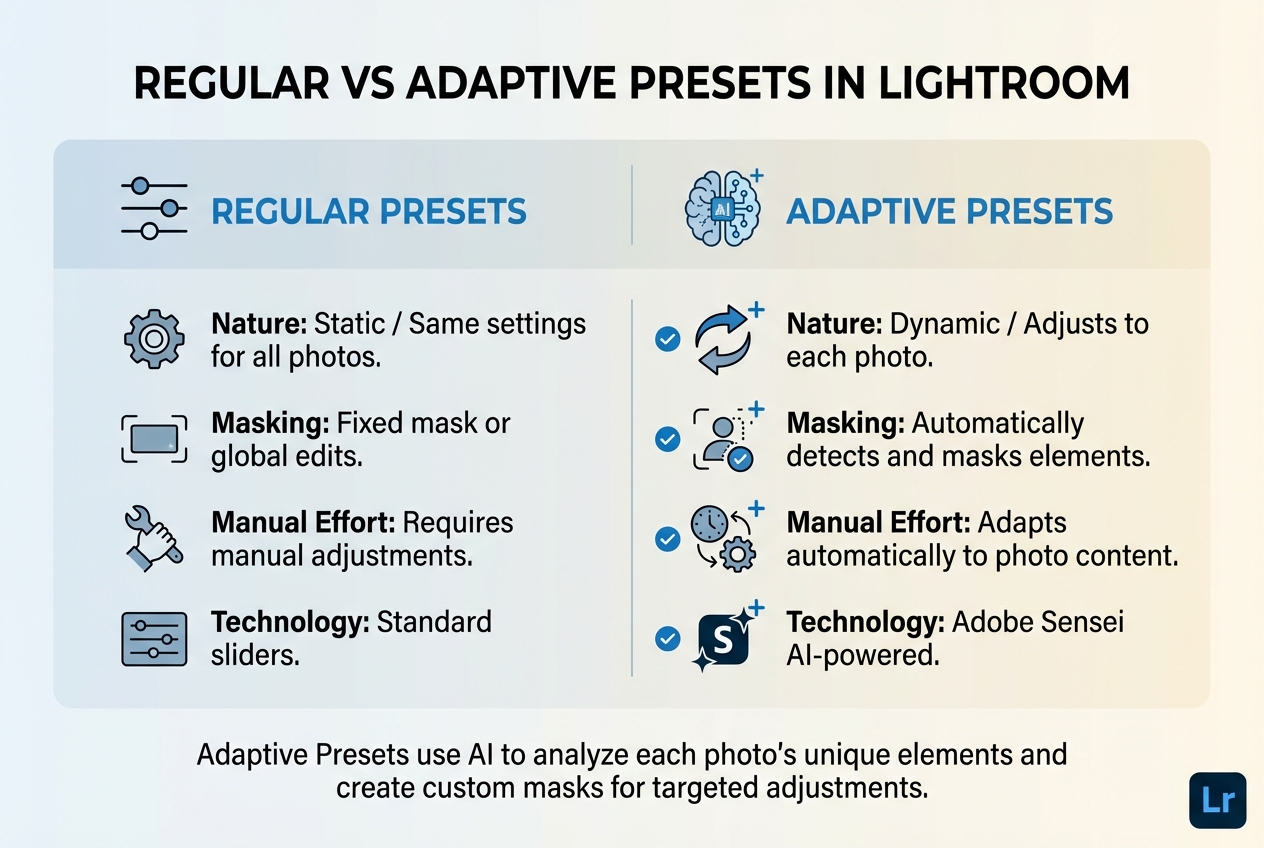
Regular Presets vs Adaptive Presets in Lightroom
Adaptive presets are smart editing tools powered by AI, designed to adjust specific areas of your photos - like faces, skies, or backgrounds - without touching the rest of the image. Instead of applying the same settings to every photo, these presets use Adobe Sensei's AI masking technology to create a custom mask for each picture based on its content and composition. By combining multiple AI-generated masks, adaptive presets let you perform detailed edits with just one click. The AI recalculates the mask for every photo, ensuring a perfect fit whether you're editing one image or an entire batch. This tailored approach is what makes adaptive presets stand out.
You can use adaptive presets in Lightroom Classic (v12.0+), Lightroom CC (v6.0+), Adobe Camera Raw (v24.0+), and the premium version of Lightroom Mobile (on devices with at least 4GB of RAM).
"Adaptive Presets are a totally different breed because they use Lightroom's AI-powered masking tools to automatically select areas, objects, and subjects regardless of the image you load so you don't get the same result every time." – Rod Lawton, Instructor, Amateur Photographer TV
How Adaptive Presets Work
The magic of adaptive presets lies in their AI-driven masking process. When you apply one, Adobe's AI scans your photo to identify key elements like a face, the sky, or the main subject. It then creates a precise mask for those areas and applies pre-set adjustments only to the masked sections, leaving the rest untouched.
For portraits, the AI goes even further, identifying and masking features like face skin, body skin, eyebrows, eye sclera, irises, pupils, lips, teeth, and hair. Each feature gets its own specific adjustments - for example, whitening teeth, enhancing eyes, or smoothing skin.
| Feature | Regular Presets | Adaptive Presets |
|---|---|---|
| Nature | Static / Same settings for all photos | Dynamic / Adjusts to each photo |
| Masking | Fixed mask or global edits | Automatically detects and masks elements |
| Manual Effort | Requires manual adjustments | Adapts automatically to photo content |
| Technology | Standard sliders | Adobe Sensei AI-powered |
Once you apply an adaptive preset, you can fine-tune its effect using the Amount slider, which ranges from 0 to 200%.
Key Features of Adaptive Presets
Adaptive presets are available in three main types:
- Adaptive Sky: Focuses on the sky, factoring in horizons and objects like trees or buildings.
- Adaptive Subject: Isolates the main subject from the background, perfect for enhancing exposure, texture, and clarity.
- Adaptive Portrait: Detects facial features to apply targeted adjustments to areas like eyes, skin, or teeth.
One standout feature of adaptive presets is the ability to stack them. For instance, you can use one preset to enhance the sky and another to brighten the subject, and they’ll work together seamlessly, giving you layered control over your edits.
These presets integrate directly into Lightroom's workflow. They appear in the Presets panel alongside your other presets, and you can hover over them to preview how they’ll affect your image. For the best experience, Adobe suggests using a device with at least 8GB of RAM (16GB is better) and 2GB of VRAM. You can even create your own adaptive presets by making an AI selection - like "Select Sky" or "Select Subject" - applying adjustments, and saving the preset with the Masking option enabled.
Types of Built-in Adaptive Presets in Lightroom
Lightroom's built-in adaptive presets are designed to address a variety of editing scenarios. Familiarizing yourself with these categories can help you select the right tools for your specific needs.
Portrait Adaptive Presets
Portrait adaptive presets use AI to identify and isolate facial features with precision. When applied, Lightroom generates separate masks for teeth, iris and pupil, eye sclera, face skin, body skin, eyebrows, and hair.
"The new Adaptive Presets work by taking a number of AI masks and bundling them together - so with a single click you can edit a bunch of things at one time." – Anthony Morganti, Photoshop and Lightroom Instructor
These presets include options like Enhance Portrait, Glamour Portrait, Gritty Portrait, Smooth Hair, and Whiten Teeth. They are especially effective for headshots, weddings, and fashion photography where skin and facial features require detailed adjustments. A key advantage is the ability to stack multiple presets on the same image. For instance, you can apply one preset to whiten teeth and another to enhance eyes, with each adjustment creating its own separate mask. If a preset includes a mask for a feature not found in the photo - such as whitening teeth on a subject with a closed mouth - Lightroom flags that specific mask layer. This targeted functionality ensures high-precision edits while saving time.
Sky and Background Adaptive Presets
Sky adaptive presets leverage AI to detect and mask the sky, enabling adjustments without altering other parts of the image. Built-in options include Blue Drama, Sunrise, Sunset, Neon Tropics, and Storm Clouds, making them ideal for landscapes and cityscapes with dull or overexposed skies.
For enhancing the main subject, presets like Pop, Warm Pop, Soft, and Cool Soft come in handy, particularly for wildlife and product photography. You can also create background-focused adjustments by using the "Select Sky" or "Select Subject" tool and then inverting the mask to target the surrounding areas. This flexibility gives you precise control over every element in your composition, allowing for seamless adjustments that enhance the overall look of your image.
ISO Adaptive Presets
ISO adaptive presets tackle technical adjustments by analyzing the image's EXIF ISO data rather than its visual content.
"Lightroom will look at the ISO of your file via the EXIF data and select the appropriate amount of sharpening and noise reduction." – Alex Coleman, Commercial Photographer
These presets automatically fine-tune noise reduction and sharpening based on the image's ISO settings, interpolating values between predefined reference points. This is particularly useful for high-volume shoots with varying lighting conditions - like sports or event photography - where Auto ISO is commonly used. For added convenience, you can set a custom ISO adaptive preset as your "Raw Default" in Lightroom Preferences. This ensures that every imported image automatically receives tailored noise reduction, streamlining your workflow while maintaining consistent quality across a wide range of shooting scenarios.
How to Apply Adaptive Presets in Lightroom
Using Built-in Adaptive Presets
To get started with adaptive presets, open the Develop module in Lightroom Classic, pick the photo you want to edit, and look for the adaptive presets under groups like Adaptive: Portrait, Adaptive: Sky, or Adaptive: Subject. If you're using Lightroom Mobile, these presets can be found under the Premium tab. Hover over a preset to see a live preview - give the AI a moment to generate the mask. When you're ready, click on the preset, and Lightroom's AI will automatically detect and mask key areas of your image. You can tweak the intensity of the preset using the Amount slider, which ranges from 0% to 200%.
After applying a preset, you can refine it further by adjusting specific mask settings.
Adjusting and Fine-Tuning Adaptive Presets
Once a preset is applied, click on the Masking icon located below the histogram to access the individual AI-generated masks, such as Teeth or Sky. From here, you can fine-tune specific areas by adjusting sliders like Exposure, Clarity, or Saturation. To see how your changes look, toggle the mask's visibility to compare the before-and-after effects. This allows for precise edits without altering other parts of the image.
If you want to take your edits further, you can layer multiple adaptive presets for a more polished result.
Layering Adaptive Presets
Layering adaptive presets is a great way to create more detailed edits. For example, you could start by applying the Enhance Portrait preset, then add Whiten Teeth. Each preset generates its own mask, which you can find in the Masking panel. Adjust the Amount slider for each mask to achieve a balanced and cohesive look. If you're working on multiple photos, enable Auto Sync to ensure Lightroom customizes the masks for each image individually.

The Master Preset Bundle

$57.00
$672.00
The Master Preset Bundle Every Style. Every Platform. One Download Get 56 high-quality Presets.io collections in one complete bundle — designed to help you edit faster, stay consistent, and get professional-looking results in seconds. Get All High-Quality Preset Collections For… continue reading
sbb-itb-b27063b
Creating Custom Adaptive Presets
Custom adaptive presets can streamline your editing process and bring consistency to your workflow. Start by selecting a reference image that clearly represents your editing goal. Open the Masking tool and pick an AI-based option like Select Subject, Select Sky, or Select People. For portraits, you can refine your selections further by targeting specific features such as Face Skin, Teeth, or Iris and Pupil. Enable "Create Separate Masks" if you want to adjust these elements independently.
After setting up your masks, fine-tune sliders like Exposure, Texture, and Clarity to achieve the desired look. Before saving your work, rename each mask by double-clicking on it in the Masking panel - this makes future adjustments much easier. Once you're satisfied, click the + in the Presets panel, select Create Preset, and give it a descriptive name. In the preset settings dialog, click Check None, then enable only the Masking box and ensure your specific AI masks are selected. For added flexibility, check the "Support Amount Slider" option to control the intensity of the preset.
This process lets you harness LR's adaptive tools for a wide range of editing needs. As Lightroom expert Rob Sylvan explains:
"What all the Adaptive groups of presets have in common is that they're designed to leverage one of the AI-based types of Masking tools to automatically detect either a person, sky, or subject respectively." - Rob Sylvan, Author and Lightroom Expert
If you're creating ISO adaptive presets, choose 2–4 raw images that represent different ISO levels. Adjust Noise Reduction and Sharpening settings for each reference image. Then, highlight all the selected images, open the Create Preset dialog, and check the options for Sharpening, Noise Reduction, and ISO Adaptive.
For added efficiency, you can create a "zeroed" template with all AI masks and sliders set to zero, allowing for quick one-click masking. To repurpose masks, use the "Duplicate and Invert Mask" option - for example, turning a sky mask into a foreground preset. When applying your custom preset to multiple photos, enable Auto Sync in the Develop module. LR will automatically recalculate the AI masks to suit each individual image, saving you even more time.
Benefits of Using Adaptive Presets for Photographers
Save Time on Large Photo Edits
Adaptive presets take the hassle out of repetitive manual edits by automating advanced adjustments across entire photo collections. Instead of painstakingly creating masks and fine-tuning each photo, you can apply high-quality edits in just seconds. When you copy settings to a batch, Lightroom's AI recalculates the masks for each individual image, ensuring edits are applied to the right areas, no matter the composition or subject placement.
This feature is a game-changer for portrait and event photographers. For example, ISO adaptive presets automatically adjust settings like noise reduction and sharpening based on the image's metadata. So, if you're editing a wedding with photos shot at ISO 400, 800, and 1,600, LR applies the correct adjustments for each frame - no manual tweaking required.
Consistent, Professional Results
Adaptive presets also make it simple to maintain a cohesive editing style. The AI recalculates selections for every image, meaning a "Sky" preset will always identify and adjust the sky in your landscape shots - even if the composition varies significantly. This ensures your color grading and tonal adjustments are consistent, while still adapting to the unique content of each photo.
"Lightroom's addition of adaptive presets that allow AI masks to be saved and recalculated for each image make creative editing faster and easier than ever before." – Angela Andrieux, Fine Art Photographer and Coach
You can even layer multiple adaptive presets, such as one for the sky and another for the subject, to create a sophisticated, stylized look across your entire collection. This not only saves time but also gives you more creative control, especially when using curated adaptive collections.
Enhance Your Workflow with Presets.io Collections
Beyond Lightroom's built-in tools, photographers can explore additional adaptive presets through platforms like Presets.io. Their collections include cinematic, vintage, and aesthetic styles, all designed to work seamlessly with LR’s adaptive features. These presets expand your creative possibilities while taking full advantage of intelligent masking. With new presets added weekly, you’ll always have fresh options for different styles and projects, keeping your workflow efficient and inspired.
Conclusion
LR's Adaptive Presets bring a new level of efficiency and precision to photo editing by blending AI-powered masking with one-click simplicity. These presets take the hassle out of manual adjustments, offering consistent, polished results for entire photo collections. Whether it's refining portraits with automatic skin and teeth enhancements or creating dramatic landscapes with intelligent sky adjustments, these presets adjust dynamically to the unique content of each image.
What makes adaptive presets stand out is their ability to recalculate masks for every photo, ensuring accuracy and consistency during batch edits. This feature is a game-changer for photographers working on large-scale projects like weddings, events, or portrait sessions. Plus, the ability to layer adjustments allows for more intricate edits without sacrificing speed, helping you maintain a cohesive and professional aesthetic.
If you're ready to take your workflow to the next level, check out curated collections on Presets.io. These collections include cinematic, vintage, and aesthetic styles, all designed to integrate seamlessly with LR’s intelligent masking. With new presets added every week, you'll have a constant stream of tools to keep your editing process fresh and efficient.
Dive into the world of adaptive presets and see how they can turn your editing routine into an inspiring and streamlined experience.
FAQs
What makes Lightroom Adaptive Presets different from regular presets?
Lightroom Adaptive Presets offer a smarter way to edit your photos. Unlike standard presets that apply the same fixed settings across all images, these presets use AI-powered masking and image-specific data, like ISO, to tailor adjustments to each photo's unique traits.
This allows Adaptive Presets to automatically refine elements like enhancing the sky or sharpening subject details - without the need for manual intervention. They’re an excellent time-saver for photographers aiming for polished, professional-quality edits with minimal effort.
Can I adjust Lightroom Adaptive Presets to match my editing style?
Yes, you can tweak Lightroom Adaptive Presets to match your specific editing style. After applying a preset, you’re free to adjust the AI-generated masks and fine-tune settings like exposure, contrast, or color tones. Once you’ve refined the look to your liking, you can save it as a new preset for easy access later. This way, your edits stay consistent and reflect your personal touch across all your photography projects.
Which types of photos work best with Lightroom Adaptive Presets?
Lightroom Adaptive Presets are a fantastic tool for quickly fine-tuning specific areas in your photos with precision. They shine in landscapes, where there’s a clear contrast between the sky and the foreground, and in portraits, where you might want to smooth skin tones or enhance lighting. They’re also perfect for images where your focus is on adjusting a particular subject, like a person or the sky.
What makes these presets so handy is their ability to save time. By leveraging AI, they apply targeted edits effortlessly, making them a go-to choice for photographers aiming for polished, professional results - no need for tedious manual tweaks.