


Table of Contents
How to Batch Edit on Lightroom iPad
Yes - you can batch edit on Lightroom iPad by editing one photo, copying its settings, and pasting them onto the rest.
I’d keep it simple:
- Pick one base photo that looks close to most of the set
- Copy only the edits that fit all images
- Paste those settings onto the selected photos
- Skip frame-based edits like crop, masks, healing, and perspective unless every shot matches
- Check a few images after pasting and fix exposure, temperature, or tint if needed
- Use presets for repeat looks across future shoots
- Usecloud sync and subscription plansto move edits across devices, not to auto-apply edits to new photos
A small choice here can save a lot of cleanup later. If I copy exposure, color, detail, and lens corrections from a well-picked base image, the batch often holds up. But if I include crop or masks, even 1 different frame can throw things off.
The short version: batch editing on Lightroom iPad works best when the photos share the same light, color, and setup. For mixed scenes, I’d paste less and adjust more.
If you want the safest path, I’d use this rule: copy global edits, leave out position-based edits, and review the batch right after the paste.
How to BATCH Edit on Lightroom Mobile (Step by Step)
sbb-itb-b27063b
How to copy edits from a finished photo
Once you finish the base photo, open it in Detail view. Tap More (…), then Copy Settings. You’ll see a panel where you can pick which edits to bring over. Choose Modified, then tap Copy.
Copy only settings that should repeat
Some edits tend to work well across similar photos. These usually include Tone Curve, Color Mix/HSL, Color Grading, texture, clarity, grain, vignette, and lens profile corrections. Sharpening and noise reduction also tend to paste well when the images were shot at similar ISO settings.
Other edits are more frame-specific. It’s usually smart to leave crop, healing, masks, and Transform turned off unless every shot lines up very closely.
Be selective. If you only need Tone Curve and Color Mix, copy just those. And if brightness shifts from one frame to another, leave Exposure out.
Then select the rest of the set and paste the copied settings.
How to select multiple photos and paste settings
After you copy the edits, head back to the grid and paste them across the batch. From the grid, press and hold any thumbnail until checkmarks appear. That puts you in multi-select mode.
Then tap each extra photo you want to include. Selected images show a checkmark overlay, so it’s easy to see what’s in the batch. Leave out test shots or frames with different lighting.
When you're set, tap the More (…) menu and choose Paste Settings or Paste. Lightroom applies the copied adjustments to every selected photo, and the thumbnails update right away.
Review the batch before and after pasting
Before you paste, make sure the batch is clean. Scan the grid for outliers that don’t belong in the same lighting setup and deselect them. If a few frames were shot under different light, remove those before you paste.
After pasting, scroll through the grid and open a handful of photos from different parts of the batch. Check exposure and color. If anything looks off, make small fixes with Exposure, Temperature, or Tint. Keep the shared look in place, then tweak only the frames that drift.
The Fashion Bundle
$39.00
$105.00
The Fashion Bundle is a carefully curated collection of Lightroom presets designed for photographers who appreciate style, sophistication, and creative expression. Whether you're capturing high-fashion editorials, elegant portraits, urban street scenes, or everyday lifestyle moments, this bundle provides the tools… continue reading

How sync and presets can speed up repeated workflows
Once you finish a batch, cloud sync and presets can make the next shoot much easier. The idea is simple: sync carries your finished edits across devices, and presets help you reuse the same look later without starting from scratch.
What cloud sync does and does not do
Cloud sync keeps your photos, edits, albums, and presets lined up across devices signed into the same Adobe account. So if you move from your iPad to another device, your edits are already waiting for you.
That said, sync has a limit. It does not apply one edit across every photo for you. It saves and mirrors the work you've already done. If you want to move a style into the next batch, presets are the better tool.
When presets are faster than copying settings
If you use the same style again and again, presets are usually faster than copying settings from one finished image. They make more sense when you want a similar look across many shoots, not just a single batch.
Presets.io offers Lightroom mobile presets in styles like cinematic, vintage, film look, and aesthetic. These collections are meant to be a steady starting point, not a final one. Install them, import them to Lightroom on Android or iOS, sync them to your Adobe account, and find them under User Presets on your iPad. Then apply the preset for the overall look and fine-tune things like exposure or white balance for each photo.
iPad limits and how to avoid bad batch edits
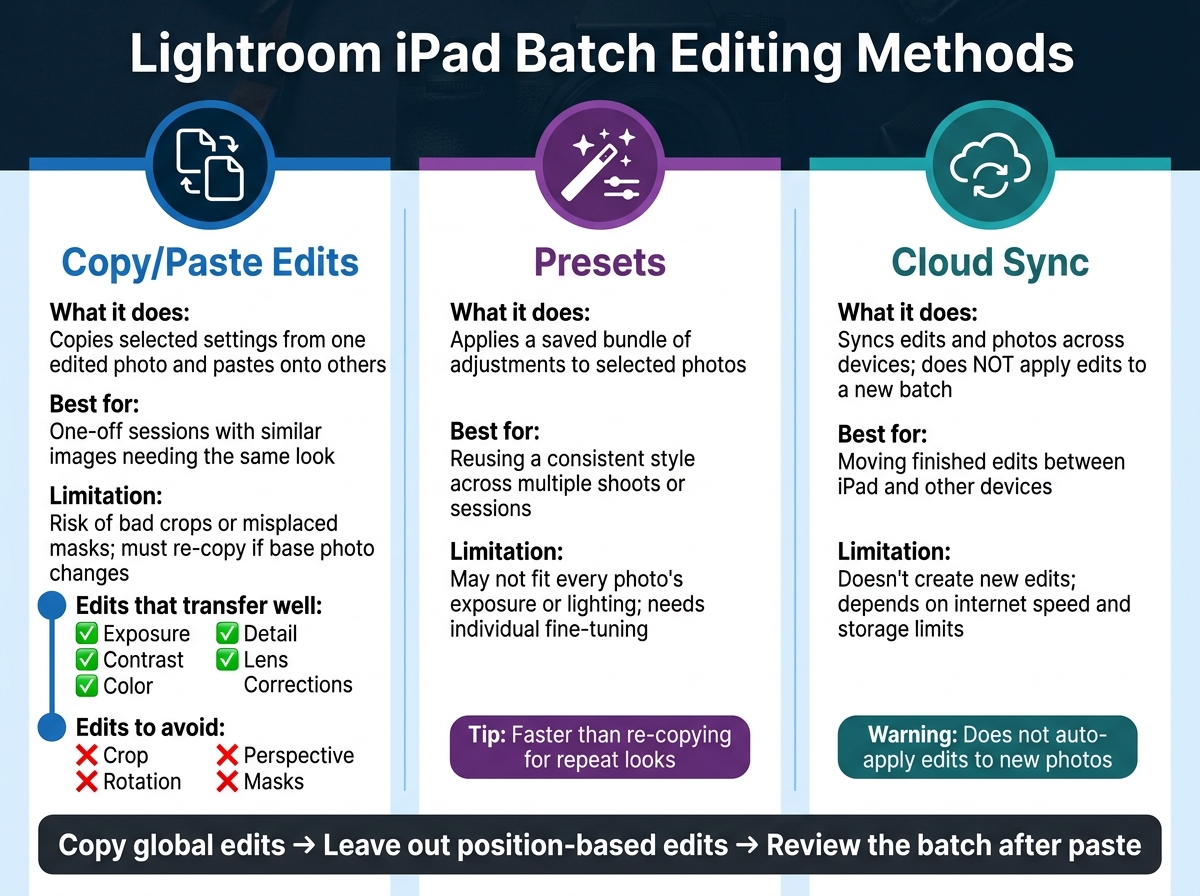
Lightroom iPad Batch Editing: Copy/Paste vs Presets vs Cloud Sync
Once the copy-and-paste workflow makes sense, the next step is knowing which edits actually hold up when you batch edit on iPad.
Lightroom iPad batch editing still runs on copy and paste. That means the biggest problem is simple: using settings that don't fit every image in the group. The first edits to go sideways are usually the ones tied to a photo's exact framing.
If Paste Settings doesn't show up, switch to the Lightroom tab. Batch paste doesn't work from Device view.
What transfers well and what needs manual fixes
Some edits usually move over cleanly across similar photos. Things like exposure, contrast, color, detail, and lens corrections tend to transfer well.
Crop, rotation, perspective, and masks are where things can fall apart. If framing changes, a crop can feel off, or a mask can land on the wrong subject or part of the image. Adobe leaves crop, rotation, perspective, and masks unchecked by default in the Copy Settings dialog for that reason.
Unless your images are framed almost the same way, like tripod-shot product photos, it's smarter to leave those options off.
Use Modified so Lightroom copies only the changes you made, instead of dragging along edits from some earlier photo.
A good rule of thumb: the more an edit depends on where something sits in the frame, the more likely it is to need cleanup.
Comparison table: copy/paste edits vs. presets vs. cloud sync
Use the table below to pick the fastest option for the type of edit you're making.
| Method | What it does on iPad | When it's most useful | Main limitations |
|---|---|---|---|
| Copy/Paste edits | Copies selected settings from one edited photo and pastes them onto other photos | One-off sessions with similar images that need the same look | Risk of bad crops or misplaced masks; must re-copy if you change the base photo |
| Presets | Applies a saved bundle of adjustments to selected photos | Reusing a consistent style across multiple shoots or sessions | May not fit every photo's exposure or lighting; still needs individual fine-tuning |
| Cloud sync | Syncs edits and photos across devices; it does not apply edits to a new batch | Moving finished edits between iPad and other devices | Doesn't create new edits; depends on internet speed and cloud storage limits |
Conclusion: The fastest reliable Lightroom iPad batch workflow
Pick a base photo that looks like the rest of the set, with mid-level exposure and normal lighting for that batch. Then copy only the global settings you need.
That simple approach cuts down cleanup without adding extra work.
FAQs
Can I batch edit RAW photos on Lightroom iPad?
No. Lightroom mobile on iPad lets you edit RAW files, but it doesn't handle RAW batch editing the same way as Lightroom Classic.
Features like Auto Sync and the advanced Sync command are only available in Lightroom Classic. That's why Lightroom Classic is a better fit for large photo libraries and more involved batch edits.
Why do some pasted edits look wrong on certain photos?
Pasted edits can go sideways when they include changes tied to the original photo’s framing or light. Things like spot healing, local brush masks, crops, and graduated filters usually don’t carry over cleanly from one image to another.
The same goes for syncing exposure or white balance across photos shot in different light. That often leads to uneven results from one frame to the next.
For more consistent edits, skip those photo-specific adjustments when copying settings. It also helps to group images by similar lighting or white balance first.
Should I use presets or copy and paste for batch editing?
Use both.
Presets from Presets.io give you a solid starting point and help keep the look of your photos consistent. Then, copy-and-paste settings let you carry over the more dialed-in adjustments to the rest of the batch.
Put together, they make batch editing faster while still giving you room to tweak lighting or tone on individual shots.
FAQs
Can I batch edit RAW photos on Lightroom iPad?
No. Lightroom mobile on iPad lets you edit RAW files, but it doesn't handle RAW batch editing the same way as Lightroom Classic.
Features like Auto Sync and the advanced Sync command are only available in Lightroom Classic. That's why Lightroom Classic is a better fit for large photo libraries and more involved batch edits.
Why do some pasted edits look wrong on certain photos?
Pasted edits can go sideways when they include changes tied to the original photo’s framing or light. Things like spot healing, local brush masks, crops, and graduated filters usually don’t carry over cleanly from one image to another.
The same goes for syncing exposure or white balance across photos shot in different light. That often leads to uneven results from one frame to the next.
For more consistent edits, skip those photo-specific adjustments when copying settings. It also helps to group images by similar lighting or white balance first.
Should I use presets or copy and paste for batch editing?
Use both.
Presets from Presets.io give you a solid starting point and help keep the look of your photos consistent. Then, copy-and-paste settings let you carry over the more dialed-in adjustments to the rest of the batch.
Put together, they make batch editing faster while still giving you room to tweak lighting or tone on individual shots.