
How to Create Lightroom Export Presets
Do you frequently use the same export settings in Lightroom for tasks like social media posts, client proofs, or prints? Save time and maintain consistency by creating custom export presets. These presets let you automate repetitive steps, such as file naming, image dimensions, and watermarking, ensuring your exports are always tailored to your needs.
Key Takeaways:
- Simplify your workflow: Presets automate export settings for different purposes (e.g., Instagram, Facebook, or high-quality prints).
- Customize for specific needs: Match settings to platform requirements (e.g., Instagram: 1080px width, Facebook: 2048px height).
- Set up once, reuse easily: Save your configurations and apply them with one click for future exports.
By organizing and updating your presets regularly, you can save hours of work while ensuring consistent, professional results every time.
How to Create an EXPORT PRESET in Lightroom Classic
Getting Ready to Create Export Presets
Before diving into creating export presets, it’s important to have the right tools and a clear idea of your goals. This preparation will help you set up an efficient workflow.
What You'll Need
To start, make sure you’re using Adobe Lightroom Classic. Test your export settings on pre-edited photos to fine-tune details like sharpening, color space, and file quality. Having a solid grasp of core export settings - such as file formats, resolution, color spaces, and where your files will be saved - is key to building useful presets.
For better organization, create dedicated folders on your computer for storing exported files. This simple step can save you time and keep your workspace tidy.
Once you’ve got your tools ready and workspace organized, take a moment to define your specific export needs.
Identifying Your Export Needs
The purpose of export presets is to simplify your workflow by automating repetitive tasks. Natalia Robert, Founder and Lead Photographer of Full Circle Images, puts it perfectly:
"Export presets are simply ones that tell Lightroom the parameters to follow when it exports your image files...they save you from applying the same settings repeatedly, only these are for exporting rather than editing".
To create effective presets, start by analyzing your most common export scenarios. For example, you may frequently export images for social media, client proofs, or printing. Each of these use cases will require different settings.
When exporting for platforms like Instagram, Facebook, or websites, you’ll want to match your settings to their specific requirements. For instance:
- Instagram: 1,080 pixels on the short edge
- Facebook: 2,048 pixels on the long edge
- Websites: 2,000 pixels on the long edge, doubled for retina screens
It’s also important to consider how the images will be used. Files for web viewing should prioritize fast loading times and screen clarity, while print files need higher resolutions and specific color profiles. Different platforms and delivery methods come with their own constraints, so understanding these will ensure your presets are practical and effective.
Lastly, think about tailoring your presets for different client types or output needs. By doing so, you can save time, maintain consistency, and keep your workflow running smoothly.
How to Create Export Presets in Lightroom
Export presets in Lightroom can save you time and effort by automating the export process. Here's how to set them up and manage them effectively.
Setting Up Export Parameters
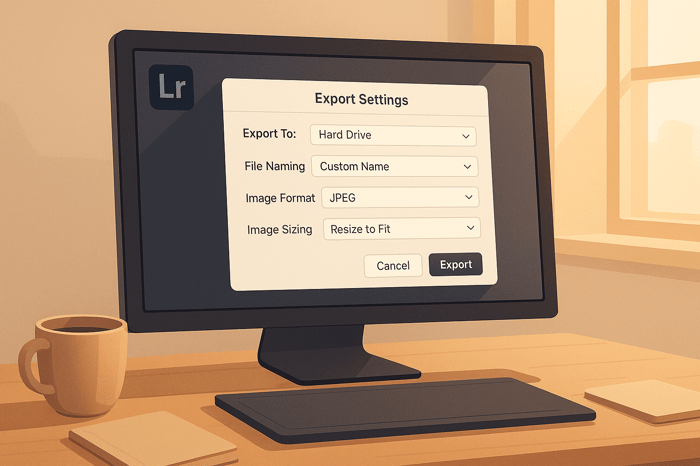
Start by selecting the photos you want to export in Lightroom Classic's Grid view. Then, go to File > Export or click the Export button in the Library module. From there, choose Export To > Hard Drive.
This opens the Export dialog, where you'll configure all the necessary settings. Adobe highlights the importance of this step:
"When you export photos, you create new files that include Develop module adjustments and other changes you've made to the photos' XMP metadata. You can choose a photo's filename, color space, pixel dimensions, and resolution. You can also save export settings as presets for reuse".
Here’s a breakdown of the key settings:
- File Settings: Choose JPEG for web use or TIFF for high-quality prints. Use the sRGB color space for online sharing. Adjust the quality slider to balance file size and image fidelity.
- Image Sizing: Set export dimensions based on your intended use. For example, use 72 pixels/inch for web images and 300 pixels/inch for print.
- Output Sharpening: Select sharpening for either screen or print to ensure your images look crisp.
- Metadata: Include only the metadata you need, such as copyright or client-specific details.
- Watermarking: Add a watermark if you want extra protection for your images.
- Post-Processing: Decide what happens after export, like opening the file location or launching another application.
Saving Your Export Preset
Once you've configured your settings, save them as a preset for future use. Click Add in the Preset panel, give your preset a descriptive name (e.g., "Instagram 1080px"), and hit Create. This transforms a detailed setup into a simple, one-click process for future exports.
Using and Managing Export Presets
To use your preset, select your photos, click the Export button, and choose the preset from the left side of the Export window. The preset will automatically apply your saved settings, making exporting quick and consistent.
Export presets are especially helpful for maintaining uniformity across a batch of photos. If you need to make a one-time adjustment, you can tweak the settings temporarily without affecting the saved preset.
To keep your workflow efficient, regularly organize and update your presets:
- Updating a Preset: Apply the preset, adjust the settings, then right-click the preset and select "Update with Current Settings".
- Organizing Presets: Use folders to group presets by theme or output destination. Descriptive names make them easier to identify.
- Removing and Backing Up: Delete unused presets and back up your collection to avoid losing your custom settings.
- Sharing Presets: Share useful presets with team members or collaborators to ensure consistency across projects.

Advanced Tips for Better Workflows
Once you've mastered export presets, you can take your workflow to the next level with these advanced techniques.
Batch Export and Multi-Preset Usage
While Lightroom doesn’t allow simultaneous exports using different presets, you can still work efficiently by exporting sequentially. For instance, you can first export a batch of images optimized for the web, then switch to a high-resolution preset for print, or create a watermarked version for client reviews. This approach is especially useful for photographers handling weddings, events, or commercial shoots, as it allows you to deliver images in multiple formats without re-editing.
To make this process even smoother, consider designing complementary preset combinations. If you often need outputs for online galleries, social media, and print, create a set of presets tailored to each purpose. These can seamlessly integrate into your workflow, saving time and effort.
Organizing and Sharing Presets
Keeping your export presets organized is key to maintaining an efficient workflow. Group similar presets into folders with clear, descriptive names like "Social Media", "Client Delivery", or "Print Output." This way, you can quickly find and apply the right preset for the task at hand.
You can also export presets as .xmp files (or DNG files for mobile use) to share them with team members or collaborators. To do this, go to the Presets panel, right-click on your custom preset, and select "Export." Save the file to a shared folder or cloud storage for easy access.
For team environments, standardized export settings can improve collaboration. Always check for version compatibility before sharing presets - make sure the recipient’s Lightroom version matches yours. If you're working across different Lightroom versions, export your presets in both .xmp and .lrtemplate formats to ensure everyone can use them without issues.
Using Presets.io with Export Presets
Take your workflow a step further by combining Presets.io’s editing tools with your custom export settings. Start by applying a creative look to your images using Presets.io editing presets, then use your tailored export settings to deliver the final files according to client needs. This method keeps your creative editing process separate from the technical delivery, allowing you to maintain artistic control while meeting specific output requirements.
Troubleshooting and Best Practices
Even seasoned photographers occasionally face challenges with export presets. By recognizing common issues and adopting smart management strategies, you can keep your workflow smooth and efficient.
Common Issues and Solutions
Corrupted presets
If a preset isn’t working as expected, it might be corrupted. The simplest fix? Delete the faulty preset and recreate it with your preferred settings.
Export location problems
Sometimes presets fail to remember their designated destination folder, forcing you to manually navigate to the same location repeatedly. To fix this, select the correct folder and update the preset with the current settings.
Storage space errors
Running out of storage can halt exports entirely. For example, in April 2024, a Lightroom user reported encountering the "Some export operations had warnings or errors" message due to low SSD space. Clearing up space on their SSD resolved the issue. To avoid this, ensure your destination drive has at least 10–15% free space before starting large exports.
File permission issues
Folder permissions can sometimes block successful exports. In December 2022, MacOS users experienced export errors caused by insufficient folder permissions. On Windows, you can resolve this by right-clicking the folder, selecting Properties, and adjusting the Security settings. For Mac users, the Get Info option allows you to modify Sharing & Permissions settings.
Software compatibility problems
Using an outdated version of Lightroom Classic can lead to glitches and export errors. Regularly updating the software through the Creative Cloud app ensures you benefit from the latest bug fixes and performance improvements.
GPU-related export failures
Graphics card conflicts can occasionally disrupt exports. To address this, update your GPU driver directly from the manufacturer’s website (e.g., NVIDIA, AMD, or Intel). If issues persist, try disabling GPU acceleration in Lightroom’s preferences temporarily.
By addressing these common problems, you’ll minimize disruptions and maintain a more reliable workflow.
Best Practices for Preset Management
Once you’ve resolved any preset issues, adopting these practices will help streamline and secure your workflow.
Use clear, descriptive names for presets and folders
Avoid generic names like "Export 1" or "Web." Instead, opt for names that describe both the purpose and technical details, such as "Instagram_1080px_sRGB" or "Print_300dpi_AdobeRGB." To make frequently used presets easier to find, consider starting folder names with symbols like "@", "*", or "–" to push them to the top of alphabetical lists.
Review and remove unused presets regularly
Set aside time each month to clean up your preset library. Before deleting anything, back up your entire collection to an external drive or a trusted cloud service like Dropbox or Google Drive. This ensures you can recover presets if needed or restore them after a system crash.
Group presets logically
Organize your presets into groups based on their purpose. For example, keep social media exports in one group, client delivery options in another, and print specifications in a separate group. This makes it easier to locate and manage them.
Back up presets in multiple locations
Don’t rely on a single backup method. Use both local storage (like external drives or USB sticks) and cloud services for extra security. When sharing presets with others, export them as .xmp files and include clear installation instructions to avoid compatibility issues.
Test presets on different Lightroom versions
Before sharing presets with clients or colleagues, test them on various Lightroom versions to ensure they work as intended. If compatibility issues arise, export the presets in multiple formats (e.g., .xmp and .lrtemplate) to cover a wider range of software versions.
Take advantage of Lightroom's favorites folder
For quicker access to your most-used export presets, add them to Lightroom’s favorites folder. This eliminates the need to scroll through your entire collection and can be updated as your workflow evolves.
Key Takeaways
Lightroom export presets are a powerful tool for simplifying your workflow by automating repetitive export tasks. They help you save time, maintain consistent output, and streamline both individual and batch photo processing tasks.
One of the biggest advantages is consistency. Export presets ensure every image follows the same settings - whether it’s file type, size, color space, or naming conventions - eliminating errors that can happen when adjusting settings manually. For example, you can create separate presets for print and web, allowing you to handle multiple export needs quickly and efficiently.
The batch export feature takes this one step further. With multiple presets, you can export the same set of images in various formats - like web, print, and social media - all in one go. This eliminates the need to run separate export jobs, making it especially useful for high-volume workflows.
To get the most out of your presets, keep them well-organized. Use clear, descriptive names and group them logically for easy access. Regularly back up your presets to avoid losing your custom settings, and consider sharing them with team members to maintain consistency across projects.
For even more creative control, you might want to explore tools like Presets.io. Their curated Lightroom preset collections can enhance your photo edits before you apply your custom export presets. This approach combines creative editing and efficient exporting for a seamless workflow.
Professional photographers often cut hours of export work down to mere minutes by using presets and batch processing. This extra time can be spent on creative projects or client interactions, boosting both productivity and business results. Start with a few essential presets and expand your collection as your workflow grows. These strategies show how custom export presets can help you work smarter and achieve consistent, polished results.
FAQs
How can I keep my Lightroom export presets compatible with different versions?
When working with Lightroom, it's important to use custom presets if you want them to remain compatible across different versions. Built-in presets are locked within the software and can't be exported, so focusing on custom ones gives you more flexibility. If you're updating Lightroom or switching to a new device, remember to migrate your presets and store them alongside your catalog to keep them easily accessible.
Another smart move is to regularly export and back up your presets. This simple habit can save you a lot of hassle if compatibility issues pop up during updates or device changes. Keeping backups ensures you can quickly restore your presets and maintain an uninterrupted workflow, even when LR evolves.
What are the best ways to organize and name Lightroom export presets for quick access?
To keep your LR export presets tidy and easy to locate, give them clear, descriptive names that indicate their purpose or settings. If you have many presets, organize similar ones into folders or collections to make navigation more efficient.
You can also use prefixes or symbols in folder names to control their order. For example, adding 'zz' to less-used folders will push them to the bottom of the list. Take time to review and update your presets regularly based on how often you use them. These simple steps can save you time and make your editing workflow more seamless.
How can I fix issues like broken presets or export location errors in Lightroom?
If you're struggling with broken or corrupted presets in LR, a simple fix is to rename or reset the preset folder. Doing this forces LR to create a fresh folder, which often resolves the problem. For issues like export location errors, try resetting Lightroom preferences or clearing out temporary files. These errors are usually tied to stuck temporary data or corrupted settings.
Tackling these common hiccups can save you time, letting you dive back into editing without unnecessary disruptions and keeping your workflow running smoothly.