


Table of Contents
- Focus Stacking for Macro Photography: Step-by-Step
- Gear and Camera Settings for a Clean Macro Stack
- How to Capture a Focus Stack: Step by Step
- Focus Stacking in Macro Photography – Beginner Tutorial
- Merge the Stack in Lightroom, Photoshop, Helicon Focus, Zerene Stacker, or Luminar NEO
- Refine the Final Macro Image and Keep the Edit Efficient
- FAQs
Focus Stacking for Macro Photography: Step-by-Step
If you want a macro photo that looks sharp from front to back, one frame often won’t do it. At high magnification, depth of field can shrink to just 40 microns (0.04 mm), so I use focus stacking to combine multiple shots instead of stopping down too far and losing detail to diffraction.
Here’s the short version:
- I keep the camera and subject as still as possible.
- I shoot a series of frames from nearest focus to farthest focus.
- I use small focus shifts with overlap between frames.
- I merge the stack in software like Photoshop, Helicon Focus, Zerene Stacker, or Luminar NEO.
- I finish by fixing halos, sharpening only the subject, and cropping the edges.
A few settings matter most:
- Aperture: I stay around f/5.6 to f/8
- Exposure: I lock ISO, shutter speed, and aperture
- White balance: I keep it fixed
- Stability: tripod, rail, remote, and steady light help a lot
If I’m shooting handheld, I switch to burst mode and rock my body slightly so the focus plane moves through the subject. If I’m on a tripod, I move in small, even steps and wait about 1–2 seconds after each move before taking the next shot.
Here’s the main idea: shoot thin overlapping slices, then blend only the sharp parts. That’s how I get more of the subject in focus without the softness that often comes with very small apertures.
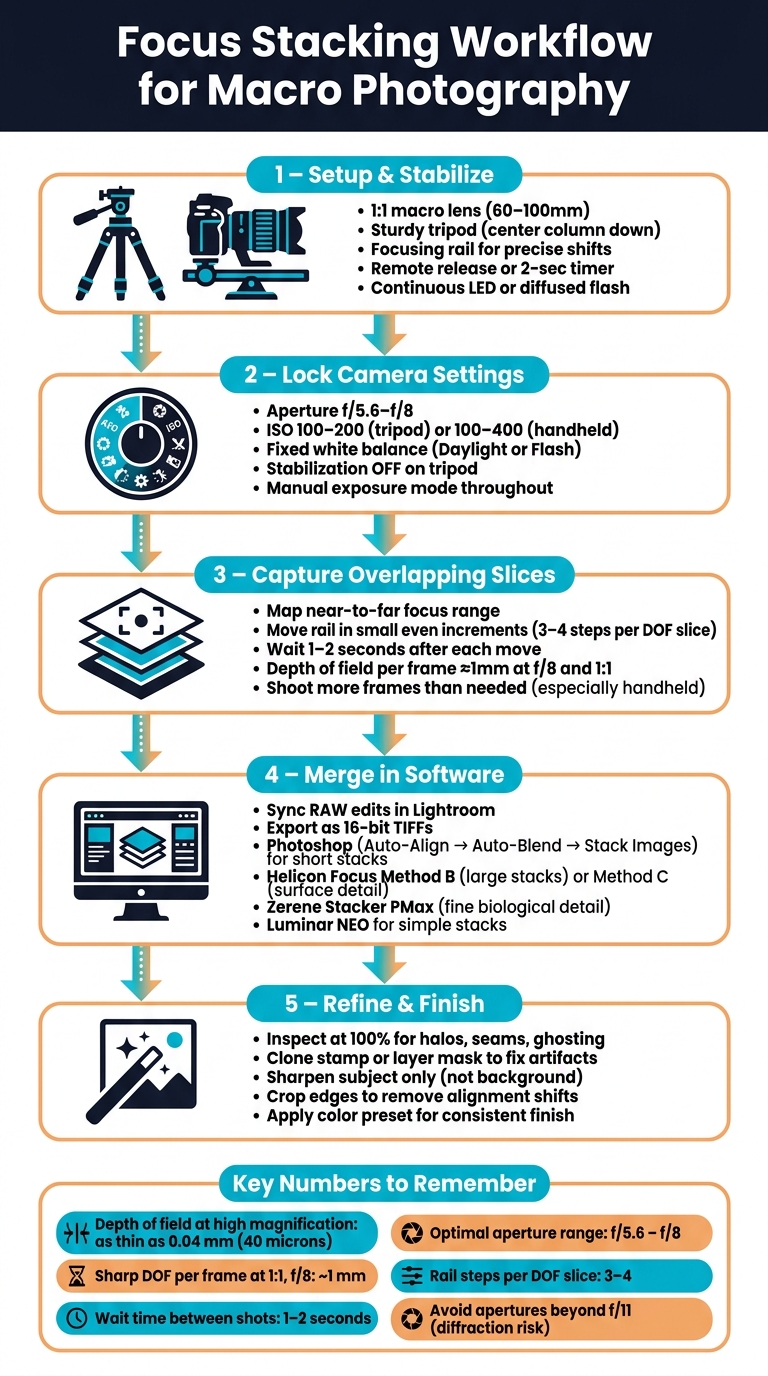
Focus Stacking Workflow: Step-by-Step Guide for Macro Photography
Gear and Camera Settings for a Clean Macro Stack
Core Gear: Macro Lens, Tripod, Rail, Remote Release, and Lighting
Start with a 1:1 macro lens, usually in the 60mm to 100mm range.
A sturdy tripod matters just as much. Keep the center column down to cut vibration. At macro distance, even tiny movement can spoil a frame.
A focusing rail helps a lot at 1:1 and beyond because it gives you precise, repeatable focus shifts. Instead of turning the focus ring, the rail moves the whole camera-lens setup. That keeps each slice more consistent and easier to blend later.
Use a remote release or set a 2-second timer. It’s a small step, but it helps you avoid shake from pressing the shutter.
For light, use continuous LED or diffused flash. Natural light can shift from one frame to the next, which makes stacking harder. Even light keeps the frames easier to blend in post.
Recommended Settings for Tripod and Handheld Stacks
Once the setup is stable, lock exposure before you begin. Shoot in manual exposure mode and keep the aperture, shutter speed, and ISO fixed through the whole sequence. If the camera meters each frame on its own, you can end up with brightness changes that show up as banding in the final composite.
For most stacks, use f/5.6 to f/8. At 1:1 magnification and f/8, you get about 1 mm of sharp depth of field per frame. Going past f/11 can reduce sharpness because of diffraction, so the tradeoff usually isn’t worth it.
Set a fixed white balance too. Daylight or Flash both work well. And if you're on a tripod, turn stabilization OFF. At macro distance, it can cause small shifts between frames.
| Setting | Tripod Stack | Handheld Stack |
|---|---|---|
| Aperture | f/5.6 – f/8 | f/4 – f/8 |
| ISO | 100 – 200 | 100 – 400 |
| Shutter Speed | Slow (as needed for exposure) | 1/100s – 1/250s (flash sync) |
| Stabilization | OFF | ON |
| Focus Method | Rail adjustment | Manual focus, then rock your body to shift focus |
| Lighting | Continuous LED or diffused flash | Macro flash with diffuser |
After each rail move, wait 1–2 seconds before firing the shutter so vibration can settle. Once your gear and exposure are locked in, you’re ready to shoot overlapping focus slices from front to back.
sbb-itb-b27063b
How to Capture a Focus Stack: Step by Step
Set Up the Subject, Exposure, and Focus Range
Once the camera is locked down, map the subject from front to back. Try to keep the subject parallel to the sensor, then set your near and far focus limits. Start with the closest detail that needs to look sharp.
From there, move through the subject in small, even steps until you reach the farthest detail. For most stacks, f/5.6 to f/8 is the sweet spot between depth of field and sharpness. Keep the aperture fixed for the whole sequence so you don't introduce exposure changes or diffraction shifts.
Capture the Full Sequence Without Gaps
Every frame needs to overlap with the sharp area from the frame before it. If it doesn't, you'll end up with a soft gap in the stack.
A good rule is to move the rail in small, even increments, about 3 to 4 steps per depth-of-field slice. If you're progressing focus with the lens instead, turn the focus ring slowly. Check the LCD just enough to make sure the sharp zone is moving forward in a smooth way.
Once you've covered the full focus range with enough overlap, you're set for stacking.
Handheld Stacking When a Tripod Is Not an Option
No tripod? You can still make it work. In that case, switch to a handheld burst and use body movement as your focus shift.
For handheld stacks, use the rocking technique. Set the camera to high-speed burst mode, then gently rock your body forward or backward so the focus plane moves through the subject. Shoot more frames than you think you'll need. That extra coverage helps make up for movement between shots.
Use the fastest shutter speed your light will allow, and bump ISO when needed to cut motion blur.
Focus Stacking in Macro Photography – Beginner Tutorial
Merge the Stack in Lightroom, Photoshop, Helicon Focus, Zerene Stacker, or Luminar NEO
Once you've shot the stack, the job shifts to post-processing. First, line everything up. Then make sure each frame matches before you blend them.
Prepare and Sync the RAW Files
Import the full sequence into Lightroom. Start with a middle frame, then sync white balance, exposure, contrast, noise reduction, and lens corrections across the stack. Apply those edit settings to every frame before you export.
For Helicon Focus or Zerene Stacker, export the files as 16-bit TIFFs.
Stack in Photoshop or Dedicated Macro Software
In Photoshop, go to Edit In > Open as Layers in Photoshop from Lightroom. Select all layers, run Edit > Auto-Align Layers, then use Edit > Auto-Blend Layers and choose Stack Images with Seamless Tones and Colors checked. Photoshop is a good fit for short stacks or handheld work, but bigger stacks can push it a bit hard.
For deeper stacks, Helicon Focus and Zerene Stacker are usually the better tools. Load your TIFFs and choose a render method based on the subject:
- Use Helicon Focus Method B for large stacks
- Use Helicon Focus Method C for subjects with lots of surface detail
- Use Zerene Stacker PMax for fine biological detail
Both programs include retouching brushes, which are a lifesaver when the merge leaves halos or ghosting. You can paint in sharp detail from a single source frame exactly where you need it.
After the merge, zoom to 100% and check for halos, seams, and soft patches.
Finish the Merge in Luminar NEO and Return for Final Edits
Use Luminar NEO's stacking extension to align and merge the frames, then keep editing in the same file. It's a solid choice if you're already working in Luminar NEO and the stack is fairly simple.
Once your merge is done, bring the file back into your RAW editor for final color work and sharpening. Then move on to cleanup, sharpening, and crop refinement.

The Ultimate Presets.IO Bundle
$89.00
$1,662.00
The Ultimate Presets.io Bundle combines The Master Preset Bundle Volume I and The Master Preset Bundle Volume II into one complete collection, giving you every editing style you need in a single download. Save $37 vs. Volume I and II… continue reading

Refine the Final Macro Image and Keep the Edit Efficient
Clean Up Artifacts, Sharpen Selectively, and Crop the Edges
With the stack merged, it’s time to clean things up.
After the merge, inspect the stack at 100% for halos, soft bands, and ghosting. If you spot a halo, use the clone stamp or healing brush to patch it. You can also blend in detail from a source frame with a layer mask in Photoshop.
Sharpening should be targeted, not global. Sharpen only the subject - like an insect's compound eye or a mushroom's gill structure - and leave the background alone. That keeps the image natural instead of harsh.
Crop the edges to remove alignment shifts and tighten the composition.
Use Presets for Consistent Color and Faster Finishing
Once cleanup is done, move to color.
A Presets.io preset can give you a fast starting point for consistent color. From there, fine-tune the image so the final result matches the scene you want.
Conclusion: A Repeatable Focus Stacking Workflow
The whole process comes down to a few steady habits: a stable setup, a moderate aperture that avoids diffraction, enough overlapping slices to cover the full subject depth, and a careful merge followed by restrained, selective edits.
Stack, retouch, crop, and color for a repeatable finish.
FAQs
How many shots do I need for a macro stack?
It depends on how much depth your subject has and the aperture you pick. For a simple subject, you may only need a handful of images. But for one final stacked photo, 20 to 50 shots is pretty common.
If you're shooting a more complex subject or pushing into extreme macro, that number can jump to 100+ frames. The aim is simple: get enough overlapping, sharply focused slices to cover the entire subject.
Should I move the focus ring or the camera?
Either method can work for focus stacking. But if you want tighter control, moving the camera with a focusing rail is usually the better pick. It tends to keep magnification steadier from shot to shot, which makes the stack easier to blend later.
Turning the focus ring is the more practical, budget-friendly route when a rail isn't an option. It gets the job done, but it can introduce small shifts in magnification. That may not sound like much, yet it can show up once you start combining frames.
Whichever method you use, keep your steps even and consistent so you don't leave any part of the subject out of focus.
Why does my stacked image have halos or ghosting?
Halos and ghosting usually happen because of focus breathing. As the lens changes focus, its effective focal length shifts a bit, so the subject can look slightly larger or smaller from one frame to the next.
When stacking software blends those misaligned images, edge artifacts can show up. You can often clean them up by brushing in the sharpest parts from the source images or using a clone stamp to fix small flaws.