

Table of Contents
- Common Problems When Applying Presets to Photos
- Fix Lightroom Presets Not Working: 7 Simple Steps to Resolve Issues
- Why Presets Don't Show Up or Apply
- Why Presets Look Different on Each Photo
- Fixing Preset Installation Problems
- Solving Performance Problems with Presets
- Quick Reference: Problems and Solutions
- Conclusion
- FAQs
Common Problems When Applying Presets to Photos
Photo presets promise quick edits and consistent styles, but they don't always work as expected. Common issues include Lightroom presets not showing up, inconsistent results across photos, or software performance problems. Here's a quick breakdown of why these issues happen and how to fix them:
- Presets not visible: Often due to using the wrong editing module, missing files, or compatibility problems with software versions.
- Results vary between photos: Differences in lighting, exposure, and white balance can make presets look different on each image.
- Performance issues: Sluggishness or crashes may stem from cache overload, outdated drivers, or insufficient system resources.
Quick Fixes:
- Switch to the Develop module in Lightroom.
- Enable "Show Partially Compatible Develop Presets" in preferences.
- Adjust exposure and white balance before applying presets.
- Clear the cache and optimize your catalog to improve performance.
These steps will help you troubleshoot and get the most out of your presets, ensuring smoother edits and more consistent results.
Fix Lightroom Presets Not Working: 7 Simple Steps to Resolve Issues
sbb-itb-b27063b
Why Presets Don't Show Up or Apply
Few things are more frustrating in photo editing than clicking on a preset and seeing no changes. This issue usually boils down to three technical problems that, thankfully, are easy to address once you identify them. Let’s break down the most common causes.
Wrong Module Selected in Editing Software
In Lightroom, presets only function in the Develop module. If you're in the Library module, nothing will happen when you try to apply a preset. This is a common hiccup, especially for those new to Lightroom. The software treats these modules as separate spaces: the Library module is for organizing and sorting photos, while the Develop module is where all the editing magic happens. To fix this, switch to the Develop module by clicking on the "Develop" tab or pressing D on your keyboard.
"Presets won't appear in the left-hand panel unless there is an active image loaded in Lightroom." - REFINED Co
Storage Settings and Missing Files
Sometimes, presets are installed but don’t show up because of compatibility settings. Lightroom hides presets it deems "partially compatible" with your current photo - this often happens if a preset was made for RAW files but you're working with a JPEG, or if the preset’s camera profile doesn’t match your file.
To make all presets visible, go to Preferences > Presets and enable "Show Partially Compatible Develop Presets". If they’re still missing, click the "+" in the Presets Panel, select "Manage Presets", and ensure your preset collections are checked. Software updates or transferring preset bundles between devices can sometimes uncheck these collections.
"Ensure the box labeled 'Show Partially Compatible Develop Presets' is checked. This should make all your presets visible, regardless of compatibility issues." - REFINED Co
Software Version Compatibility Issues
Lightroom updates can change how the software handles color and tone, which may cause older presets to behave differently or disappear. For instance, if you're editing JPEGs, you might notice some presets appear italicized or grayed out. This happens because JPEGs come with built-in camera profiles that can conflict with the preset’s settings.
For Lightroom Mobile users, file formats can also cause problems. Mobile uses DNG files, while the desktop version uses XMP, which can lead to presets behaving inconsistently across platforms. If presets vanish after an update, revisit the "Manage Presets" menu and confirm that "Show Partially Compatible Develop Presets" is still enabled, as updates can reset these preferences.
Why Presets Look Different on Each Photo
Presets work by applying specific slider adjustments - like exposure, contrast, tone curves, and color shifts - to your photo's existing settings. Since every photo starts with its own unique lighting and color conditions, these adjustments can produce varying results. For instance, if one photo is underexposed and another is overexposed, a preset with a +1.0 exposure adjustment might perfectly balance the first image while completely washing out the second one.
"Think of a preset like seasoning. If one dish is already salty and the other is bland, the same seasoning amount won't taste the same on both."
– Asanka, Creator of AAAPresets
How Exposure and White Balance Affect Preset Results
Exposure is one of the main reasons presets can look inconsistent. For example, presets that increase contrast or deepen blacks might make shadows too dark on an underexposed photo, while also causing bright areas to lose detail on an overexposed one. Similarly, a tone curve that looks balanced in a high-contrast midday shot might feel too harsh in a soft, foggy scene.
White balance is another critical factor. Lighting conditions - whether from tungsten bulbs, LEDs, or natural sunlight - affect a photo's base colors. A preset that adds warmth to highlights might look natural on a photo with neutral white balance but could make an already warm indoor shot appear overly orange or muddy. Additionally, camera brands like Sony, Canon, and Nikon have distinct color profiles, which can lead to different results unless the preset is tailored to match those profiles.
Recognizing these differences is key to preparing your images before applying presets.
Adjusting Photos Before Applying Presets
To get the best results, start by normalizing your photo's base settings. Spend 30–60 seconds adjusting exposure and white balance to a neutral state before applying a preset. Set the exposure so the subject looks natural, recover highlights and shadows to maintain detail, and use the eyedropper tool to balance the white balance against a neutral reference like a white shirt, gray wall, or concrete surface. This preparation ensures the preset's adjustments enhance the image rather than clash with it.
If the preset still doesn’t look right, try the "Micro-Fix Rule": fine-tune settings in this order - Exposure → Highlights/Shadows → White Balance. These small tweaks can resolve most preset inconsistencies, about 80% of the time. For more specific adjustments, like when a global change affects the subject negatively, use tools like subject masks to warm skin tones or sky masks to reduce highlights in the background.
"The goal is not to completely re-edit the photo. The goal is to make small corrections so the preset can work with the image instead of fighting against it."
– Lou & Marks Presets
Fixing Preset Installation Problems
Getting presets to work seamlessly in Lightroom is crucial for a smooth editing experience. Even when presets are downloaded correctly, they might not show up if installed the wrong way. To avoid this, always use Lightroom's built-in import tools instead of manually dragging and dropping files or trying to open preset files as if they were photos.
Wrong Folder Locations
To check where your presets should go, use Lightroom Classic's Preferences. Here's how to find the correct folder:
- On Windows: Go to Edit > Preferences
- On macOS: Go to Lightroom Classic > Preferences
Once there, select the Presets tab and click Show Lightroom Develop Presets. This will open the folder where presets need to be stored. The default locations are:
- Windows:
C:\Users\[username]\AppData\Roaming\Adobe\CameraRaw\Settings - macOS:
/Users/[username]/Library/Application Support/Adobe/CameraRaw/Settings
If you're moving presets from another location, make sure to paste them into this folder. Keep in mind, if the Store presets with this catalog option is enabled, presets will only show up for the currently open catalog. Disabling this option allows presets to be accessed across all catalogs.
If placing presets in the right folder doesn’t solve the problem, try re-importing them to ensure everything is set up correctly.
Re-Importing and Checking Presets
Sometimes, presets don’t appear because of file format issues. Lightroom uses different formats depending on the version: .xmp files for desktop, .dng files for mobile, and older .lrtemplate files might need conversion.
"If your Lightroom presets aren't showing up after downloading a pack, it's usually a simple cause: wrong file type (XMP/DNG/LRTEMPLATE), wrong Lightroom app (Classic vs Desktop vs Mobile), hidden presets, or sync issues."
– AAAPresets
Instead of manually placing files, use the Import Presets feature. In Lightroom Classic, click the + icon in the Presets panel (inside the Develop Module) and select Import Presets. For Lightroom Desktop (Cloud), go to File > Import Profiles & Presets. This method ensures the presets are routed to the correct directory automatically.
If the presets still don’t show up, double-check that Show Partially Compatible Develop Presets is enabled in the preferences. If a preset pack doesn’t appear at all, delete the folder and re-import the presets to prompt Lightroom to detect them again.

The Adventure Bundle

$39.00
$105.00
The Adventure Bundle is a carefully curated collection of Lightroom presets designed for photographers who are inspired by travel, discovery, and the great outdoors. Whether you're documenting a weekend getaway or a once-in-a-lifetime expedition, this bundle provides the tools to… continue reading
Solving Performance Problems with Presets
When Lightroom starts to lag or freeze while applying presets, the root cause often lies in limited processing power, cache overload, or even corrupted files. Advanced AI-driven presets, in particular, require a computer with significant resources. Systems with less than 8GB of RAM or 4GB of VRAM may struggle to keep up with these demands.
"Any computing/detecting error, lag/delay, or crash usually has to do with limited processing power (such as limited RAM, incompatible GPU, multiple programs open, maxed out cache or scratch disk, etc.)"
– The Luxe Lens
A simple test can help pinpoint the issue. If a preset appears in your library but doesn't make any visible changes to the photo, the problem is likely software-related rather than a broken preset file. Try applying a different, functioning preset to the same image. If that one also fails, the culprit is probably cache or preference corruption. Just like installation or compatibility hiccups, performance bottlenecks can disrupt the smooth application of presets. Below are steps to tackle these issues head-on.
Clearing Cache and Boosting Software Performance
The Camera Raw cache is designed to store temporary data for faster editing, but when it becomes full, Lightroom may freeze when applying presets. To clear it, navigate to Edit > Preferences (Windows) or Lightroom Classic > Preferences (macOS), go to the Performance tab, and click Purge Cache. Increasing the cache size limit can also help prevent future slowdowns.
Another effective step is closing resource-heavy programs to free up RAM and CPU. If you're working from a cloud or network drive, consider moving your catalog and images to a local SSD. Cloud storage can introduce delays, especially when Lightroom updates AI masks in real time. Additionally, optimize your catalog by selecting File > Optimize Catalog in Lightroom Classic. This process repairs the catalog's data structure, often leading to noticeable performance improvements.
"Optimize Catalog triggers Lightroom to examine the data structure of the catalog and make sure that it is both correct and succinct."
– The Luxe Lens
Don't overlook your graphics drivers. Outdated drivers are a common reason for crashes, especially with AI-powered presets. Check Adobe's GPU compatibility list to ensure your graphics card is supported.
Addressing Corrupted Preferences and Disk Space Issues
If clearing the cache and optimizing your system doesn't resolve the issue, corrupted preferences or insufficient disk space might be to blame. Start by exiting LR completely and restarting your computer to clear temporary glitches and cached previews. If the problem persists, reset LR's preferences. Hold Alt+Shift (Windows) or Option+Shift (macOS) while launching LR Classic to generate a fresh preferences file. This won't affect your catalog or presets.
"If no presets affect the photo, your issue is likely software/caching/preferences or a corrupted catalog/settings state."
– Asanka, Creator of AAAPresets
Make sure you have enough disk space by deleting unnecessary files like crash reports and unused previews. If you're storing presets on an external drive that disconnects or goes into sleep mode, LR might lose the ability to read or write them. To prevent this, move your presets to a local folder (like your Desktop) before importing.
For stubborn problems, try a clean re-import. Remove the presets, restart Lightroom, and then re-import them from a local drive using LR's built-in import tool.
Quick Reference: Problems and Solutions
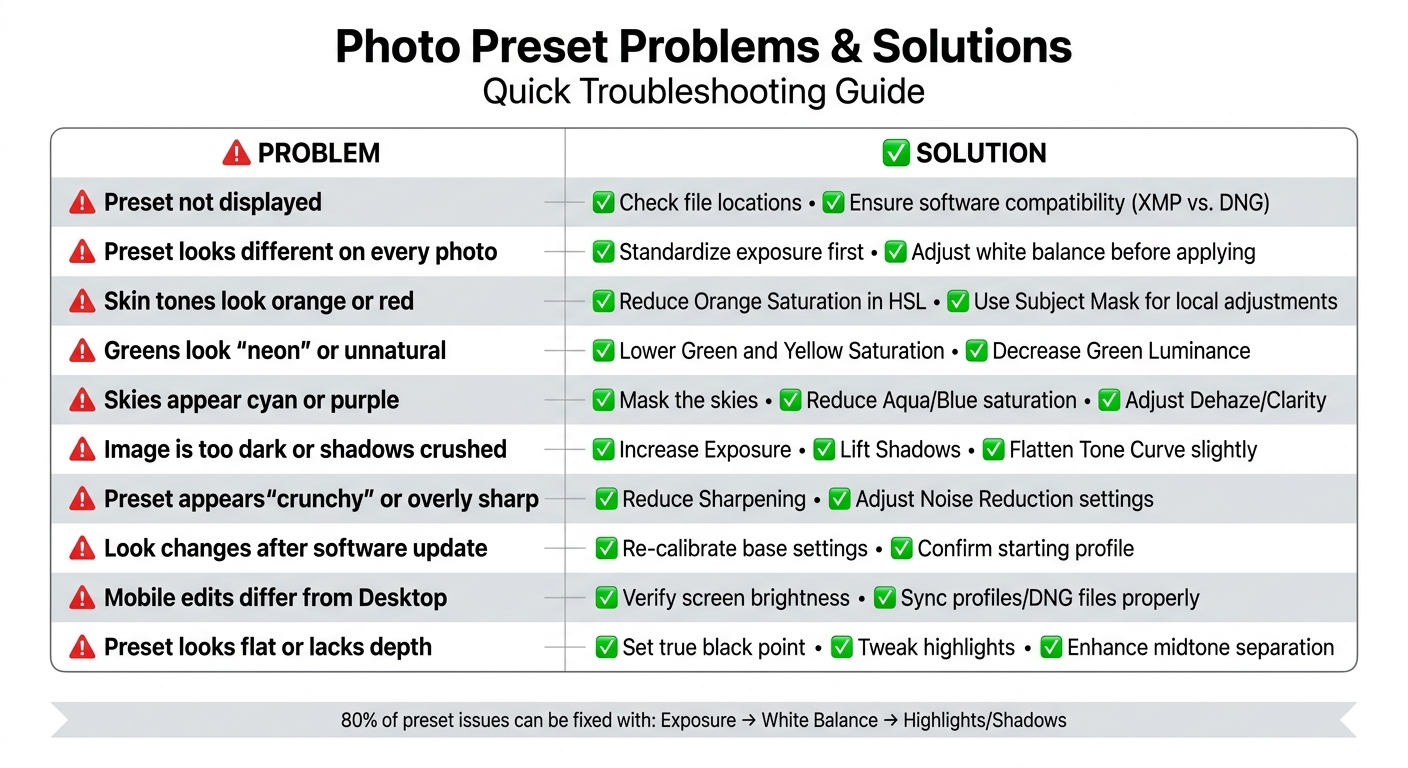
Common Photo Preset Problems and Solutions Quick Reference Guide
Here's a quick troubleshooting guide to common preset issues and their fixes. Use this table for immediate solutions while referring to earlier sections for detailed explanations.
Table Contents
| Problem | Solution Steps |
|---|---|
| Preset not displayed | Check file locations and ensure software compatibility (XMP vs. DNG). |
| Preset looks different on every photo | Standardize exposure and white balance before applying the preset. |
| Skin tones look orange or red | Reduce Orange Saturation in HSL or use a Subject Mask to adjust saturation locally. |
| Greens look "neon" or unnatural | Lower Green and Yellow Saturation; decrease Green Luminance for richer foliage. |
| Skies appear cyan or purple | Mask the skies, reduce Aqua/Blue saturation, and adjust Dehaze/Clarity sliders. |
| Image is too dark or shadows are crushed | Increase Exposure, lift Shadows, and slightly flatten the Tone Curve. |
| Preset appears "crunchy" or overly sharp | Reduce Sharpening and adjust Noise Reduction settings for balance. |
| Look changes after a software update | Re-calibrate base settings (exposure/white balance) and confirm the starting profile. |
| Mobile edits differ from Desktop | Verify screen brightness and ensure profiles/DNG files are synced properly. |
| Preset looks flat or lacks depth | Set a true black point, tweak highlights, and enhance midtone separation. |
This guide is designed for quick fixes - refer back to earlier sections for more in-depth guidance when needed.
Conclusion
Presets offer consistency, but because every photo has its own exposure, white balance, and lighting conditions, the same preset can produce different results. This variability is natural and part of the editing process.
The troubleshooting techniques discussed - from fixing installation issues to adjusting exposure and white balance - shift the focus away from expecting one-click perfection. Instead, they encourage a workflow that’s adaptable and effective. This not only saves time but also gives you greater creative control. These adjustments form a solid foundation for achieving polished, professional edits.
By following these steps, you can handle most preset-related challenges with ease. Recognizing these common issues helps turn presets from unpredictable filters into reliable tools. The three-check rule (Exposure, White Balance, Highlights/Shadows) can address about 80% of inconsistencies. Additionally, testing a preset on three types of photos - one with highlights, one neutral, and one with shadows - helps ensure a cohesive look across your gallery.
If you’re ready to take your editing further, consider exploring the curated collections at Presets.io. Their presets are rigorously tested for compatibility across devices and come with clear installation guides to reduce technical hiccups. With variations tailored to different lighting scenarios, you’ll spend less time troubleshooting and more time crafting the perfect aesthetic.
FAQs
Why are some presets grayed out or italicized?
When presets in Lightroom appear italicized or grayed out, it means they're only partially compatible with your photo. This typically happens when you're working with non-raw files or unsupported camera raw formats. If you enable the Show Partially Compatible Develop Presets option, these presets will become visible. However, they'll remain italicized and grayed out to signal their limited compatibility.
How do I make a preset work on both RAW and JPEG photos?
When working with RAW and JPEG files, it's important to note that they process image data differently. This means presets can often yield inconsistent results between the two formats. To maintain uniformity, apply the preset to each photo individually and make adjustments to settings like exposure or white balance as needed.
If you're looking for the best of both worlds, consider shooting in RAW + JPEG mode. This approach gives you the flexibility to edit the RAW file for maximum control while keeping the JPEG handy for quick sharing. The key to achieving matching results lies in careful fine-tuning.
What should I do if Lightroom freezes when I apply a preset?
If Lightroom freezes while applying a preset, the first step is to restart the app and ensure it's updated. This can resolve minor glitches or compatibility problems. Also, double-check that your presets are compatible with the version of Lightroom you're using. Keeping the software fully updated is key to avoiding these issues.
If the problem persists, try organizing your presets and look for any corrupted files. Corrupted presets can sometimes cause the app to freeze, so identifying and removing them might help restore smooth performance.