


Table of Contents
How AI Sky Replacement Works in Luminar NEO
Luminar NEO's AI Sky Replacement simplifies swapping skies in photos. It identifies the sky, masks it, and adjusts the lighting and color of the foreground to match the new sky. This tool even creates water reflections if needed, saving you hours of manual editing. Here's what you need to know:
- Who it's for: Photographers of all levels, from hobbyists to professionals in real estate, travel, or portrait photography.
- What you need: Luminar NEO installed, a photo with at least 15% visible sky, and optional presets for further edits.
- How it works: Import your photo, use the Sky AI tool to select or upload a sky replacement, and adjust settings like position, lighting, and blending for natural results.
- Tips for success: Match the sky replacement to the photo's time of day, refine edges, and use features like lighting adjustments and grain to blend seamlessly.
This tool transforms a tedious process into one that’s quick and effective, making it easier to achieve polished results.
Preparing Your Photo for Sky Replacement
How to Open and Select Your Image
Start by importing your photo into the Catalog. Once it's there, select the image and switch to the Edit tab. You’ll find the Sky AI tool in the Creative or Favorites section on the right-hand tools panel.
Here’s a tip: if you crop the image to fix the horizon, make sure to export and then re-import it. This step is crucial because skipping it might cause Sky AI to misread the original horizon position.
Basic Adjustments to Help AI Detection
For the Sky AI tool to work properly, your sky replacement needs to be clearly visible. If the sky replacement in your photo is overexposed or completely white, you might notice that the tool's sliders are greyed out. This happens when the AI can’t identify the sky replacement area.
"If your sky is overexposed or blank white, the Sky AI tool might not detect it." - Skylum Knowledge Hub
To fix this, head to the Enhance AI tool. Adjust the Accent AI and Sky Enhancer AI sliders to bring out more detail in the sky. You can also temporarily boost Saturation, Vibrance, and Blue Saturation to highlight any soft blue tones that may help with detection. Once the AI picks up the sky, you can dial these settings back to normal.
After ensuring the sky is detectable, save your work to keep track of your changes.
Save Your Original Image First
Before diving into edits, save a copy of your original image. This gives you a clean version to reference later, especially if you want to compare Before/After results. Saving the original is particularly important if you’re making extensive pre-adjustments. If the final outcome doesn’t meet your expectations, you’ll have the untouched file to start over.
sbb-itb-b27063b
Sky AI in Luminar NEO – 2025 Update & Full Sky Replacement Tutorial
How to Replace the Sky Using Sky AI
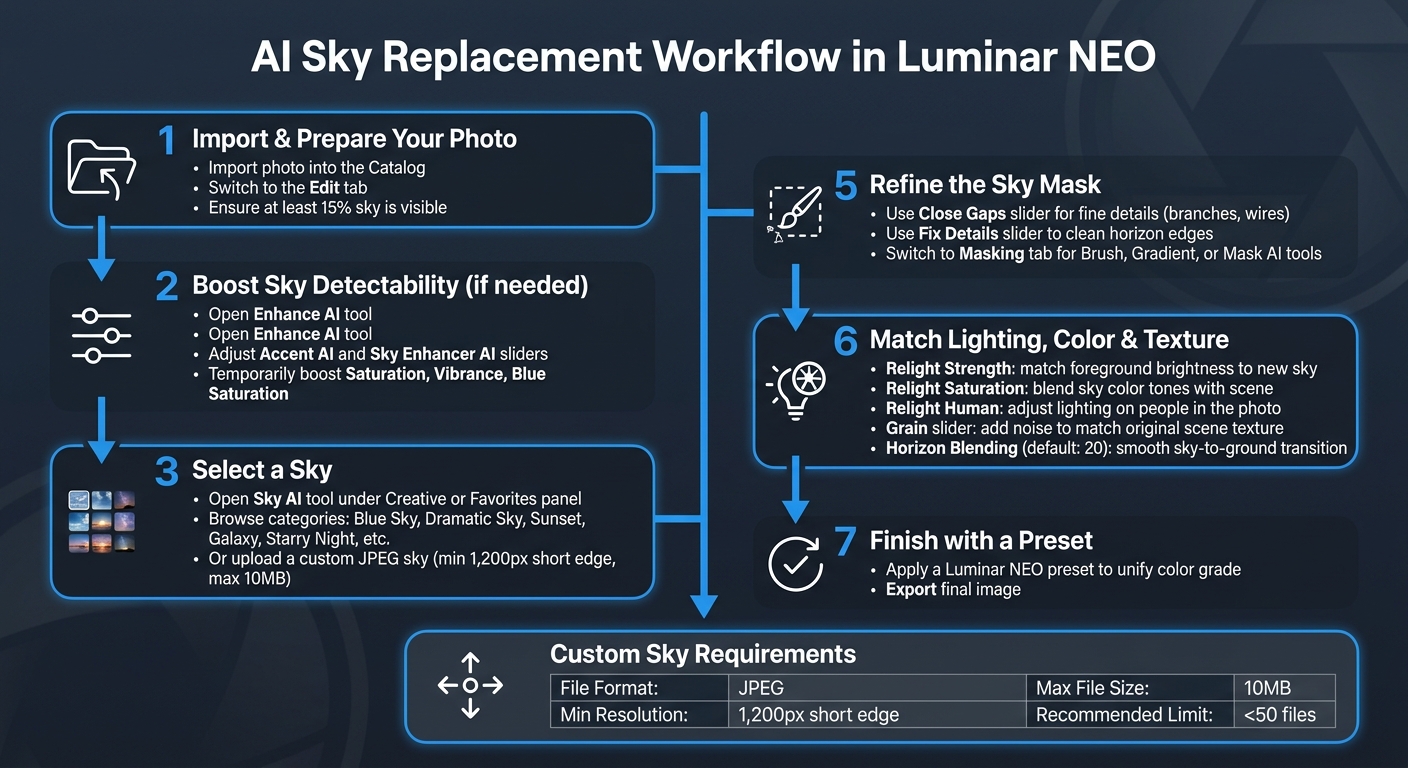
AI Sky Replacement in Luminar NEO: Step-by-Step Workflow
With your image ready for AI detection, it's time to swap out the sky using Luminar NEO's Sky AI tool.
Using the Built-In Sky Library
Once you're in the Edit tab, locate the Sky AI tool under either the Creative or Favorites section. Click on the Sky Selection dropdown, and you'll see a grid of thumbnail previews grouped into categories like Blue Sky, Dramatic Sky, Dramatic Sunset, Galaxy, Starry Night, Sunset, and Sunset Clouds.
When you pick a thumbnail, the tool instantly replaces the sky in your image. The AI automatically identifies the horizon, masks objects in the foreground, and adjusts the lighting in the scene to match the new sky. Found a sky you love? Click the heart icon below the thumbnail to save it as a favorite - it'll move to the top of the list for easy access next time.
Want even more options? You can upload your own skies for a personal touch. Alternatively, you can explore Luminar NEO presets to quickly enhance the colors of your landscape and travel photos.
Adding Your Own Custom Skies
To use custom skies, click the + icon and select a JPEG file from your computer. If you'd like to add multiple skies at once, choose "Show Custom Skies…" from the dropdown menu. This opens a folder on your hard drive where you can drag and drop several files at once.
Your uploaded skies will appear in the Custom category within the Sky Selection list. Just make sure your files meet these guidelines:
| Requirement | Specification |
|---|---|
| File Format | JPEG |
| Minimum Resolution | 1,200 pixels on the short edge |
| Maximum File Size | 10 MB |
| Recommended Limit | Fewer than 50 files in the Custom folder |
Keeping the custom folder under 50 images ensures the software runs smoothly.
How to Pick a Sky That Looks Natural
Selecting the right sky is just as important as the replacement itself. Make sure the new sky matches your photo's time of day. Pay attention to details like the direction of shadows and light. If the sun in your chosen sky is on the wrong side, use the Flip Sky option in the Sky Orientation settings to correct it. For images with a blurred background, the Sky Defocus slider helps you soften the new sky so it blends seamlessly into the scene.
"Sky AI in Luminar Neo offers the perfect balance between ease of use and professional-quality results." - Ana Mireles, Shotkit Writer
Fine-Tuning the Sky and Scene Blend
Fine-tuning how the sky integrates with your scene involves adjusting its position, refining the mask, and ensuring the colors and textures align seamlessly. Once the sky is replaced, these steps help create a natural and cohesive final image.
Adjusting Sky Position and Alignment
Luminar NEO provides tools to precisely position the sky in your frame. Start by using the Horizon Position pin to align the sky with the foreground. The Vertical Position slider shifts the sky texture and water reflections in opposite directions, maintaining alignment. For side-to-side adjustments, the Horizontal Position slider lets you reposition the sky, with the AI automatically scaling it to keep the horizon intact.
If the sky appears tilted, correct it by rotating along the Z-axis. You can also use the Flip tool to mirror the sky, ensuring the light source aligns correctly with the scene.
Fixing the Sky Mask
Once the sky is positioned, refine the mask to address any imperfections. While the AI does a solid job, it may struggle with intricate details like tree branches or power lines. Use the Close Gaps and Fix Details sliders to handle small gaps and refine edges. For more precision, switch to the Masking tab and use tools like Brush, Linear Gradient, or Mask AI.
For interior shots where the sky is visible through windows, manual masking via the Layers feature often delivers cleaner results than relying solely on Sky AI.
"When you replace the sky using traditional methods, like using Photoshop... you'd have to pay a great deal of attention to the horizon where the sky meets the ground... the masking process can get really painstaking." - Ben Kepka, Travel Photographer
Matching Colors, Lighting, and Texture
With the mask in place, adjust the lighting and textures to blend the sky with the scene. A good mask is only part of the equation - lighting consistency is just as critical. Use the Relight Strength slider to match the foreground's brightness to the new sky. The Relight Saturation slider helps integrate the sky's color tones with the rest of the image. If people are present in the photo, the Relight Human slider ensures they’re lit appropriately.
For texture consistency, the Grain slider can add noise to the sky, matching it with the original scene. If the image has atmospheric elements like haze, use the Atmospheric Haze tool to soften the sky. The Horizon Blending tool (default value: 20) smooths the transition between the sky and the ground, eliminating any harsh edges. Increasing this value creates a more gradual, natural blend.
"A detailed mask is not the only thing you need to create a realistic composite – you also need the lighting of the scene to match the new sky." - Ana Mireles, Writer, Shotkit

The Adventure Bundle

$39.00
$105.00
The Adventure Bundle is a carefully curated collection of Lightroom presets designed for photographers who are inspired by travel, discovery, and the great outdoors. Whether you're documenting a weekend getaway or a once-in-a-lifetime expedition, this bundle provides the tools to… continue reading
Tips for Realistic Results and Fixing Common Problems
Workflow Tips for Consistent Edits
To make your sky replacement look seamless, match the new sky to your scene's time of day and lighting conditions. Pay attention to the direction of light - if the shadows in your foreground don't align with the position of the sun in the new sky, use the Flip tool to mirror the sky for a better match.
For high-ISO images, adding grain can help the sky blend naturally with the foreground. Use the Grain slider to introduce noise that matches the rest of the image. Similarly, if your background appears slightly soft, adjust the Defocus slider to ensure the sky doesn't look overly sharp compared to the rest of the scene. These small tweaks can make a big difference in creating a realistic result.
Common Problems and How to Fix Them
Even with careful adjustments, you might encounter some common issues during sky replacement. If Sky AI struggles to detect the sky, try increasing Accent AI and Sky Enhancer AI in the Enhance AI tool to bring out enough detail for detection. If that doesn't work, you can manually add the sky using the Layers feature.
Halos around elements like trees, buildings, or wires can be tricky but fixable. Open the Mask Refinement panel and use the Close Gaps slider to handle fine details like branches. For cleaning up edges along the horizon, the Fix Details slider is your go-to tool. If the colors of the sky and foreground clash, adjust the Warmth slider, and consider using Relight Saturation to balance the overall color tones.
Using Luminar NEO Presets to Finish Your Edit
Once you've resolved any issues, bring your edit together with a preset. Presets can help unify the color grade across the sky and foreground, achieving a cohesive look that might be hard to replicate with individual sliders.
For tailored options, Presets.io offers a collection of Luminar NEO presets designed specifically for this purpose. Whether you're going for a cinematic vibe, a warm film-inspired tone, or a clean editorial finish, presets can give your image that polished, professional touch.
Conclusion
Luminar NEO's AI Sky Replacement transforms what used to be a tedious, time-consuming process into something you can accomplish in minutes. From selecting a sky to fine-tuning the mask and adjusting the lighting, every step is designed to create results that feel natural, not artificial. This efficient workflow sets the stage for your creative vision to shine.
Paying attention to details like light, grain, and alignment is what makes the difference between a polished cinematic edit and one that feels out of place. These subtle tweaks are the secret to achieving a seamless and convincing final image.
Looking ahead, consider building your own library of sky images. Capture striking skies whenever you see them - this personal collection will ensure your edits remain distinctive.
For practice, start with photos featuring dull or overcast skies. The more you experiment, the sharper your instincts will become for creating realistic sky replacements.
FAQs
Why are the Sky AI sliders greyed out?
If the Sky AI sliders are grayed out, it means the tool can't detect a sky in your image. This typically happens when the sky is too faint, overexposed, or entirely white. To address this, try using the Enhance tool to adjust Accent AI or Sky Enhancer AI. You can also boost saturation and vibrance in the Color tool. Once the tool detects a sky, the sliders will become available.
What’s the best way to fix halos around trees or buildings?
To address halos around trees or buildings in Luminar NEO, head to the Sky AI panel. Start by adjusting the Close Gaps slider to fill in small holes or gaps. Then, fine-tune the edges with the Fix Details slider. For smoother blending between the foreground and sky, use the Mask Refinement tool to create a more natural transition.
How do I make the new sky’s lighting match my foreground?
To make the lighting in your new sky blend seamlessly with your foreground, you can use tools like Relight AI or Scene Relighting. These allow you to tweak exposure and color tones effectively. Adjustments can be refined further using the Relight Strength and Relight Saturation sliders. Don't forget to fine-tune the sky's brightness and warmth to suit the overall mood. Also, ensure the light source direction aligns with your original scene for a natural look. For more accurate color matching, features like White Balance or Color Harmony can be incredibly helpful.