
Table of Contents
- 5 Common Wedding Photo Editing Mistakes
- 1. Over-Smoothing Skin and Creating Flat Skin Tones
- 2. Inconsistent White Balance and Color Throughout the Gallery
- 3. Losing Detail in White Dresses Through Overexposure
- 4. Leaving Distracting Elements in Backgrounds
- 5. Using Trendy Editing Styles That Quickly Look Dated
- Conclusion
- FAQs
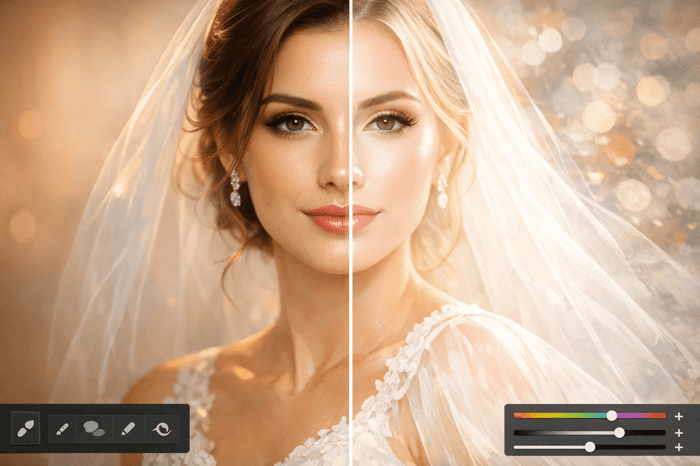
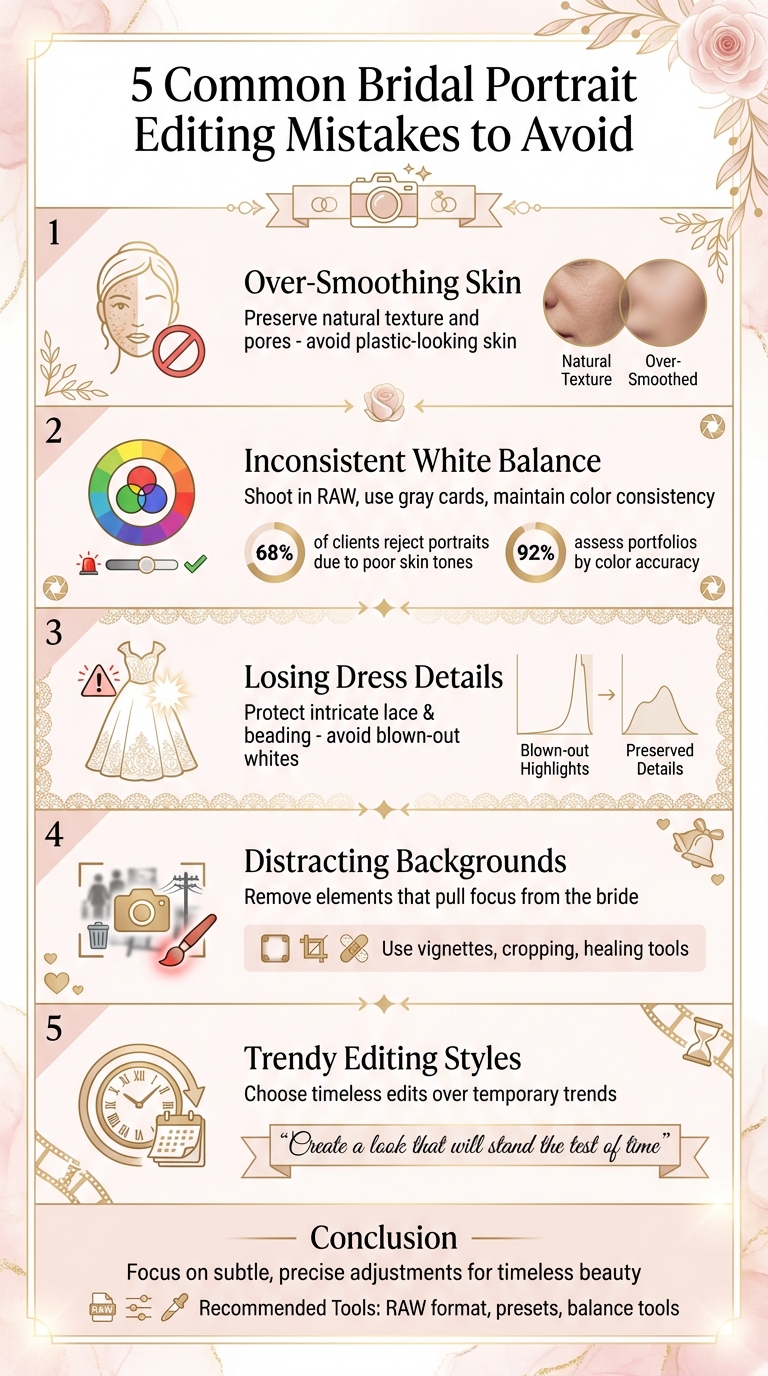
5 Common Bridal Portrait Editing Mistakes to Avoid
Bridal portraits are treasured keepsakes, but editing them comes with challenges. Avoid these five common mistakes to deliver polished, timeless photos:
- Over-smoothing skin: Avoid making skin look plastic by preserving natural texture and details like pores.
- Inconsistent white balance: Mixed lighting can cause color shifts. Use tools like gray cards and RAW format to maintain consistency.
- Overexposing white dresses: Protect intricate dress details by managing exposure carefully and using RAW files for recovery.
- Distracting backgrounds: Remove or tone down elements that pull focus from the bride using vignettes, cropping, or healing tools.
- Trendy editing styles: Stick to classic edits that won’t look outdated over time, keeping colors and textures natural.
Focus on subtle, precise adjustments to create galleries that remain beautiful for years.
5 Common Bridal Portrait Editing Mistakes Photographers Should Avoid
5 Common Wedding Photo Editing Mistakes
1. Over-Smoothing Skin and Creating Flat Skin Tones
One of the most frequent mistakes in editing bridal portraits is turning naturally radiant skin into something that resembles smooth plastic. When every pore, fine line, and bit of texture is erased, the result is a bride who looks more like a doll than her real self. Photographer Jason Parnell‐Brookes emphasizes the importance of keeping it real:
In fact, you want to see the pores of the skin, because this indicates the level of sharpness and detail in the photo, and it brings a sense of realism to the subject.
This overly artificial look often happens when tools like Lightroom's Clarity slider, AI retouching software, or presets are used too aggressively. Overdoing it flattens the skin, stripping away the natural highlights and shadows that give it dimension. The result? A lifeless, unrealistic finish that lacks the texture that makes skin look real.
The solution is straightforward: go easy on the edits. If you're using a skin-smoothing preset in Lightroom - like those available from Presets.io - dial back the "Amount" slider until you can see the natural pores again. Stick to the golden rule: "Remove what is temporary, leave what is permanent." This means cleaning up stray blemishes or redness while leaving freckles, moles, and other defining features intact.
Always review your edits at a regular viewing size to ensure the skin texture looks natural. Your aim is to enhance the photo while preserving the bride's individuality. Photographer Andrew S. Gibson puts it perfectly:
It's conventional to apply some skin smoothing with most portraits of women, but it's also important to retain skin texture to avoid the plastic skin look.
Keep an eye on medium-tone areas of the skin to maintain proper RGB balance, ensuring the skin tones remain realistic. These adjustments will help you refine the overall image without sacrificing authenticity. Up next, focus on maintaining consistent color balance throughout your entire gallery.
2. Inconsistent White Balance and Color Throughout the Gallery
Imagine browsing a bridal gallery where the same dress appears blue in one photo, yellow in another, and gray somewhere else. This kind of inconsistency screams amateur editing. It’s no surprise that 68% of clients reject portrait proofs because of unflattering skin tones caused by poor white balance. Even more telling, 92% of potential clients assess portfolio quality based on color accuracy before deciding to hire.
The main culprit? Mixed lighting. Venues often combine orange tungsten lights with blue daylight streaming through windows. Your camera’s Auto White Balance (AWB) tries to adapt to these varying conditions, but even small changes - like the bride moving a few feet - can throw off the balance. The result? Flickering color temperatures across your gallery, making it look inconsistent and unprofessional.
To avoid these issues, focus on building a solid foundation during the shoot. Always shoot in RAW. This format allows you to make non-destructive adjustments to color and white balance, cutting down color-related revisions by 40%. For added accuracy, use a gray card in your main light source and set a custom white balance in-camera to better match the actual lighting conditions.
When it’s time to edit, tools like Lightroom can help you fine-tune your work. Start by using the eyedropper tool on neutral areas, such as the gray card, to eliminate color casts. For large galleries, apply a preset from Presets.io to a "hero image" with perfect white balance. Then, use Lightroom's Sync tool to apply those settings to all photos taken under similar lighting. Another helpful feature is Lightroom’s Reference View (R|A), which lets you compare your current photo side-by-side with a reference image. This ensures consistent skin tones and color temperatures across the gallery.
Here’s a quick pro tip: Change your Lightroom workspace background from gray to white (Command+Click on Mac). This small adjustment makes it easier to spot color inconsistencies, especially in whites, before your client notices them.
3. Losing Detail in White Dresses Through Overexposure
A wedding dress is more than just an outfit - it’s a work of art and often a major investment. But overexposure in photos can turn all that intricate lace, beading, and embroidery into flat, bright white areas, completely wiping out the details that make the dress unique. Wedding photographer Melissa Grissom sums it up perfectly:
The bride wants to see her dress and all that gorgeous detail, not a bright white blob.
Here’s the issue: cameras are designed to meter for 50% gray, which often leads to underexposed white dresses. To fix this, many photographers increase the exposure. However, going too far - say, bumping it up by +3 stops - can make the highlights unrecoverable. Photographer Romanas Naryškin points out:
It is impossible to recover any details that have blown out to pure white.
This happens because camera sensors are much better at pulling details from shadows than from areas that are overexposed.
Shooting in RAW is a must if you want to preserve the delicate details of a bride’s dress. RAW files give you more flexibility to recover exposure in post-processing. While shooting, use your camera's highlight warning feature (sometimes called "blinkies") to check when parts of the dress are losing detail. A good rule of thumb is to meter the brightest part of the dress and overexpose slightly - around +1.5 to +2 stops - so the dress looks bright but not blown out.
When editing in Lightroom, enable the clipping alert by clicking the triangles on the histogram or pressing "J." This shows red overlays where detail has been lost. To fix this, lower the Highlights slider and fine-tune with the Whites slider until the clipping disappears. If the dress still looks flat, use a local adjustment brush to enhance Clarity or Texture on the intricate details without affecting the bride’s skin.
For a polished and cohesive look across the entire bridal gallery, try starting with professionally designed presets from Presets.io. Apply the preset to a well-exposed photo, sync the settings to similar images, and then make final adjustments to highlight the dress details. Finally, ensure the background complements the dress and doesn’t steal attention from the recovered details.

The Master Preset Bundle

$57.00
$672.00
The Master Preset Bundle Every Style. Every Platform. One Download Get 56 high-quality Presets.io collections in one complete bundle — designed to help you edit faster, stay consistent, and get professional-looking results in seconds. Get All High-Quality Preset Collections For… continue reading
sbb-itb-b27063b
4. Leaving Distracting Elements in Backgrounds
A bridal portrait can lose its charm when the background pulls attention away from the bride. These distractions typically fall into two categories: physical objects and lighting issues. Physical distractions might include things like trash, stray leaves, random furniture (like a chair awkwardly placed in a corner), or architectural features such as window bars. Lighting distractions, on the other hand, are more subtle but equally disruptive - think bright spots between tree branches, streetlights, Christmas lights, or reflections bouncing off walls and mirrors.
Commercial photographer Joseph Parry sums it up perfectly:
Wherever there is contrast, the eye will be directed to.
Bright or high-contrast areas in a photo will naturally compete with the bride for attention. A quick way to spot these distractions is by inverting the image, which makes them easier to identify. Also, be mindful of "edge flicker", where high-contrast areas along the borders of the frame can pull focus away from your subject. Thankfully, these issues can often be fixed with proper editing.
The key to keeping the bride as the focal point lies in addressing these distractions with careful editing. Start by applying a soft vignette preset from Presets.io to gently draw the viewer’s eye inward. For subjects that aren’t centered, use a radial filter with a -0.50 Exposure Burn to create a natural-looking vignette. Lightroom’s AI masking tools also make it easy to isolate and adjust the background with just one click.
For more stubborn distractions, such as window bars or stray leaves, use a dodge brush set to Exposure +4.00 and the healing tool to tone down textures and keep the focus on the bride . If the background still feels too busy, try applying a matte preset to soften shadows and create a more muted, even look. Lastly, don’t forget the crop tool - it’s a simple yet effective way to eliminate distracting elements near the edges and ensure the bride remains the star of the shot.
5. Using Trendy Editing Styles That Quickly Look Dated
When it comes to bridal portraits, staying true to timeless beauty is essential. These photos should remain stunning decades down the line, not just during their moment of social media fame. Unfortunately, many photographers fall into the trap of using trendy editing styles that might seem fresh now but quickly lose their appeal. Techniques like matte curves and selective coloring are prime examples - they might catch the eye today but can feel outdated in no time. Photographer Natalia Robert puts it best:
While things like matte curves and selective colouring appeal to some clients, they're trends that come and go. When editing, think about creating a look that will stand the test of time.
The problem with trendy edits is that they often prioritize short-term impact over long-term value. Overdone effects like extreme saturation, heavy HDR, or overly smoothed skin can detract from the bride’s natural beauty, leaving images that feel artificial when revisited later. Andrew S. Gibson, a writer and photographer, advocates for a more grounded approach:
I favor a natural, authentic approach to portraiture. That means using natural light, prime lenses, wide apertures and minimal processing.
To create portraits that age gracefully, focus on authenticity. Keep colors true to life, maintain natural skin textures, and ensure contrast is balanced. If a client requests a trendy look, consider offering it as an optional set while keeping the main gallery more classic.
Another helpful tip? Step back often while editing. When you're zoomed in on details like brightening eyes or whitening teeth, it’s easy to go overboard. Taking a broader view ensures that your adjustments stay subtle and cohesive. For a practical starting point, consider exploring preset collections like those at Presets.io. Their emphasis on natural tones and balanced processing can help you achieve edits that look just as beautiful years from now.
Conclusion
Bridal portraits are more than just photographs; they are cherished keepsakes meant to last for generations. By avoiding five key editing mistakes - preserving natural skin texture, maintaining consistent white balance, protecting dress details, removing distractions, and sticking to timeless styles - you’re doing more than creating beautiful images. You’re building trust with your clients and shaping a strong, recognizable brand identity.
These mistakes don’t just impact the quality of your work - they can also influence your professional reputation. High-quality editing can lead to substantial business growth, with many photographers securing wedding packages ranging from $5,000 to over $15,000 while meeting the demand for quick previews. Exceptional bridal photography not only commands premium pricing but also drives referrals, helping your business thrive.
Streamlining your workflow with professional presets can make a world of difference. Starting with a well-crafted preset ensures consistency across hundreds of images, giving your gallery a unified and polished look. Platforms like Presets.io offer collections tailored specifically for bridal photography, making it easier to maintain quality and efficiency. This approach not only saves time but also enhances the lasting appeal of your work.
Consistent, thoughtful editing fosters trust and strengthens your brand. By applying these techniques - and leveraging precise tools like those from Presets.io - you ensure your bridal portraits remain timeless. These strategies don’t just elevate your artistry; they also bring commercial rewards, ensuring your images will be just as admired on a couple’s 25th anniversary as they were on their wedding day.
FAQs
How can I keep a bride’s skin looking natural when editing bridal portraits?
To maintain the natural beauty of a bride’s skin, focus on making subtle, precise adjustments rather than relying on heavy smoothing techniques. Start by refining the overall color balance and exposure in Lightroom. Tools like the Adjustment Brush are perfect for enhancing specific areas - like the cheeks or décolletage - without compromising the skin's delicate details. Keep Clarity and Texture sliders low, ideally between +5 and +10, to gently boost definition while steering clear of an overly processed or plastic look.
Steer away from global skin-smoothing presets that can eliminate the skin's natural pore structure and leave it looking artificial. Instead, opt for a light-touch preset that corrects tones and colors while preserving texture. You can tweak these presets further with local adjustments or, for more advanced edits, use frequency separation. This technique allows you to address color and texture separately, ensuring the bride’s complexion looks natural yet radiant. The result? A polished and authentic finish every time.
How can I ensure consistent white balance across all bridal portraits?
Achieving consistent white balance is essential for creating a polished bridal gallery. Start by editing on a calibrated monitor in neutral lighting to ensure accurate colors. When using Lightroom, take advantage of the White Balance Selector (eyedropper tool) by clicking on a neutral gray area in the image. Avoid selecting pure white or black areas, as they can throw off the readings and lead to inaccurate results.
Once you've set the white balance for one photo, you can save time by syncing the settings across the entire gallery in Lightroom. Select all the images, click Sync…, and ensure only the Temperature and Tint options are checked to apply the adjustments consistently. Alternatively, using a custom preset can simplify the process and help maintain a uniform look across all photos.
After syncing, review the gallery side-by-side to ensure the white balance remains consistent. If lighting conditions vary significantly between shots, make minor adjustments as needed. Following these steps will help you deliver a professional and cohesive bridal collection.
How can I avoid editing bridal portraits in a way that might look outdated over time?
To craft bridal portraits that remain timeless, focus on classic editing techniques instead of chasing trends that might fade quickly. Stick to natural skin tones, gentle lighting, and balanced contrast. Avoid effects like bold color shifts, heavy grain, or overly dramatic styles, as these can quickly feel outdated. For example, extreme vignettes or heavily saturated colors might seem appealing now but can lose their charm over time.
Presets can be a helpful starting point to speed up your editing process, but don’t rely on them without making adjustments. Tailor each preset to suit the couple’s unique style and the mood of the moment. Pay close attention to exposure, white balance, and color adjustments, ensuring they enhance the image without overshadowing its natural beauty. Thoughtful, subtle edits will keep the focus on the genuine emotion captured, making the portraits feel just as meaningful years down the road.