
Want to move your Lightroom presets to Capture One?
Lightroom has long been a favorite tool for photographers, but many are now exploring Capture One for its powerful features and color control.
If you're making the switch, one question likely comes up: how can you bring your favorite Lightroom presets with you?
In this guide, we’ll walk you through the process of converting Lightroom presets for Capture One, so you can maintain your editing style and workflow consistency in the new software. Whether you’re a seasoned Lightroom user or just curious about Capture One, these steps will help make the transition smooth and straightforward. Here's everything you need to know:
| Method | Cost | Time | Difficulty |
|---|---|---|---|
| Picture Instruments Converter | $47 | Minutes | Easy |
| Manual Conversion | Free | Hours | Hard |
What converts well:
- Basic exposure settings
- White balance
- Contrast
- Curves
- Simple color adjustments
What doesn't convert:
- Dehaze
- Camera calibration
- Complex LUTs
- Some HSL adjustments
Quick steps:
- Export Lightroom presets as XMP files
- Use Picture Instruments ($47) to convert them
- Import into Capture One as styles
- Fine-tune colors and curves as needed
You'll need:
- Capture One Pro (20 or newer)
- Your Lightroom presets
- Picture Instruments Preset Converter
- About 1-2 hours for testing and adjustments
Most basic edits convert smoothly, but you'll need to tweak color settings manually. The process takes some time, but it beats recreating everything from scratch.
Featured Video: Preset Converter Lightroom to Capture One Tutorial
Before You Start
Here's everything you need to switch your presets from Lightroom to Capture One:
| Software | Version | Purpose | Cost |
|---|---|---|---|
| Capture One Pro | 20 or newer | Your new editing software | Subscription/License |
| Lightroom | Current version | Your current preset source | Adobe subscription |
| Picture Instruments | Latest | Converts your presets | $47 one-time |
| Briz LUT Converter | Latest | Handles LUT files | $50 one-time |
Before you jump in, let's get your files and system ready:
1. Back Up Everything
Make copies of your Lightroom catalog, presets, and current edits. Better safe than sorry!
2. Set Up Your Folders
| What | Mac Location | Windows Location |
|---|---|---|
| Presets | /Library/Application Support/Capture One | C:\Users\yourname\AppData\Local\CaptureOne\Presets60 |
| Styles | User/Library/Application Support/Capture One/Styles | C:\Users[username]\AppData\Local\CaptureOne\Styles |
3. Know What Works
| Features | Works | Needs Work | Won't Work |
|---|---|---|---|
| Basic Edits | Exposure, Contrast | Color Grading | Camera Calibration |
| Color Tools | White Balance | HSL Changes | Dehaze |
| Effects | Grain, Vignette | Split Toning | LUTs |
"I switched to Capture One after seeing other photographers talk about its RAW conversion quality. Their webinars sealed the deal." - Bob DeLellis, Wedding Photographer
Quick Tip: Export your Lightroom presets as XMP files first. This keeps your data intact during conversion.
How Presets Work
Let's break down how presets work in both LR and Capture One.
Lightroom Preset Basics
Think of LR presets like recipe cards for your photos. One click applies all your favorite editing settings instantly.
Here's what you need to know:
| What It Does | Where to Find It | How It Works |
|---|---|---|
| Applies saved edits | Left panel (Classic), Presets button (CC) | Click to apply settings |
| Shows preview | Hover over preset name | Displays effect before applying |
| Controls settings | Preset panel | Pick which edits to include |
Capture One Style Basics

Capture One splits things into two parts:
| Type | What It Does | Where to Find It |
|---|---|---|
| Styles | Changes multiple settings | Styles and Presets panel |
| Presets | Changes one tool's settings | Individual tool menus |
Key Differences Between Both
Here's what sets them apart:
| Feature | Lightroom | Capture One |
|---|---|---|
| Cost | $0-200 | $49-69 per pack |
| What's Included | Everything | Selected tools only |
| Batch Processing | Works on thousands | More limited |
| Market Size | Lots of options | Fewer choices |
| How It Works | One system | Split into Styles/Presets |
Watch These Settings:
- White Balance
- Exposure
- Crop
- Color Editor
- Curves
- Film Grain
- Vignetting
Make Them Work Better:
- Don't go overboard with adjustments
- Try them on different photos
- Use them when importing
- Mix and match for custom effects
Want to use both programs? Check out Presets.io - they make presets that work in both Lightroom and Capture One.
Automatic Conversion Tools
Want to move your LR presets to Capture One? Here are the tools that can help.
Picture Instruments Preset Converter
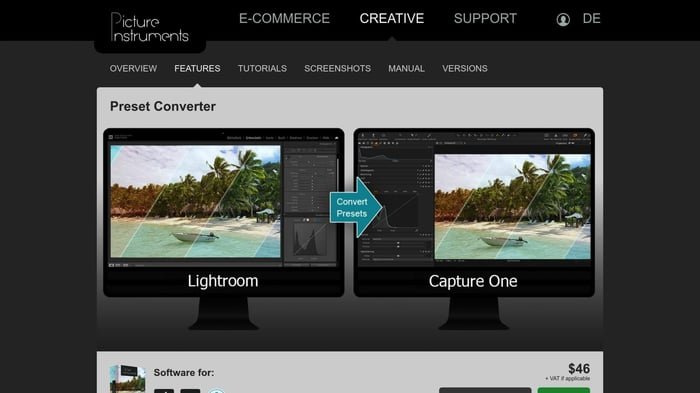
Picture Instruments makes a tool that turns Lightroom presets into Capture One styles. Here's what it does:
| Feature | Details |
|---|---|
| Input Format | .xmp or .lrtemplate files |
| Output Format | Single styles (.costyle) or style packs (.costylepack) |
| Batch Processing | Convert multiple presets at once |
| Price | $47 one-time payment |
| Updates | Free for license owners |
How to Use the Converter
The process is simple:
- Pick your LR presets (single file or folder)
- Choose where to save your new Capture One styles
- Turn off white balance settings to avoid issues
- Hit convert and let it work
But heads up: Not everything converts perfectly.
| What Works | What Doesn't |
|---|---|
| Basic Adjustments | Dehaze Tool |
| Most Color Edits | LUTs |
| Curves | Camera Calibration |
"Since Adobe Lightroom and Capture One differ fundamentally in their RAW-conversion there are a few technical hurdles that we want to be clear and honest about." - Picture Instruments
Making It Work Better
Here's what I've learned:
- Try the converted styles in Capture One's free trial first
- Test your styles on different photos
- Fix color issues by hand if needed
- Use presets with moderate settings
- Convert in batches to work faster
The tool uses Capture One's Color Editor and Luma Curve Tools to match Lightroom's look. While it won't give you perfect copies, it beats spending hours doing it yourself.
Manual Conversion Steps
Here's how to turn your LR presets into Capture One styles:
Export from Lightroom
First, get your preset out of LR:
- Go to the Develop module
- Find your preset folder
- Right-click your preset
- Hit "Export"
- Pick XMP as the file type
Create Capture One Styles
Here's what matches between the two programs:
| Lightroom Tool | Capture One Tool | Notes |
|---|---|---|
| Basic Panel | Exposure Tab | Controls basic light settings |
| Tone Curve | Luma Curve | Works like Lightroom curves |
| HSL/Color | Color Editor | Gives you MORE control over colors |
| Split Toning | Color Balance | Changes highlight/shadow colors |
| Calibration | Base Characteristics | Sets color profiles |
Now, let's build your style:
- Open a photo in both apps
- Use your LR preset
- Copy those settings in Capture One
- Save it as a style
Fix Common Problems
Here's what might go wrong (and how to fix it):
| Problem | Solution |
|---|---|
| Colors look off | Tweak them in Color Editor |
| Contrast isn't right | Play with Luma Curve |
| Missing some effects | Look for similar tools |
| White balance problems | Check Base Characteristics |
Quick tip: Want to edit multiple photos at once? Turn on "Edit All Selected Variants" in Capture One.
To save your style:
- Click the three-line menu in any tool
- Pick "Save User Preset"
- Give it a clear name
- Put similar presets in style packs
sbb-itb-b27063b
Improve Your Converted Styles
Here's how to fine-tune your presets after moving them from LRto Capture One:
Fix Color Settings
The Color Editor in Capture One lets you match colors with precision. Here's what works:
| Adjustment | Tool | Action |
|---|---|---|
| Skin Tones | Color Editor | Pick specific spots, smooth edges |
| Overall Look | Base Characteristics | Set main color profile |
| Mixed Colors | Uniformity | Blend different shades |
| Single Colors | HSL | Set exact color values |
Want to fix those green tones in your nature shots? Just set Hue to -20 and Saturation to -17.9. That'll match what you had in Lightroom.
Adjust Curves
You've got two main curve options in Capture One:
| Type | What It Does | Use It For |
|---|---|---|
| RGB | Changes contrast + color | Big image impact |
| Luma | Tweaks brightness only | Fine-tuning tones |
Here's what works for curves:
- Drop in points for dark and bright spots
- Make an S-shape for pop
- Lock in your blacks and whites
- Keep those curves smooth
These settings nail it most times:
| Part | Setting |
|---|---|
| Shadow | +5 |
| Mids | -0.13 |
| Highlights | 203 |
| Exposure | -0.77 |
"The color editor helps fix those tricky skin tones that need work." - Pratik Naik, High-End Retoucher
Pro Move: Keep flipping between your LR edit and Capture One version. You'll spot what needs fixing right away.
Test Your Styles
Here's how to check if your Capture One styles match your LR presets:
| Testing Method | How to Use | What to Check |
|---|---|---|
| Compare View | Press "Y" key | Full before/after view |
| Option Key | Hold + click reset | Single adjustment comparison |
| Survey View | Select multiple images | Side-by-side comparison |
| Focus Mask | View > Show Focus Mask | Detail preservation |
When testing, focus on these key areas:
| Element | Check Points | Fix Method |
|---|---|---|
| Color Editor | HSL values match | Adjust individual channels |
| Base Characteristics | Color profile accuracy | Set main ICC profile |
| Luma Curve | Tone mapping | Fine-tune curve points |
| RGB Curve | Color shifts | Modify channel curves |
"When applying a Style or Preset, the changes should indeed be visible in every tool included." - Alex, Capture One Support
Here's what to do:
- Pick a reference photo and apply your style
- Look at each tool's settings
- Use Compare View to see the whole effect
- Check for any missing parts
Picture Instruments' Preset Converter ($47) helps find issues, especially with tools like Dehaze.
| Issue | Fix |
|---|---|
| Missing Dehaze | Use Color Editor adjustments |
| LUT differences | Adjust Base Characteristics |
| Extreme settings | Scale back intensity |
| Tool mismatches | Find equivalent adjustments |
For multiple images:
- Sort by metadata
- Look at different versions
- Check focus points
- Compare similar photos
Organize Your Styles
Here's how to set up your styles for quick access and better workflow:
| Organization Method | Purpose | Implementation |
|---|---|---|
| Subfolders | Group similar styles | Sort by photo type (portraits, landscapes) |
| Color Tags | Fast finding | Mark style types with colors |
| Star Ratings | Quick access | 5 stars = most used styles |
| Names | Easy search | YYYY-MM_StyleType_Name |
Your styles need a home. Think of it like organizing your closet - everything needs its place.
Here's what works:
| Style Group | Categories | Why It Works |
|---|---|---|
| Genre | Wedding, Street, Product | Grab what you need fast |
| Effect | B&W, Film, HDR | Match style to project |
| Client | Client A, Client B | Keep brand looks consistent |
| Strength | Light, Medium, Strong | Control your edits |
"Styles aren't just presets - they're your secret weapon for faster editing." - Alexander Flemming, Product Manager at Capture One
Put these in your style groups:
- Curves
- Levels
- Color Balance
- Color Editor
- Highlight/Shadow Recovery
- Film Grain
- Vignetting
Keep these separate:
- White Balance
- Exposure
- Crop
- Contrast slider
- Rating tags
Save and Share
Back up your styles. No excuses.
| Where | What | When |
|---|---|---|
| Local SSD | Main copy | Every day |
| NAS | Network backup | Every week |
| Cloud | Online backup | Always on |
Name your files like this:
YYYY-MMDD_StyleName_Version
For big catalogs:
- Main styles go in root
- Variations go in subfolders
- Back up everywhere
- Name everything clearly
Do this:
- Test on different photos
- Keep folders simple
- Update versions
- Write down special settings
Wrap-Up
Here's what you need to know about moving from LR to Capture One:
| Area | What to Do | Why It Matters |
|---|---|---|
| Software Setup | Get Picture Instruments Preset Converter ($47) | Cuts down conversion time |
| Color Management | Add ICC profiles | Keeps colors looking the same everywhere |
| Performance | Pick Capture One version for your camera | Works better, costs less |
| Learning | Master basics first | Makes the switch easier |
Before You Start:
- Back up your Lightroom stuff
- Clean up your presets
- Try converting a few test files
During the Switch:
- Use 100x100x100 color grid settings
- Focus on simple adjustments
- Skip the fancy stuff (LUTs, complex curves)
After You're Done:
- Check your styles on different photos
- Fix any weird color issues
- Set up your Capture One workspace
Here's what it'll cost you:
| Version Type | Monthly | One-Time |
|---|---|---|
| Full Version | $20 | $299 |
| Sony/Fuji Version | $9.99 | $129 |
"If I were producing high-end commercial images, this would be the obvious choice as my retouching work would be a lot more detailed." - Andy Day, Photographer and Writer
What Works Right Away:
- Basic exposure
- White balance
- Color tweaks
- Curves
- Basic tones
What You'll Need to Set Up Again:
- Layers
- Local adjustments
- Advanced color work
- Camera profiles
The switch might take some time, but stick with it. Focus on getting the basics right first, then work your way up to the more advanced features.
FAQs
Do Lightroom presets work with Capture One?
Nope. Lightroom presets and Capture One styles are two different things. They both help you edit photos faster, but they're NOT compatible with each other.
Here's what you need to know:
| Feature | Lightroom | Capture One |
|---|---|---|
| Name | Presets | Styles |
| File Format | .xmp | .costyle |
| Tools Used | LUTs | ICC profiles |
| Adjustments | Single-tool changes | Multi-tool changes |
How do I export from Lightroom to Capture One?
It's pretty simple. Here's what to do:
- Open Capture One Pro
- Go to File > Import Catalog > Lightroom Catalog
- Pick your Lightroom catalog file
When you do this, Capture One brings over:
- Ratings
- Color labels
- Keywords
- IPTC data
- Basic edits (like White Balance, Exposure, and Saturation)
How do I add styles to Capture One?
Here's the quick way:
- Open Capture One Pro
- Drag your Styles Pack into the app window
- Click the ••• icon in Styles and Presets
- Hit "Import Styles"
- Find your Styles Pack
- Click Open
Your new styles will show up under Custom Styles. Want to use your old Lightroom presets? Picture Instruments' Preset Converter ($47) can turn them into Capture One styles.